Add money to your balance with QRIS, from Rp 15,000 with no fee. Scan and pay without leaving the page. Added balance is non-refundable.
One prepaid balance in Indonesian rupiah pays for your VPS and AI API usage. You add money to it with QRIS: the console shows a QR code in a dialog over the page you’re on, and you scan it with any banking or e-wallet app that supports QRIS. Your balance goes up as soon as the payment is confirmed, without leaving the page. To learn how your balance is spent, see Balance and billing.
The maximum is Rp 10,000,000 per payment, the QRIS limit for one transaction. To add more, make several top-ups.
Amounts are whole rupiah. You can’t enter decimals.
There’s no fee. The dialog shows Fee as Free because SinarCloud pays the QRIS fee, so the full amount you pay is added to your balance.
Balance you add is non-refundable. You can’t withdraw it or have it paid back to your bank or e-wallet, but you can spend it on any SinarCloud service. The dialog says so before you pay: Credit is non-refundable and can’t be withdrawn. Use it for any SinarCloud service.
If your balance is below zero, for example after AI usage, the top-up covers that amount first. Balance after top-up in the dialog shows what you’ll have.
Top-ups can be turned off for your account. If the Current Credits card says Wallet is frozen. Top-ups are disabled. or Wallet is closed. Top-ups are disabled., the Add Credit button is turned off. If you open the dialog from another page, it says Your wallet isn’t active, so it can’t be topped up. Contact support for help.Contact support to resolve it.
The same Add credit dialog opens from several places, always over the page you’re on:
Billing page: the Add Credit button.
My VPS page (under Servers in the sidebar): the top up to extend runway link on the Available Credit card.
Create a VPS: the Top up wallet button on the review step or in Confirm your order, when your balance doesn’t cover the order. After you pay from Confirm your order, click Back to your order to return to it.
A server’s page: the Top up wallet button in the renewal warning or the This server is suspended notice, and the Top up link on the Overview and Billing tabs when your balance won’t cover the next renewal. On a suspended server, Renew now also opens the dialog when your balance doesn’t cover the renewal yet.
When you start from a place where your balance is short, the amount is filled in for you. It’s the missing amount rounded up to the next Rp 1,000, at least Rp 15,000 and at most Rp 10,000,000. A note above the amount says how much more the order or renewal needs.
In the console sidebar, under Account, click Billing, then click Add Credit. You can also start from any of the places listed above.
2
Choose an amount
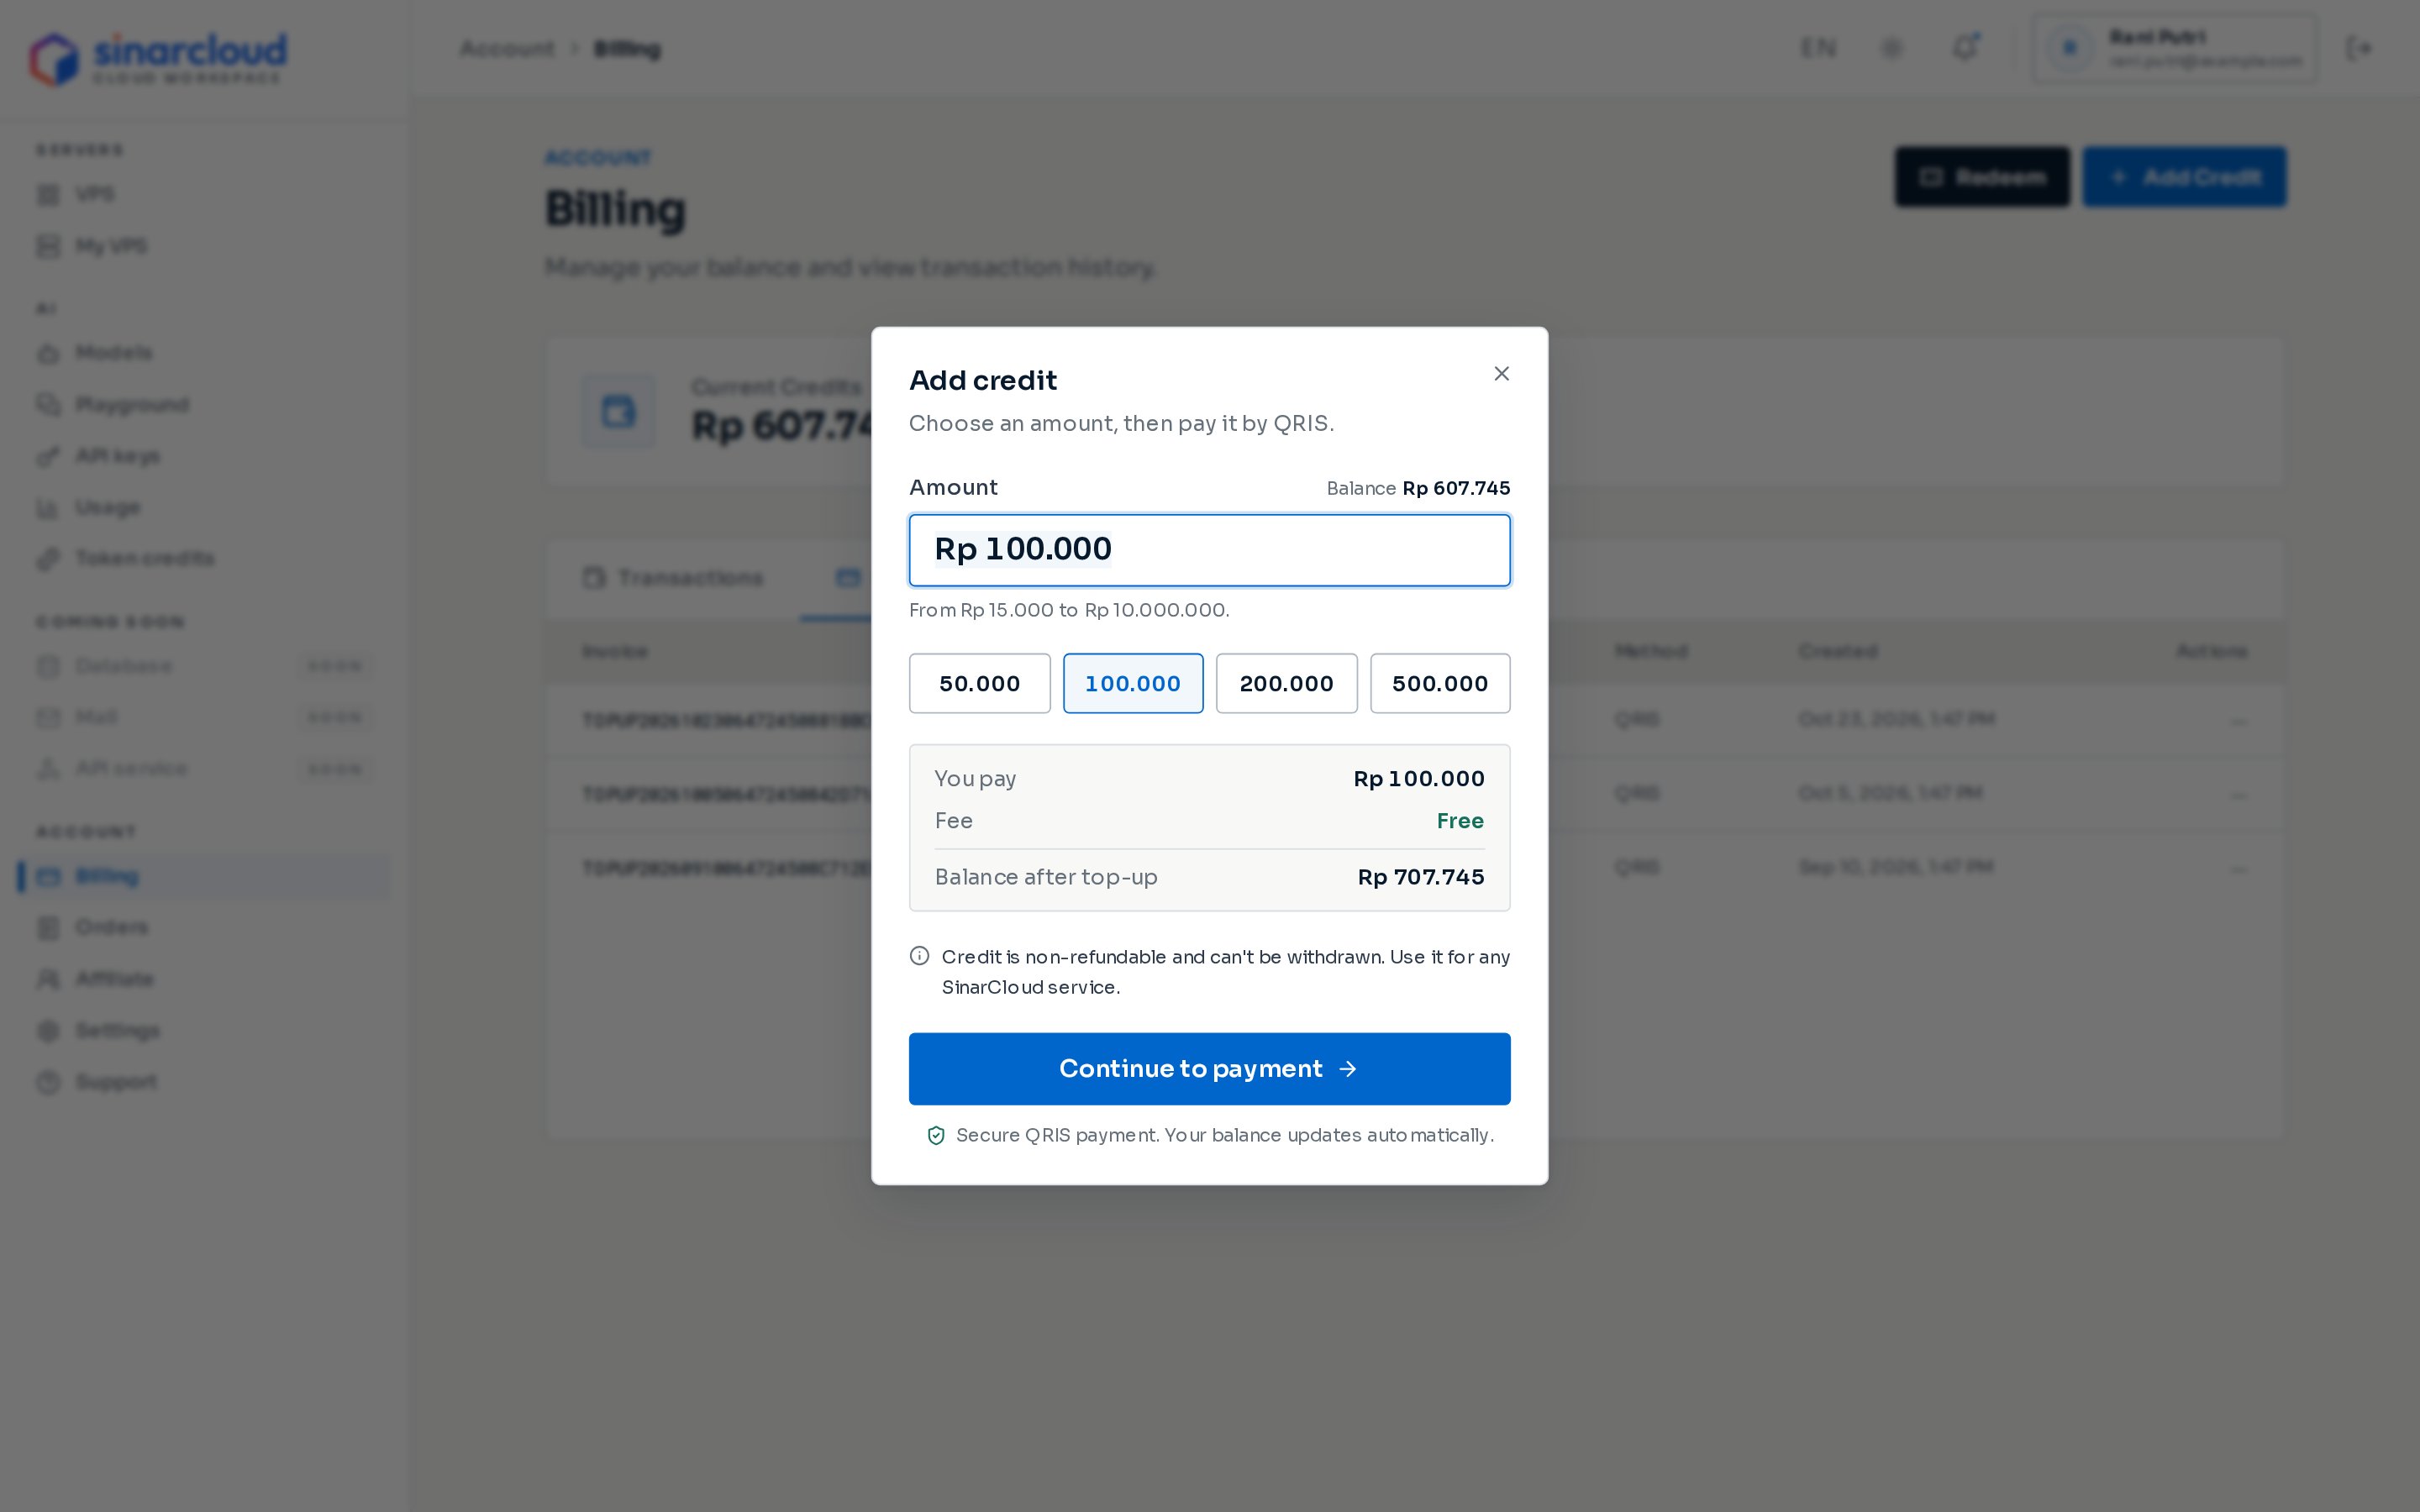
The dialog starts at Rp 100,000, or at the missing amount when it’s filled in for you. If you close it without paying, it keeps the last amount you chose for next time. After you close it on Payment received, it goes back to Rp 100,000.Click a preset amount (Rp 50,000, Rp 100,000, Rp 200,000 or Rp 500,000), or type another amount in Amount. Your current balance appears above the field, to the right of Amount.Below the presets, You pay shows the amount, Fee shows Free, and Balance after top-up shows your balance once the payment is confirmed. Under the summary, a note reminds you that added balance is non-refundable and can’t be withdrawn. Continue to payment stays disabled until the amount is between Rp 15,000 and Rp 10,000,000.
The Add credit dialog, opened from the Billing page
3
Create the QR code
Click Continue to payment. The button shows Creating QR code… while SinarCloud creates the code.The dialog then shows your QRIS code, the Amount to pay, a countdown under Expires in, and a short How to pay guide.If the code can’t be created, the dialog shows Couldn’t create the QR code with the reason. Click Continue to payment to try again.
4
Scan and pay
Open your banking or e-wallet app, scan the code, and check that the amount matches Amount to pay. Then pay before the countdown ends.If the console is open on the same phone as your banking app, click Save QR image. On most phones this opens the share menu, where you choose to save the image. Then upload the saved image in your app’s QRIS scanner.To pay a different amount, click Change next to the amount.
5
Wait for confirmation
While the dialog shows Waiting for your payment…, the console checks the payment every few seconds. If it loses its connection, the dialog shows Can’t reach SinarCloud to check. Retrying… and keeps trying. When the payment is confirmed, the dialog shows Payment received and your New balance. Click Done to close it.
For a few amounts, Amount to pay is Rp 1 more than the amount you entered. Pay the amount shown. The full amount you pay is added to your balance.
A payment is usually confirmed within a minute. To check right away, click Check payment status. If the payment hasn’t arrived yet, the dialog says Not received yet. It can take up to a minute. If the check itself doesn’t go through, the dialog says Couldn’t check right now. Try again. Click the button again after a moment.SinarCloud also emails you a confirmation with the amount, the invoice number, the payment method, when you paid and your new balance.
If you signed up through a friend’s affiliate link, your first paid top-up can earn you both a reward when it meets the minimum in the offer. See Affiliate program.
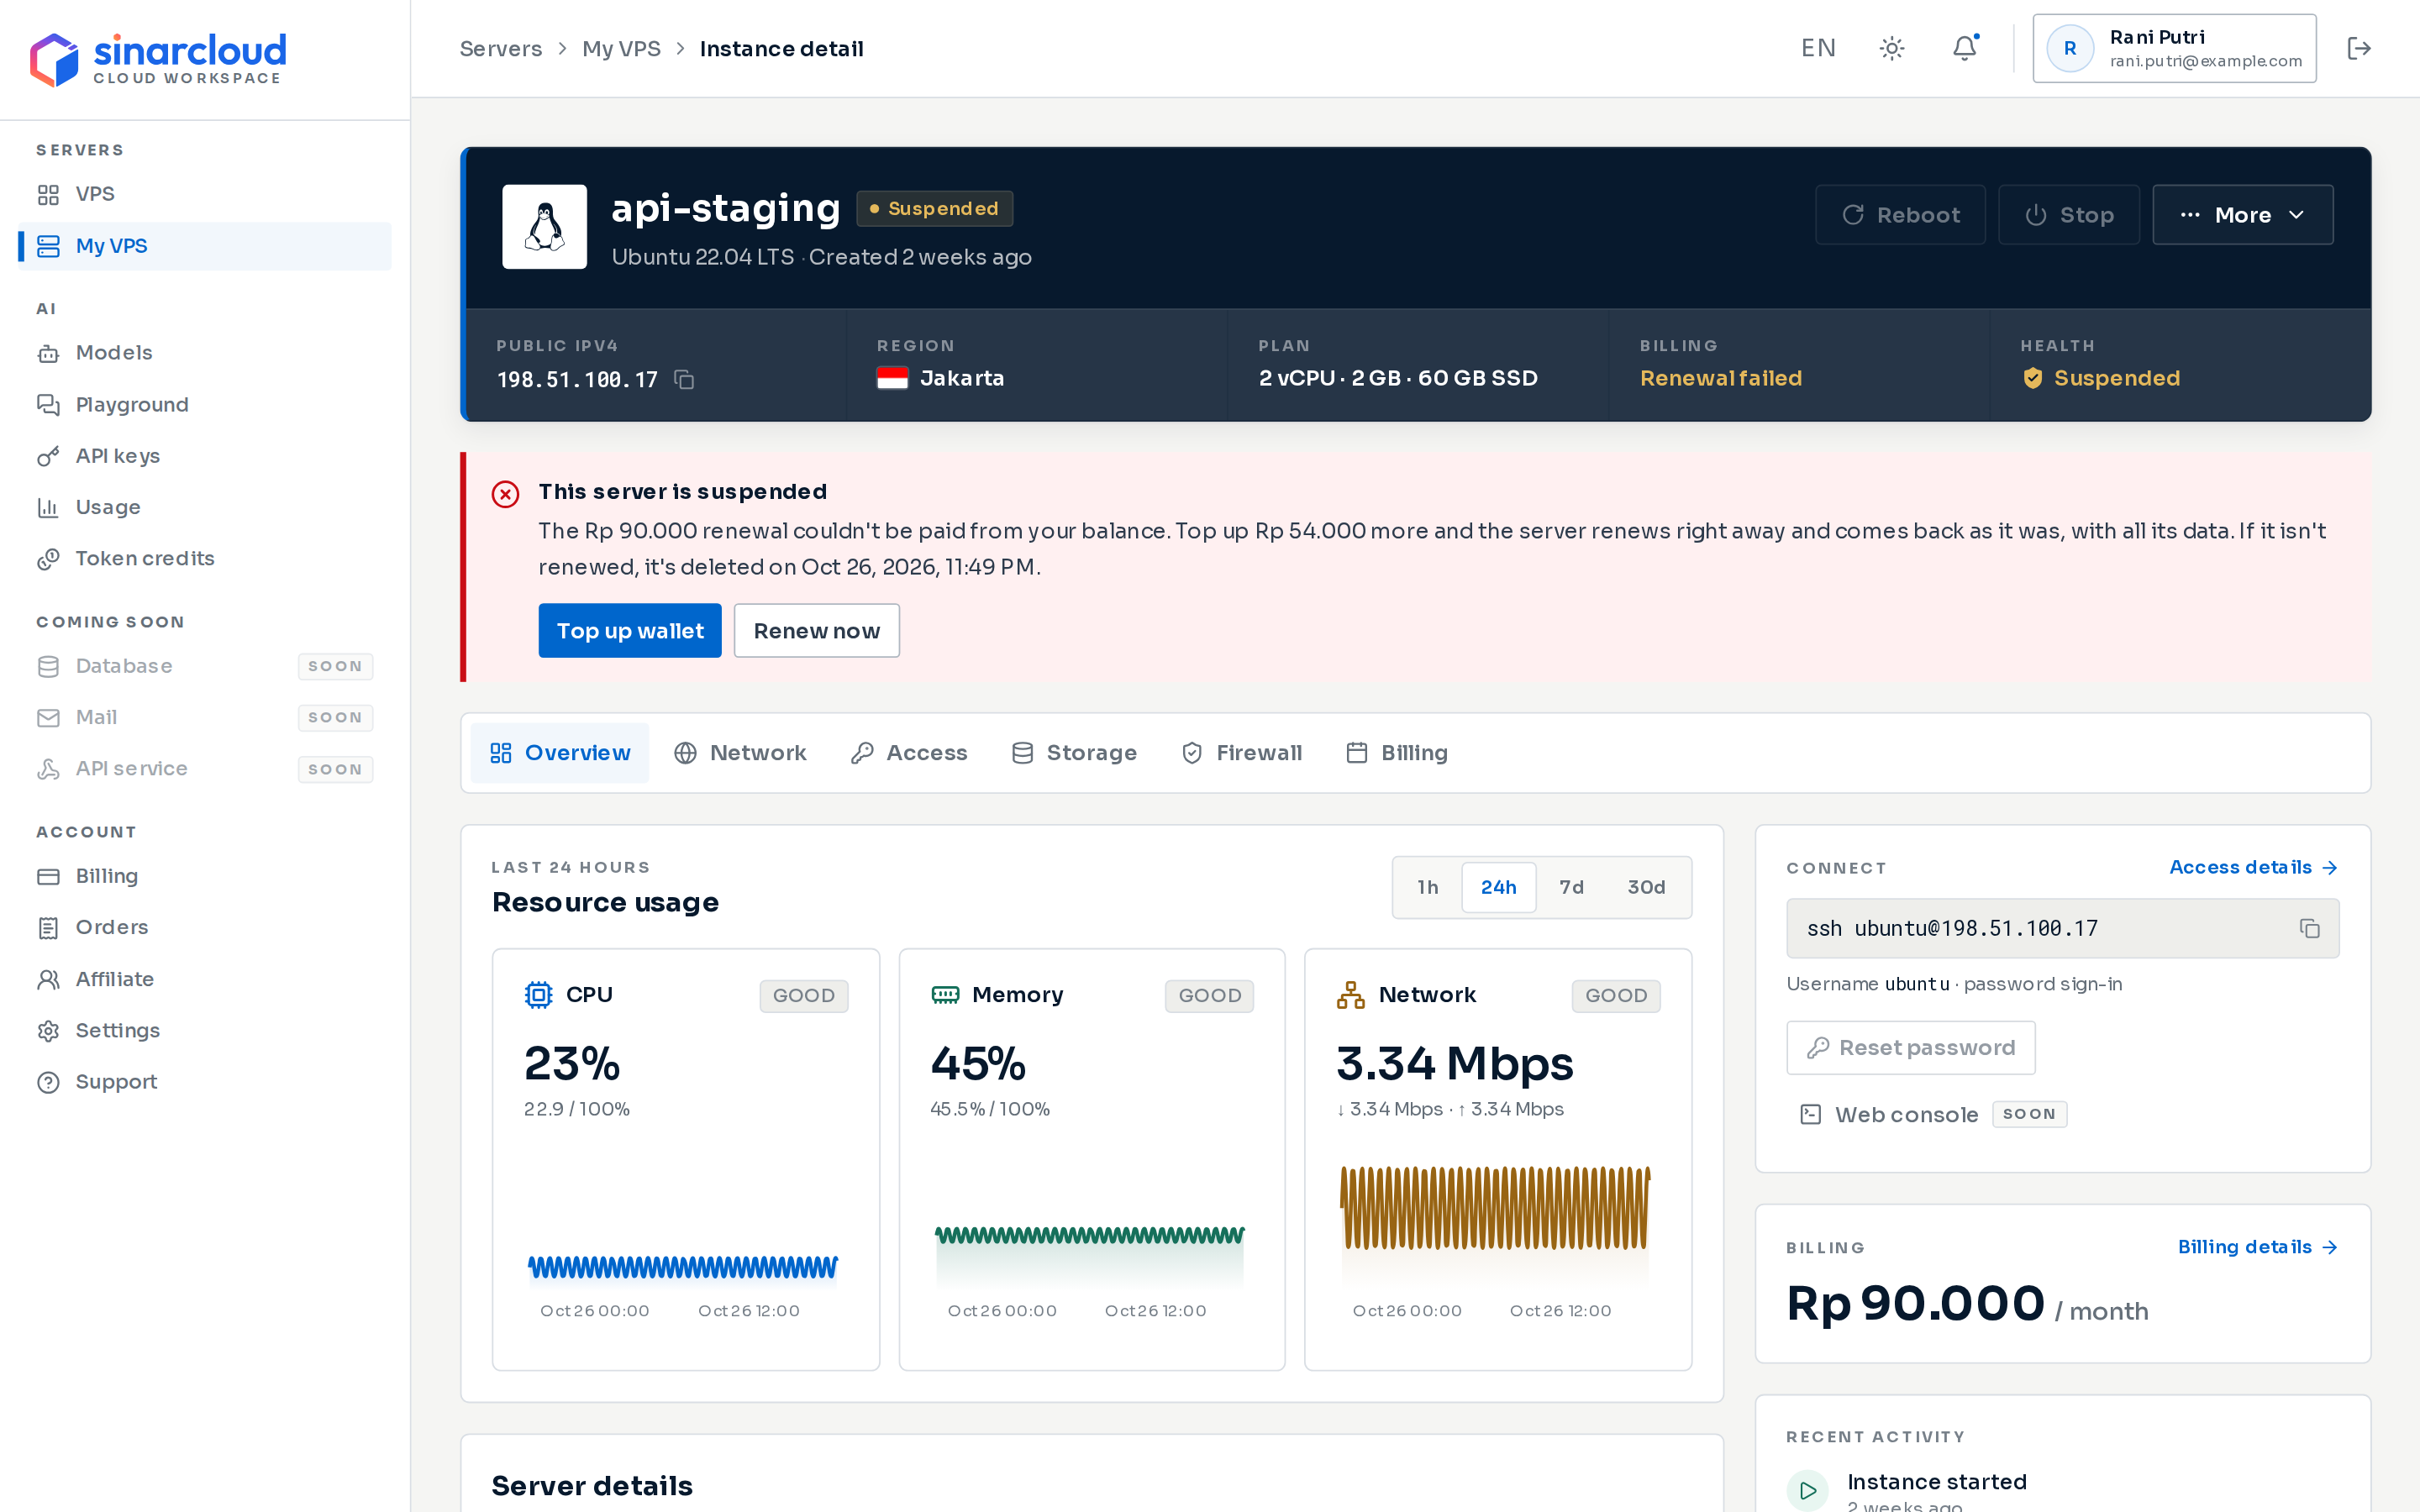
When a server’s renewal can’t be paid, the server is suspended. Unless it’s renewed, it’s deleted with its data 6 hours after its period ends. The server’s page shows the This server is suspended notice with the time it will be deleted.
The notice on a suspended server's page
To bring the server back with a top-up:
On the server’s page, click Top up wallet in the This server is suspended notice. The dialog fills in the missing amount, and the note above it reads “The renewal needs Rp … more. The server renews as soon as the payment comes in.”
Scan and pay the QR code, as described in Add balance.
As soon as the payment is confirmed, SinarCloud renews your suspended servers, starting with the one that would be deleted first. Each server whose renewal your balance covers comes back as it was, with all its data.
Any paid top-up does this, wherever you started it. Other balance, for example from a coupon, doesn’t renew a server on its own. If your balance already covers the renewal, click Renew now in the notice instead. See Renewals and expiry.
You can close the dialog before you pay. The QR code stays valid until its countdown ends, and the console keeps watching the payment in that browser tab, even if you reload the page.
A QRIS button with the time left appears at the top of the console. Click it to show the QR code again. Once the countdown ends, the button shows Expired, and clicking it opens This QR code has expired, where you can get a new code.
If you click Add Credit again, the dialog shows the waiting QR code. If it opens on the amount step instead, click Show it under Continue to payment.
When the payment goes through, a Top-up successful message appears on whichever page you’re on, and every balance on screen updates.
If the code expires or the top-up doesn’t go through, a message such as QR code expired or Top-up failed appears instead, with a New QR code button.
From another browser tab or device, open Billing, then the Payments tab, and click Show QR on the payment.
When the countdown ends, the dialog shows This QR code has expired. Click New QR code to get a new code for the same amount, or Change amount to pick another amount. If the new code can’t be created, the dialog returns to the amount step with the message.If you paid just as the code expired, the payment still counts. Click Already paid? Check payment status, or wait about a minute for your balance to update.
Don’t pay a saved QR image after its countdown has ended. Create a new QR code instead.
The QR code is ready, and SinarCloud is waiting for your payment. You can pay until the time shown under Expires in Payment details.
Not changed yet
Succeeded
Your payment was confirmed.
The full amount is added
Expired
The QR code ran out before a payment came through.
Not changed
Cancelled
The payment was cancelled before it was paid.
Not changed
Failed
The QR code couldn’t be created, or the payment couldn’t be completed.
Not changed
If a payment expires, is cancelled or fails while the Add credit dialog is open, the dialog offers New QR code and Change amount. In the Payments tab, such a payment has no QR code. To try again, click Add Credit to start a new top-up. You don’t need to cancel anything yourself.
If you paid but the payment shows Failed or Expired, don’t pay again. Open the payment in the Payments tab and click Check payment. If it doesn’t change to Succeeded, contact support with the invoice number and your payment receipt.
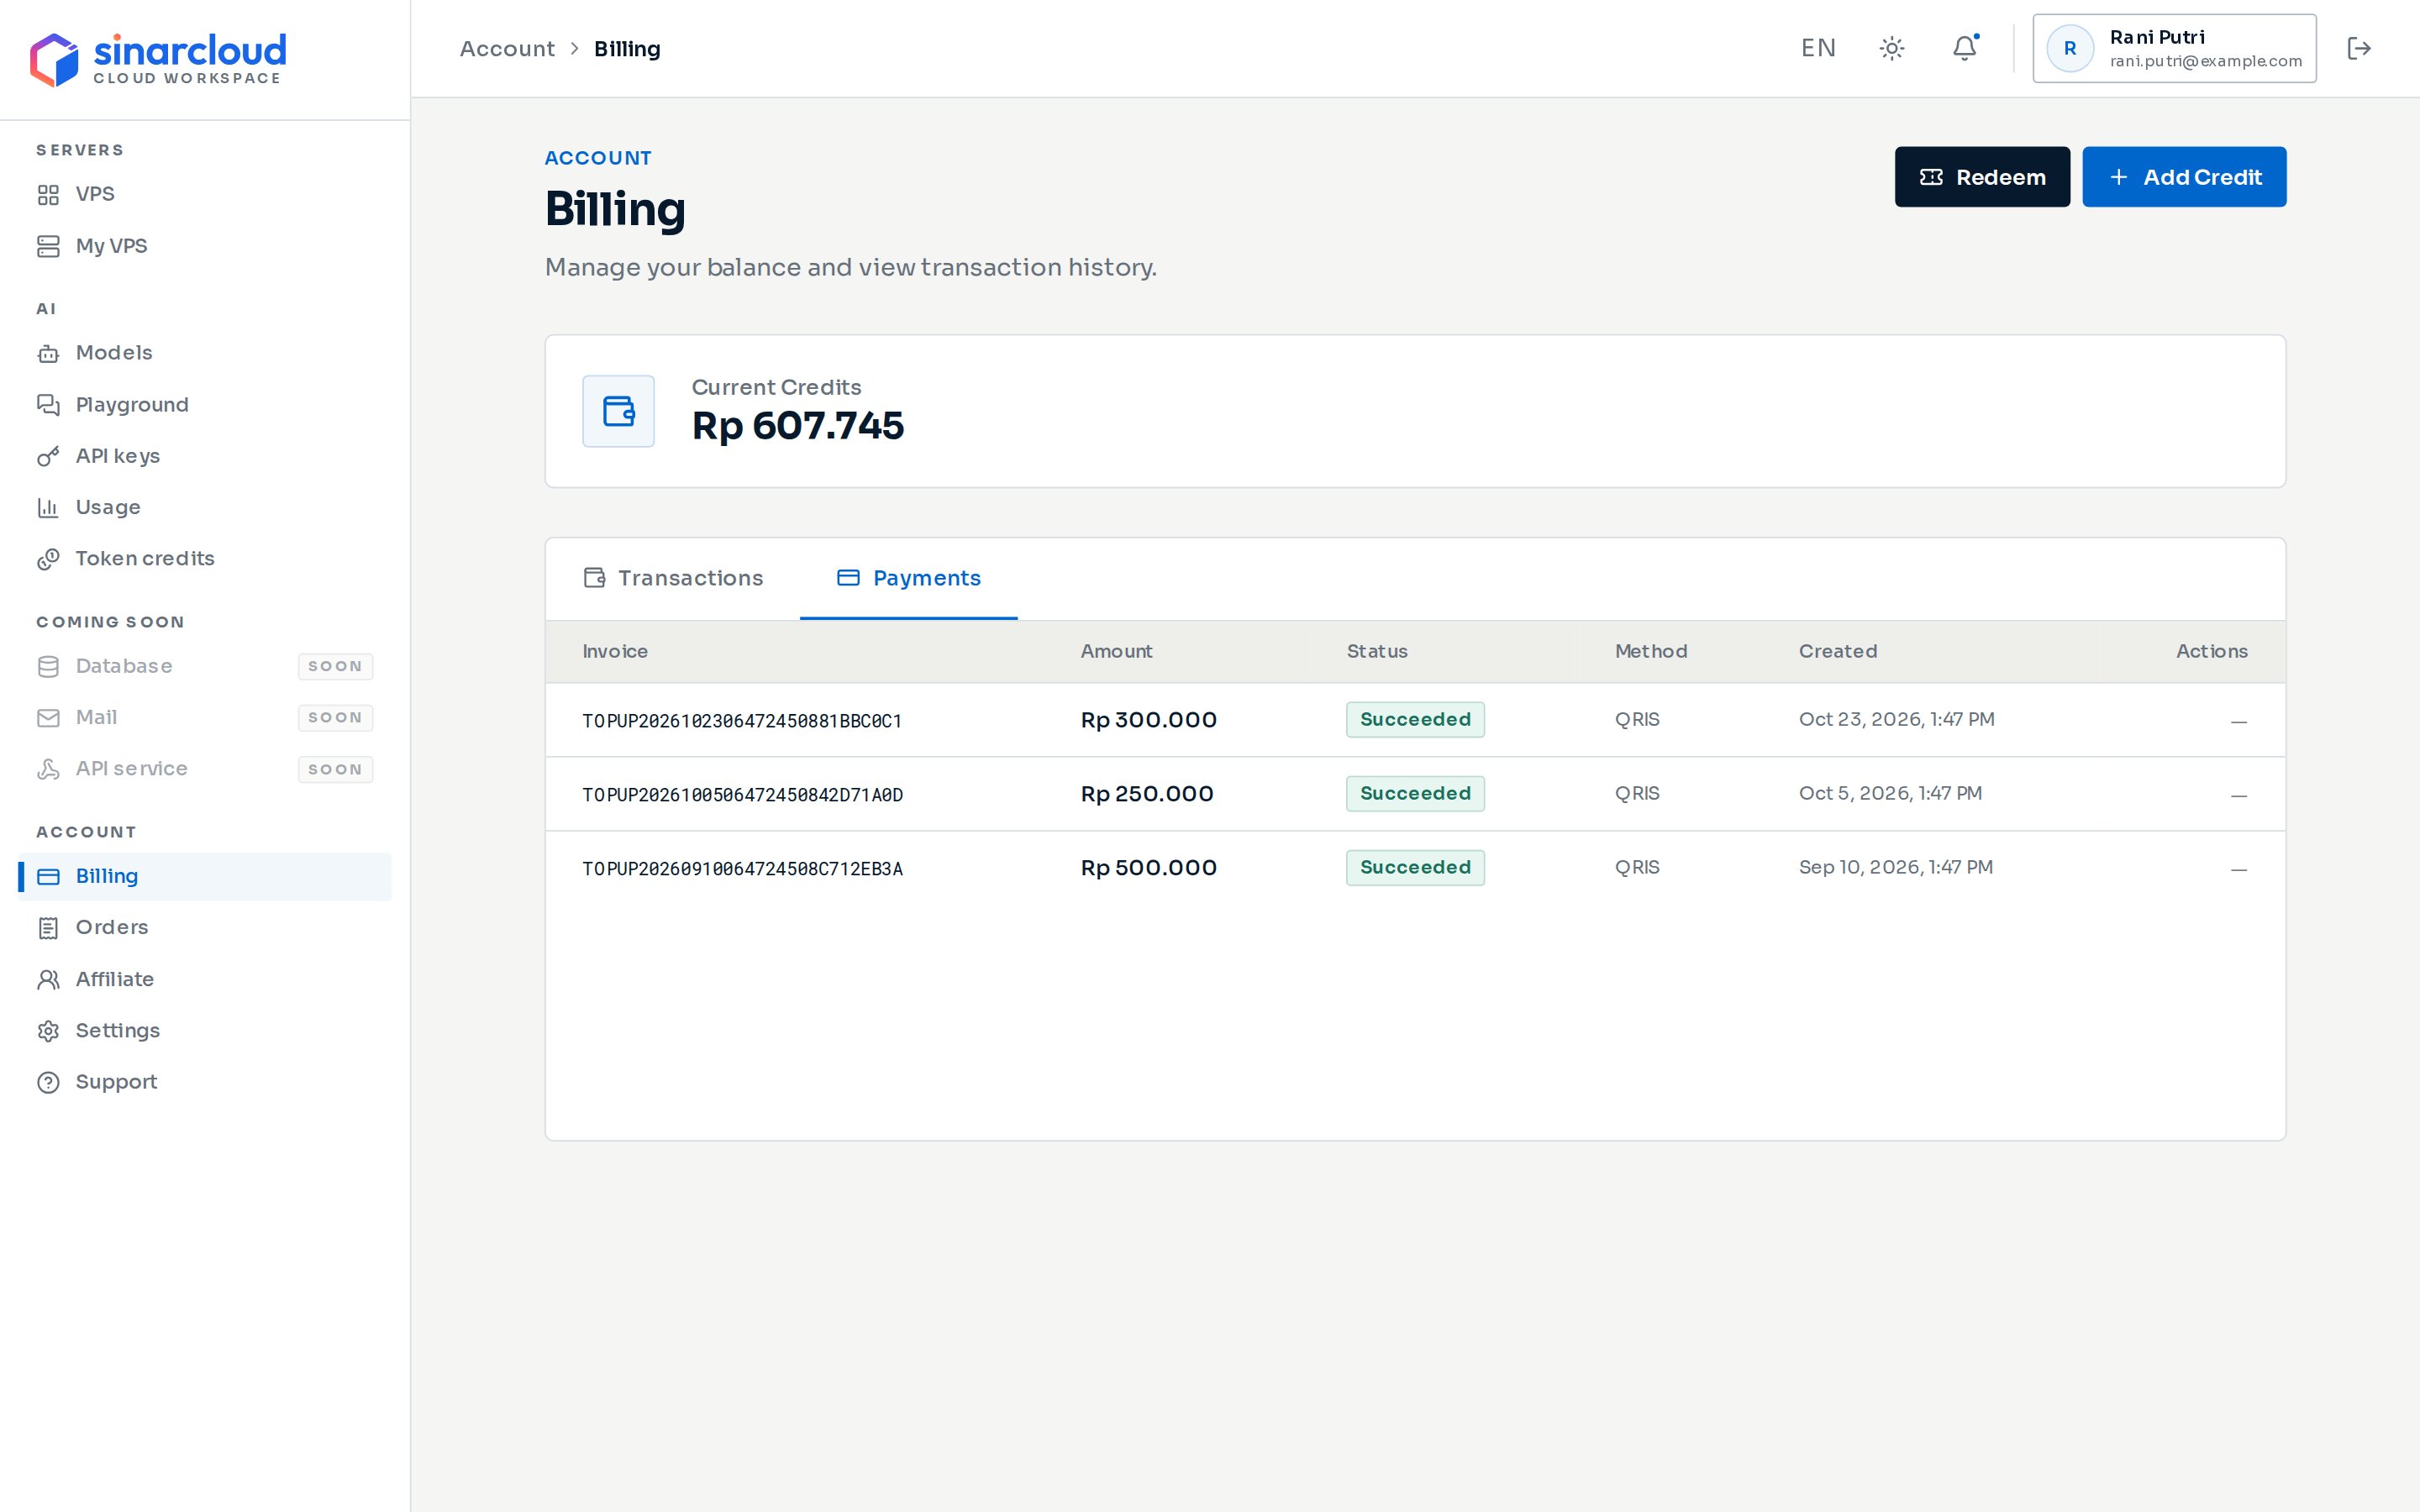
On the Billing page, open the Payments tab. It lists all your top-ups, newest first, with the Invoice, Amount, Status, Method, Created and Actions columns.
The Payments tab on the Billing page
While a payment is Awaiting payment, the Actions column shows Show QR. Click it to open the QR code and pay. Otherwise the column shows a dash (—).Click a row to open Payment details. It shows the amount, invoice number, status, Payment ID, Created, Expires and Method. Click Check payment to refresh the status. While the payment is waiting, the dialog updates on its own, and you can click Show QR code to pay it.A successful top-up also appears in the Transactions tab as a Wallet top-up, with QRIS and the invoice number below it.
Every top-up gets an invoice number that starts with TOPUP. You can find it in the Invoice column, in Payment details, below the QR code and in the confirmation email. Keep it for your records, and include it whenever you contact support about a payment.The console doesn’t create a downloadable invoice or receipt file. Keep the confirmation email and the receipt from your banking or e-wallet app as proof of payment.
Confirmation can take up to a minute after you pay. Don’t pay a second time while you check.
Open the Payments tab and click the payment.
Click Check payment.
If the status still shows Awaiting payment, or it shows Failed or Expired even though money left your account, contact support from the Support page. Include the invoice number and your payment receipt.
{"docsConfig":{"theme":"mint","$schema":"https://mintlify.com/docs.json","name":"SinarCloud","description":"Documentation for SinarCloud: deploy VPS in Southeast Asia, call AI models through one OpenAI-compatible API, and manage your prepaid IDR balance.","colors":{"primary":"#0066CC","light":"#6AAAEB","dark":"#004D99"},"logo":{"light":"https://mintcdn.com/sinar-cloud/B5Imz7vUklgE_ozS/logo/light.svg?fit=max\u0026auto=format\u0026n=B5Imz7vUklgE_ozS\u0026q=85\u0026s=e9d750a5729c82b08c0c002770ca98b0","dark":"https://mintcdn.com/sinar-cloud/B5Imz7vUklgE_ozS/logo/dark.svg?fit=max\u0026auto=format\u0026n=B5Imz7vUklgE_ozS\u0026q=85\u0026s=73748aa26054037a0788d4f33711e8fc","href":"https://sinarcloud.com"},"favicon":"https://mintcdn.com/sinar-cloud/B5Imz7vUklgE_ozS/favicon.svg?fit=max\u0026auto=format\u0026n=B5Imz7vUklgE_ozS\u0026q=85\u0026s=3a8c6e463fff5c4bbd253aa1aa394f3a","navbar":{"links":[{"href":"mailto:support@sinarcloud.com","label":"Support"}],"primary":{"type":"button","label":"Open console","href":"https://console.sinarcloud.com"}},"footer":{"links":[{"header":"SinarCloud","items":[{"label":"Website","href":"https://sinarcloud.com"},{"label":"Console","href":"https://console.sinarcloud.com"},{"label":"VPS pricing","href":"https://sinarcloud.com/vps"}]},{"header":"Help","items":[{"label":"Email support","href":"mailto:support@sinarcloud.com"},{"label":"Legal","href":"https://sinarcloud.com/legal"}]}]},"contextual":{"options":["copy","view","chatgpt","claude","perplexity","mcp","cursor","vscode"],"display":"header"},"styling":{"latex":false},"navigation":{"pages":[]}},"deployment":{"deploymentMetadataValue":{"subdomain":"sinar-cloud","hasAudioNarration":false,"actualSubdomain":"sinar-cloud","customDomains":["docs.sinarcloud.com"],"gitSource":{"type":"github","owner":"mintlify-community","repo":"docs-sinar-cloud-bc5a92e3","deployBranch":"main","contentDirectory":"","isPrivate":true,"mountPath":"","label":""},"chroma":{"latestBuiltDeploymentHistoryId":"6ae76f01039e90b0fea263d5","collectionId":"78c6943e-12ad-464b-8ab6-c16ab533d6c1","liveDeploymentHistoryId":"6ae76f01039e90b0fea263d5","schemaVersion":"v3"},"entitlements":{"AI_CHAT":{"status":"DISABLED"},"WEB_MCP":{"status":"DISABLED"},"NARRATION":{"status":"DISABLED"}},"buildId":"6ae76f01039e90b0fea263d5","clientVersion":"0.0.4054","searchFilterCounts":[{"language":"default","tag":"Guides","count":26},{"language":"default","tag":"AI API","count":9},{"language":"default","tag":"Integrations","count":9},{"language":"default","tag":"VPS","count":6},{"language":"default","tag":"Billing","count":4},{"language":"default","tag":"VS Code","count":4},{"language":"default","tag":"Get started","count":3},{"language":"default","tag":"Start here","count":3},{"language":"default","tag":"Account","count":2},{"language":"default","tag":"Help","count":2}]},"assistantConfig":{"enableAskAiButton":false,"enableStarterQuestions":false,"enableContextualStarterQuestions":false,"enableAskAiSearchBar":true},"basePath":"","hasChatPermissions":false,"hasWebMcpPermissions":false,"toggles":[{"name":"kill-isr","enabled":true,"variant":{"name":"disabled","enabled":false,"feature_enabled":true},"impressionData":false},{"name":"agent-mintlify-slack","enabled":true,"variant":{"name":"disabled","enabled":false,"feature_enabled":true},"impressionData":false},{"name":"agent-integrations-settings","enabled":true,"variant":{"name":"disabled","enabled":false,"feature_enabled":true},"impressionData":false},{"name":"automations-pr-grouping","enabled":true,"variant":{"name":"disabled","enabled":false,"feature_enabled":true},"impressionData":false},{"name":"custom-prefix","enabled":true,"variant":{"name":"disabled","enabled":false,"feature_enabled":true},"impressionData":false},{"name":"analytics-v7","enabled":true,"variant":{"name":"disabled","enabled":false,"feature_enabled":true},"impressionData":false},{"name":"user-flows-analytics","enabled":true,"variant":{"name":"disabled","enabled":false,"feature_enabled":true},"impressionData":false},{"name":"no-publish-flow","enabled":true,"variant":{"name":"disabled","enabled":false,"feature_enabled":true},"impressionData":false},{"name":"workos-onboarding","enabled":true,"variant":{"name":"disabled","enabled":false,"feature_enabled":true},"impressionData":false},{"name":"llms-txt-v2","enabled":true,"variant":{"name":"disabled","enabled":false,"feature_enabled":true},"impressionData":false},{"name":"snapshot-serving-live","enabled":true,"variant":{"name":"disabled","enabled":false,"feature_enabled":true},"impressionData":false},{"name":"stripTemperatureMiddleware","enabled":true,"variant":{"name":"disabled","enabled":false,"feature_enabled":true},"impressionData":false},{"name":"support-platform-pylon-zendesk","enabled":true,"variant":{"name":"disabled","enabled":false,"feature_enabled":true},"impressionData":false},{"name":"snapshot-serving","enabled":true,"variant":{"name":"disabled","enabled":false,"feature_enabled":true},"impressionData":false},{"name":"instant-rollback","enabled":true,"variant":{"name":"disabled","enabled":false,"feature_enabled":true},"impressionData":false},{"name":"granular-notifications-server","enabled":true,"variant":{"name":"disabled","enabled":false,"feature_enabled":true},"impressionData":false},{"name":"granular-notifications","enabled":true,"variant":{"name":"disabled","enabled":false,"feature_enabled":true},"impressionData":false},{"name":"automations-fable","enabled":true,"variant":{"name":"disabled","enabled":false,"feature_enabled":true},"impressionData":false},{"name":"fixed-ai-action-pricing","enabled":true,"variant":{"name":"disabled","enabled":false,"feature_enabled":true},"impressionData":false},{"name":"automation-resolve-merge-conflict","enabled":true,"variant":{"name":"disabled","enabled":false,"feature_enabled":true},"impressionData":false},{"name":"scoped-publishing","enabled":true,"variant":{"name":"disabled","enabled":false,"feature_enabled":true},"impressionData":false},{"name":"mintql","enabled":true,"variant":{"name":"disabled","enabled":false,"feature_enabled":true},"impressionData":false},{"name":"page-level-analytics","enabled":true,"variant":{"name":"disabled","enabled":false,"feature_enabled":true},"impressionData":false},{"name":"editor-version-history-v2","enabled":true,"variant":{"name":"disabled","enabled":false,"feature_enabled":true},"impressionData":false},{"name":"billing-page-v2","enabled":true,"variant":{"name":"disabled","enabled":false,"feature_enabled":true},"impressionData":false},{"name":"full-page-search","enabled":true,"variant":{"name":"disabled","enabled":false,"feature_enabled":true},"impressionData":false},{"name":"workspace-projects","enabled":true,"variant":{"name":"disabled","enabled":false,"feature_enabled":true},"impressionData":false},{"name":"assistant-v5","enabled":true,"variant":{"name":"disabled","enabled":false,"feature_enabled":true},"impressionData":false},{"name":"byok-sep-25","enabled":true,"variant":{"name":"disabled","enabled":false,"feature_enabled":true},"impressionData":false},{"name":"fork-pr-previews","enabled":true,"variant":{"name":"disabled","enabled":false,"feature_enabled":true},"impressionData":false},{"name":"revalidation-jwt","enabled":true,"variant":{"name":"disabled","enabled":false,"feature_enabled":true},"impressionData":false},{"name":"vite-origin","enabled":true,"variant":{"name":"disabled","enabled":false,"feature_enabled":true},"impressionData":false},{"name":"billing-updated-9-15","enabled":true,"variant":{"name":"disabled","enabled":false,"feature_enabled":true},"impressionData":false},{"name":"workos-sso-scim","enabled":true,"variant":{"name":"disabled","enabled":false,"feature_enabled":true},"impressionData":false},{"name":"hobby-abuse-scan","enabled":true,"variant":{"name":"disabled","enabled":false,"feature_enabled":true},"impressionData":false},{"name":"dashboard-inbox","enabled":true,"variant":{"name":"disabled","enabled":false,"feature_enabled":true},"impressionData":false},{"name":"workos-signup","enabled":true,"variant":{"name":"disabled","enabled":false,"feature_enabled":true},"impressionData":false},{"name":"turbopuffer-dual-write","enabled":true,"variant":{"name":"disabled","enabled":false,"feature_enabled":true},"impressionData":false},{"name":"workos-enabled","enabled":true,"variant":{"name":"disabled","enabled":false,"feature_enabled":true},"impressionData":false},{"name":"approve-review-flow","enabled":true,"variant":{"name":"disabled","enabled":false,"feature_enabled":true},"impressionData":false},{"name":"sso-setup-deadline-banner","enabled":true,"variant":{"name":"disabled","enabled":false,"feature_enabled":true},"impressionData":false},{"name":"rbac-expansion","enabled":true,"variant":{"name":"disabled","enabled":false,"feature_enabled":true},"impressionData":false}],"googleFontsInlined":false},"customCss":[],"page":{"pagePath":"billing/top-up","slug":"/billing/top-up","pageMetadata":{"title":"Add balance","sidebarTitle":"Add balance","description":"Add money to your balance with QRIS, from Rp 15,000 with no fee. Scan and pay without leaving the page. Added balance is non-refundable.","icon":"credit-card","href":"/billing/top-up"},"description":{"compiledSource":"\"use strict\";\nconst {jsx: _jsx} = arguments[0];\nconst {useMDXComponents: _provideComponents} = arguments[0];\nfunction _createMdxContent(props) {\n const _components = {\n p: \"p\",\n ..._provideComponents(),\n ...props.components\n };\n return _jsx(_components.p, {\n children: \"Add money to your balance with QRIS, from Rp 15,000 with no fee. Scan and pay without leaving the page. Added balance is non-refundable.\"\n });\n}\nfunction MDXContent(props = {}) {\n const {wrapper: MDXLayout} = {\n ..._provideComponents(),\n ...props.components\n };\n return MDXLayout ? _jsx(MDXLayout, {\n ...props,\n children: _jsx(_createMdxContent, {\n ...props\n })\n }) : _createMdxContent(props);\n}\nreturn {\n default: MDXContent\n};\n","frontmatter":{},"scope":{}},"pageType":"default","mdx":{"mdxSource":{"compiledSource":"\"use strict\";const{Fragment:_Fragment,jsx:_jsx,jsxs:_jsxs}=arguments[0];const{useMDXComponents:_provideComponents}=arguments[0];function _createMdxContent(props){const _components={a:`a`,code:`code`,li:`li`,ol:`ol`,p:`p`,strong:`strong`,tbody:`tbody`,td:`td`,th:`th`,thead:`thead`,tr:`tr`,ul:`ul`,..._provideComponents(),...props.components},{Card,CardGroup,Frame,Heading,Note,OptimizedImage,Step,Steps,Table,Tip,Warning}=_components;if(!Card)_missingMdxReference(`Card`,true);if(!CardGroup)_missingMdxReference(`CardGroup`,true);if(!Frame)_missingMdxReference(`Frame`,true);if(!Heading)_missingMdxReference(`Heading`,true);if(!Note)_missingMdxReference(`Note`,true);if(!OptimizedImage)_missingMdxReference(`OptimizedImage`,true);if(!Step)_missingMdxReference(`Step`,true);if(!Steps)_missingMdxReference(`Steps`,true);if(!Table)_missingMdxReference(`Table`,true);if(!Tip)_missingMdxReference(`Tip`,true);if(!Warning)_missingMdxReference(`Warning`,true);return _jsxs(_Fragment,{children:[_jsxs(_components.p,{children:[`One prepaid balance in Indonesian rupiah pays for your VPS and AI API usage. You add money to it with QRIS: the console shows a QR code in a dialog over the page you’re on, and you scan it with any banking or e-wallet app that supports QRIS. Your balance goes up as soon as the payment is confirmed, without leaving the page. To learn how your balance is spent, see `,_jsx(_components.a,{href:`/billing/overview`,children:`Balance and billing`}),`.`]}),`\n`,_jsx(Heading,{level:`2`,id:`amounts-and-fees`,children:`Amounts and fees`}),`\n`,_jsxs(_components.ul,{children:[`\n`,_jsx(_components.li,{children:`The minimum top-up is Rp 15,000.`}),`\n`,_jsx(_components.li,{children:`The maximum is Rp 10,000,000 per payment, the QRIS limit for one transaction. To add more, make several top-ups.`}),`\n`,_jsx(_components.li,{children:`Amounts are whole rupiah. You can’t enter decimals.`}),`\n`,_jsxs(_components.li,{children:[`There’s no fee. The dialog shows `,_jsx(_components.strong,{children:`Fee`}),` as `,_jsx(_components.strong,{children:`Free`}),` because SinarCloud pays the QRIS fee, so the full amount you pay is added to your balance.`]}),`\n`,_jsxs(_components.li,{children:[`Balance you add is non-refundable. You can’t withdraw it or have it paid back to your bank or e-wallet, but you can spend it on any SinarCloud service. The dialog says so before you pay: `,_jsx(_components.strong,{children:`Credit is non-refundable and can’t be withdrawn. Use it for any SinarCloud service.`})]}),`\n`,_jsxs(_components.li,{children:[`If your balance is below zero, for example after AI usage, the top-up covers that amount first. `,_jsx(_components.strong,{children:`Balance after top-up`}),` in the dialog shows what you’ll have.`]}),`\n`]}),`\n`,_jsxs(_components.p,{children:[`Top-ups can be turned off for your account. If the `,_jsx(_components.strong,{children:`Current Credits`}),` card says `,_jsx(_components.strong,{children:`Wallet is frozen. Top-ups are disabled.`}),` or `,_jsx(_components.strong,{children:`Wallet is closed. Top-ups are disabled.`}),`, the `,_jsx(_components.strong,{children:`Add Credit`}),` button is turned off. If you open the dialog from another page, it says `,_jsx(_components.strong,{children:`Your wallet isn’t active, so it can’t be topped up. Contact support for help.`}),` `,_jsx(_components.a,{href:`/help/support`,children:`Contact support`}),` to resolve it.`]}),`\n`,_jsx(Heading,{level:`2`,id:`where-you-can-top-up`,children:`Where you can top up`}),`\n`,_jsxs(_components.p,{children:[`The same `,_jsx(_components.strong,{children:`Add credit`}),` dialog opens from several places, always over the page you’re on:`]}),`\n`,_jsxs(_components.ul,{children:[`\n`,_jsxs(_components.li,{children:[_jsx(_components.strong,{children:`Billing`}),` page: the `,_jsx(_components.strong,{children:`Add Credit`}),` button.`]}),`\n`,_jsxs(_components.li,{children:[_jsx(_components.strong,{children:`My VPS`}),` page (under `,_jsx(_components.strong,{children:`Servers`}),` in the sidebar): the `,_jsx(_components.strong,{children:`top up to extend runway`}),` link on the `,_jsx(_components.strong,{children:`Available Credit`}),` card.`]}),`\n`,_jsxs(_components.li,{children:[_jsx(_components.a,{href:`/vps/create`,children:`Create a VPS`}),`: the `,_jsx(_components.strong,{children:`Top up wallet`}),` button on the review step or in `,_jsx(_components.strong,{children:`Confirm your order`}),`, when your balance doesn’t cover the order. After you pay from `,_jsx(_components.strong,{children:`Confirm your order`}),`, click `,_jsx(_components.strong,{children:`Back to your order`}),` to return to it.`]}),`\n`,_jsxs(_components.li,{children:[`A server’s page: the `,_jsx(_components.strong,{children:`Top up wallet`}),` button in the renewal warning or the `,_jsx(_components.strong,{children:`This server is suspended`}),` notice, and the `,_jsx(_components.strong,{children:`Top up`}),` link on the `,_jsx(_components.strong,{children:`Overview`}),` and `,_jsx(_components.strong,{children:`Billing`}),` tabs when your balance won’t cover the next renewal. On a suspended server, `,_jsx(_components.strong,{children:`Renew now`}),` also opens the dialog when your balance doesn’t cover the renewal yet.`]}),`\n`]}),`\n`,_jsx(_components.p,{children:`When you start from a place where your balance is short, the amount is filled in for you. It’s the missing amount rounded up to the next Rp 1,000, at least Rp 15,000 and at most Rp 10,000,000. A note above the amount says how much more the order or renewal needs.`}),`\n`,_jsx(Heading,{level:`2`,id:`add-balance`,children:`Add balance`}),`\n`,_jsxs(Steps,{children:[_jsx(Step,{title:`Open the Add credit dialog`,children:_jsxs(_components.p,{children:[`In the console sidebar, under `,_jsx(_components.strong,{children:`Account`}),`, click `,_jsx(_components.strong,{children:`Billing`}),`, then click `,_jsx(_components.strong,{children:`Add Credit`}),`. You can also start from any of the places listed above.`]})}),_jsxs(Step,{title:`Choose an amount`,children:[_jsxs(_components.p,{children:[`The dialog starts at Rp 100,000, or at the missing amount when it’s filled in for you. If you close it without paying, it keeps the last amount you chose for next time. After you close it on `,_jsx(_components.strong,{children:`Payment received`}),`, it goes back to Rp 100,000.`]}),_jsxs(_components.p,{children:[`Click a preset amount (Rp 50,000, Rp 100,000, Rp 200,000 or Rp 500,000), or type another amount in `,_jsx(_components.strong,{children:`Amount`}),`. Your current balance appears above the field, to the right of `,_jsx(_components.strong,{children:`Amount`}),`.`]}),_jsxs(_components.p,{children:[`Below the presets, `,_jsx(_components.strong,{children:`You pay`}),` shows the amount, `,_jsx(_components.strong,{children:`Fee`}),` shows `,_jsx(_components.strong,{children:`Free`}),`, and `,_jsx(_components.strong,{children:`Balance after top-up`}),` shows your balance once the payment is confirmed. Under the summary, a note reminds you that added balance is non-refundable and can’t be withdrawn. `,_jsx(_components.strong,{children:`Continue to payment`}),` stays disabled until the amount is between Rp 15,000 and Rp 10,000,000.`]}),_jsx(Frame,{caption:`The Add credit dialog, opened from the Billing page`,children:_jsx(OptimizedImage,{src:`https://mintcdn.com/sinar-cloud/Zz311Jgf5s_A88RD/images/billing-top-up.png?fit=max\u0026auto=format\u0026n=Zz311Jgf5s_A88RD\u0026q=85\u0026s=717acbda0faf4c6c1583d816b277694f`,alt:`Add credit dialog over the Billing page, with the default Rp 100,000 in the Amount field, the current balance to the right of the Amount label, the allowed range below the field, and preset buttons from 50,000 to 500,000. Below them are a summary with You pay, Fee Free and Balance after top-up, the note that credit is non-refundable and can't be withdrawn, and the Continue to payment button.`,\"data-og-width\":`2880`,width:`2880`,\"data-og-height\":`1800`,height:`1800`,\"data-path\":`images/billing-top-up.png`,\"data-optimize\":`true`,\"data-opv\":`3`,srcset:`https://mintcdn.com/sinar-cloud/Zz311Jgf5s_A88RD/images/billing-top-up.png?w=280\u0026fit=max\u0026auto=format\u0026n=Zz311Jgf5s_A88RD\u0026q=85\u0026s=919e3c4ff741cc992d0273bd0d2e2f91 280w, https://mintcdn.com/sinar-cloud/Zz311Jgf5s_A88RD/images/billing-top-up.png?w=560\u0026fit=max\u0026auto=format\u0026n=Zz311Jgf5s_A88RD\u0026q=85\u0026s=a6e57dd1bd2b454e36a874bd8fea9c76 560w, https://mintcdn.com/sinar-cloud/Zz311Jgf5s_A88RD/images/billing-top-up.png?w=840\u0026fit=max\u0026auto=format\u0026n=Zz311Jgf5s_A88RD\u0026q=85\u0026s=4f2735cda6145b3a5c80a573ee1fda2d 840w, https://mintcdn.com/sinar-cloud/Zz311Jgf5s_A88RD/images/billing-top-up.png?w=1100\u0026fit=max\u0026auto=format\u0026n=Zz311Jgf5s_A88RD\u0026q=85\u0026s=d95b48fce03f60345c0b0f3ee90bd46e 1100w, https://mintcdn.com/sinar-cloud/Zz311Jgf5s_A88RD/images/billing-top-up.png?w=1650\u0026fit=max\u0026auto=format\u0026n=Zz311Jgf5s_A88RD\u0026q=85\u0026s=48359ccc0fb2c74826e26a90f4788e8e 1650w, https://mintcdn.com/sinar-cloud/Zz311Jgf5s_A88RD/images/billing-top-up.png?w=2500\u0026fit=max\u0026auto=format\u0026n=Zz311Jgf5s_A88RD\u0026q=85\u0026s=85d4c5911fc4c28b2ed3b345cf45ca32 2500w`})})]}),_jsxs(Step,{title:`Create the QR code`,children:[_jsxs(_components.p,{children:[`Click `,_jsx(_components.strong,{children:`Continue to payment`}),`. The button shows `,_jsx(_components.strong,{children:`Creating QR code…`}),` while SinarCloud creates the code.`]}),_jsxs(_components.p,{children:[`The dialog then shows your QRIS code, the `,_jsx(_components.strong,{children:`Amount to pay`}),`, a countdown under `,_jsx(_components.strong,{children:`Expires in`}),`, and a short `,_jsx(_components.strong,{children:`How to pay`}),` guide.`]}),_jsxs(_components.p,{children:[`If the code can’t be created, the dialog shows `,_jsx(_components.strong,{children:`Couldn’t create the QR code`}),` with the reason. Click `,_jsx(_components.strong,{children:`Continue to payment`}),` to try again.`]})]}),_jsxs(Step,{title:`Scan and pay`,children:[_jsxs(_components.p,{children:[`Open your banking or e-wallet app, scan the code, and check that the amount matches `,_jsx(_components.strong,{children:`Amount to pay`}),`. Then pay before the countdown ends.`]}),_jsxs(_components.p,{children:[`If the console is open on the same phone as your banking app, click `,_jsx(_components.strong,{children:`Save QR image`}),`. On most phones this opens the share menu, where you choose to save the image. Then upload the saved image in your app’s QRIS scanner.`]}),_jsxs(_components.p,{children:[`To pay a different amount, click `,_jsx(_components.strong,{children:`Change`}),` next to the amount.`]})]}),_jsx(Step,{title:`Wait for confirmation`,children:_jsxs(_components.p,{children:[`While the dialog shows `,_jsx(_components.strong,{children:`Waiting for your payment…`}),`, the console checks the payment every few seconds. If it loses its connection, the dialog shows `,_jsx(_components.strong,{children:`Can’t reach SinarCloud to check. Retrying…`}),` and keeps trying. When the payment is confirmed, the dialog shows `,_jsx(_components.strong,{children:`Payment received`}),` and your `,_jsx(_components.strong,{children:`New balance`}),`. Click `,_jsx(_components.strong,{children:`Done`}),` to close it.`]})})]}),`\n`,_jsx(Note,{children:_jsxs(_components.p,{children:[`For a few amounts, `,_jsx(_components.strong,{children:`Amount to pay`}),` is Rp 1 more than the amount you entered. Pay the amount shown. The full amount you pay is added to your balance.`]})}),`\n`,_jsxs(_components.p,{children:[`A payment is usually confirmed within a minute. To check right away, click `,_jsx(_components.strong,{children:`Check payment status`}),`. If the payment hasn’t arrived yet, the dialog says `,_jsx(_components.strong,{children:`Not received yet. It can take up to a minute.`}),` If the check itself doesn’t go through, the dialog says `,_jsx(_components.strong,{children:`Couldn’t check right now. Try again.`}),` Click the button again after a moment.`]}),`\n`,_jsx(_components.p,{children:`SinarCloud also emails you a confirmation with the amount, the invoice number, the payment method, when you paid and your new balance.`}),`\n`,_jsx(Tip,{children:_jsxs(_components.p,{children:[`If you signed up through a friend’s affiliate link, your first paid top-up can earn you both a reward when it meets the minimum in the offer. See `,_jsx(_components.a,{href:`/account/affiliate`,children:`Affiliate program`}),`.`]})}),`\n`,_jsx(Heading,{level:`2`,id:`if-a-server-is-suspended`,children:`If a server is suspended`}),`\n`,_jsxs(_components.p,{children:[`When a server’s renewal can’t be paid, the server is suspended. Unless it’s renewed, it’s deleted with its data 6 hours after its period ends. The server’s page shows the `,_jsx(_components.strong,{children:`This server is suspended`}),` notice with the time it will be deleted.`]}),`\n`,_jsx(Frame,{caption:`The notice on a suspended server's page`,children:_jsx(OptimizedImage,{src:`https://mintcdn.com/sinar-cloud/Zz311Jgf5s_A88RD/images/vps-instance-suspended.png?fit=max\u0026auto=format\u0026n=Zz311Jgf5s_A88RD\u0026q=85\u0026s=7d4ad1f79babdbc9730b10a2743c4bed`,alt:`Instance detail page of a suspended server. The header shows the Suspended status, Renewal failed under Billing and Suspended under Health. Below it, the This server is suspended notice gives the renewal price, how much more to top up for the server to renew right away with all its data, and when the server is deleted if it isn't renewed, followed by the Top up wallet and Renew now buttons.`,\"data-og-width\":`2880`,width:`2880`,\"data-og-height\":`1800`,height:`1800`,\"data-path\":`images/vps-instance-suspended.png`,\"data-optimize\":`true`,\"data-opv\":`3`,srcset:`https://mintcdn.com/sinar-cloud/Zz311Jgf5s_A88RD/images/vps-instance-suspended.png?w=280\u0026fit=max\u0026auto=format\u0026n=Zz311Jgf5s_A88RD\u0026q=85\u0026s=36054a3982afbdea9292bab65ba4429e 280w, https://mintcdn.com/sinar-cloud/Zz311Jgf5s_A88RD/images/vps-instance-suspended.png?w=560\u0026fit=max\u0026auto=format\u0026n=Zz311Jgf5s_A88RD\u0026q=85\u0026s=617f2ba96be76182d226d8cabd0679a2 560w, https://mintcdn.com/sinar-cloud/Zz311Jgf5s_A88RD/images/vps-instance-suspended.png?w=840\u0026fit=max\u0026auto=format\u0026n=Zz311Jgf5s_A88RD\u0026q=85\u0026s=3fe1e73b6320eca500b9ece5fd881cf4 840w, https://mintcdn.com/sinar-cloud/Zz311Jgf5s_A88RD/images/vps-instance-suspended.png?w=1100\u0026fit=max\u0026auto=format\u0026n=Zz311Jgf5s_A88RD\u0026q=85\u0026s=0991f7c231f25ccb5ea8d3e8614c1382 1100w, https://mintcdn.com/sinar-cloud/Zz311Jgf5s_A88RD/images/vps-instance-suspended.png?w=1650\u0026fit=max\u0026auto=format\u0026n=Zz311Jgf5s_A88RD\u0026q=85\u0026s=8bc7521f6a1aa7f56d60c181f53537a0 1650w, https://mintcdn.com/sinar-cloud/Zz311Jgf5s_A88RD/images/vps-instance-suspended.png?w=2500\u0026fit=max\u0026auto=format\u0026n=Zz311Jgf5s_A88RD\u0026q=85\u0026s=51714413a2749c4409b1919cfd390c16 2500w`})}),`\n`,_jsx(_components.p,{children:`To bring the server back with a top-up:`}),`\n`,_jsxs(_components.ol,{children:[`\n`,_jsxs(_components.li,{children:[`On the server’s page, click `,_jsx(_components.strong,{children:`Top up wallet`}),` in the `,_jsx(_components.strong,{children:`This server is suspended`}),` notice. The dialog fills in the missing amount, and the note above it reads “The renewal needs Rp … more. The server renews as soon as the payment comes in.”`]}),`\n`,_jsxs(_components.li,{children:[`Scan and pay the QR code, as described in `,_jsx(_components.a,{href:`#add-balance`,children:`Add balance`}),`.`]}),`\n`,_jsx(_components.li,{children:`As soon as the payment is confirmed, SinarCloud renews your suspended servers, starting with the one that would be deleted first. Each server whose renewal your balance covers comes back as it was, with all its data.`}),`\n`]}),`\n`,_jsxs(_components.p,{children:[`Any paid top-up does this, wherever you started it. Other balance, for example from a coupon, doesn’t renew a server on its own. If your balance already covers the renewal, click `,_jsx(_components.strong,{children:`Renew now`}),` in the notice instead. See `,_jsx(_components.a,{href:`/vps/renewals`,children:`Renewals and expiry`}),`.`]}),`\n`,_jsx(Heading,{level:`2`,id:`if-you-close-the-dialog`,children:`If you close the dialog`}),`\n`,_jsx(_components.p,{children:`You can close the dialog before you pay. The QR code stays valid until its countdown ends, and the console keeps watching the payment in that browser tab, even if you reload the page.`}),`\n`,_jsxs(_components.ul,{children:[`\n`,_jsxs(_components.li,{children:[`A QRIS button with the time left appears at the top of the console. Click it to show the QR code again. Once the countdown ends, the button shows `,_jsx(_components.strong,{children:`Expired`}),`, and clicking it opens `,_jsx(_components.strong,{children:`This QR code has expired`}),`, where you can get a new code.`]}),`\n`,_jsxs(_components.li,{children:[`If you click `,_jsx(_components.strong,{children:`Add Credit`}),` again, the dialog shows the waiting QR code. If it opens on the amount step instead, click `,_jsx(_components.strong,{children:`Show it`}),` under `,_jsx(_components.strong,{children:`Continue to payment`}),`.`]}),`\n`,_jsxs(_components.li,{children:[`When the payment goes through, a `,_jsx(_components.strong,{children:`Top-up successful`}),` message appears on whichever page you’re on, and every balance on screen updates.`]}),`\n`,_jsxs(_components.li,{children:[`If the code expires or the top-up doesn’t go through, a message such as `,_jsx(_components.strong,{children:`QR code expired`}),` or `,_jsx(_components.strong,{children:`Top-up failed`}),` appears instead, with a `,_jsx(_components.strong,{children:`New QR code`}),` button.`]}),`\n`]}),`\n`,_jsxs(_components.p,{children:[`From another browser tab or device, open `,_jsx(_components.strong,{children:`Billing`}),`, then the `,_jsx(_components.strong,{children:`Payments`}),` tab, and click `,_jsx(_components.strong,{children:`Show QR`}),` on the payment.`]}),`\n`,_jsx(Heading,{level:`2`,id:`if-the-qr-code-expires`,children:`If the QR code expires`}),`\n`,_jsxs(_components.p,{children:[`When the countdown ends, the dialog shows `,_jsx(_components.strong,{children:`This QR code has expired`}),`. Click `,_jsx(_components.strong,{children:`New QR code`}),` to get a new code for the same amount, or `,_jsx(_components.strong,{children:`Change amount`}),` to pick another amount. If the new code can’t be created, the dialog returns to the amount step with the message.`]}),`\n`,_jsxs(_components.p,{children:[`If you paid just as the code expired, the payment still counts. Click `,_jsx(_components.strong,{children:`Already paid? Check payment status`}),`, or wait about a minute for your balance to update.`]}),`\n`,_jsx(Warning,{children:_jsx(_components.p,{children:`Don’t pay a saved QR image after its countdown has ended. Create a new QR code instead.`})}),`\n`,_jsx(Heading,{level:`2`,id:`payment-statuses`,children:`Payment statuses`}),`\n`,_jsxs(Table,{children:[_jsx(_components.thead,{children:_jsxs(_components.tr,{children:[_jsx(_components.th,{children:`Status`}),_jsx(_components.th,{children:`What it means`}),_jsx(_components.th,{children:`Your balance`})]})}),_jsxs(_components.tbody,{children:[_jsxs(_components.tr,{children:[_jsx(_components.td,{children:_jsx(_components.strong,{children:`Awaiting payment`})}),_jsxs(_components.td,{children:[`The QR code is ready, and SinarCloud is waiting for your payment. You can pay until the time shown under `,_jsx(_components.strong,{children:`Expires`}),` in `,_jsx(_components.strong,{children:`Payment details`}),`.`]}),_jsx(_components.td,{children:`Not changed yet`})]}),_jsxs(_components.tr,{children:[_jsx(_components.td,{children:_jsx(_components.strong,{children:`Succeeded`})}),_jsx(_components.td,{children:`Your payment was confirmed.`}),_jsx(_components.td,{children:`The full amount is added`})]}),_jsxs(_components.tr,{children:[_jsx(_components.td,{children:_jsx(_components.strong,{children:`Expired`})}),_jsx(_components.td,{children:`The QR code ran out before a payment came through.`}),_jsx(_components.td,{children:`Not changed`})]}),_jsxs(_components.tr,{children:[_jsx(_components.td,{children:_jsx(_components.strong,{children:`Cancelled`})}),_jsx(_components.td,{children:`The payment was cancelled before it was paid.`}),_jsx(_components.td,{children:`Not changed`})]}),_jsxs(_components.tr,{children:[_jsx(_components.td,{children:_jsx(_components.strong,{children:`Failed`})}),_jsx(_components.td,{children:`The QR code couldn’t be created, or the payment couldn’t be completed.`}),_jsx(_components.td,{children:`Not changed`})]})]})]}),`\n`,_jsxs(_components.p,{children:[`If a payment expires, is cancelled or fails while the `,_jsx(_components.strong,{children:`Add credit`}),` dialog is open, the dialog offers `,_jsx(_components.strong,{children:`New QR code`}),` and `,_jsx(_components.strong,{children:`Change amount`}),`. In the `,_jsx(_components.strong,{children:`Payments`}),` tab, such a payment has no QR code. To try again, click `,_jsx(_components.strong,{children:`Add Credit`}),` to start a new top-up. You don’t need to cancel anything yourself.`]}),`\n`,_jsx(Warning,{children:_jsxs(_components.p,{children:[`If you paid but the payment shows `,_jsx(_components.strong,{children:`Failed`}),` or `,_jsx(_components.strong,{children:`Expired`}),`, don’t pay again. Open the payment in the `,_jsx(_components.strong,{children:`Payments`}),` tab and click `,_jsx(_components.strong,{children:`Check payment`}),`. If it doesn’t change to `,_jsx(_components.strong,{children:`Succeeded`}),`, `,_jsx(_components.a,{href:`/help/support`,children:`contact support`}),` with the invoice number and your payment receipt.`]})}),`\n`,_jsx(Heading,{level:`2`,id:`review-your-payments`,children:`Review your payments`}),`\n`,_jsxs(_components.p,{children:[`On the `,_jsx(_components.strong,{children:`Billing`}),` page, open the `,_jsx(_components.strong,{children:`Payments`}),` tab. It lists all your top-ups, newest first, with the `,_jsx(_components.strong,{children:`Invoice`}),`, `,_jsx(_components.strong,{children:`Amount`}),`, `,_jsx(_components.strong,{children:`Status`}),`, `,_jsx(_components.strong,{children:`Method`}),`, `,_jsx(_components.strong,{children:`Created`}),` and `,_jsx(_components.strong,{children:`Actions`}),` columns.`]}),`\n`,_jsx(Frame,{caption:`The Payments tab on the Billing page`,children:_jsx(OptimizedImage,{src:`https://mintcdn.com/sinar-cloud/Zz311Jgf5s_A88RD/images/billing-payments.png?fit=max\u0026auto=format\u0026n=Zz311Jgf5s_A88RD\u0026q=85\u0026s=d5bd693dffc78526dc17d20e5f6321fe`,alt:`Billing page with the Redeem and Add Credit buttons, the Current Credits card, and the Payments tab listing three top-ups under the Invoice, Amount, Status, Method, Created and Actions columns. Each row shows a Succeeded status, QRIS as the method and a dash under Actions.`,\"data-og-width\":`2880`,width:`2880`,\"data-og-height\":`1800`,height:`1800`,\"data-path\":`images/billing-payments.png`,\"data-optimize\":`true`,\"data-opv\":`3`,srcset:`https://mintcdn.com/sinar-cloud/Zz311Jgf5s_A88RD/images/billing-payments.png?w=280\u0026fit=max\u0026auto=format\u0026n=Zz311Jgf5s_A88RD\u0026q=85\u0026s=40293e1537a60ccd24b70165b653e668 280w, https://mintcdn.com/sinar-cloud/Zz311Jgf5s_A88RD/images/billing-payments.png?w=560\u0026fit=max\u0026auto=format\u0026n=Zz311Jgf5s_A88RD\u0026q=85\u0026s=2a9fc2a2067ef6c0ed66b88044ba6972 560w, https://mintcdn.com/sinar-cloud/Zz311Jgf5s_A88RD/images/billing-payments.png?w=840\u0026fit=max\u0026auto=format\u0026n=Zz311Jgf5s_A88RD\u0026q=85\u0026s=0fe14fcef3f709967c4f09f493372e85 840w, https://mintcdn.com/sinar-cloud/Zz311Jgf5s_A88RD/images/billing-payments.png?w=1100\u0026fit=max\u0026auto=format\u0026n=Zz311Jgf5s_A88RD\u0026q=85\u0026s=071b1949d4bc9fb510e6bcdc0575b78b 1100w, https://mintcdn.com/sinar-cloud/Zz311Jgf5s_A88RD/images/billing-payments.png?w=1650\u0026fit=max\u0026auto=format\u0026n=Zz311Jgf5s_A88RD\u0026q=85\u0026s=4d618c491f4a344788afb4034c958d0d 1650w, https://mintcdn.com/sinar-cloud/Zz311Jgf5s_A88RD/images/billing-payments.png?w=2500\u0026fit=max\u0026auto=format\u0026n=Zz311Jgf5s_A88RD\u0026q=85\u0026s=1581bead63ee35749e7d4d119fadd8b2 2500w`})}),`\n`,_jsxs(_components.p,{children:[`While a payment is `,_jsx(_components.strong,{children:`Awaiting payment`}),`, the `,_jsx(_components.strong,{children:`Actions`}),` column shows `,_jsx(_components.strong,{children:`Show QR`}),`. Click it to open the QR code and pay. Otherwise the column shows a dash (—).`]}),`\n`,_jsxs(_components.p,{children:[`Click a row to open `,_jsx(_components.strong,{children:`Payment details`}),`. It shows the amount, invoice number, status, `,_jsx(_components.strong,{children:`Payment ID`}),`, `,_jsx(_components.strong,{children:`Created`}),`, `,_jsx(_components.strong,{children:`Expires`}),` and `,_jsx(_components.strong,{children:`Method`}),`. Click `,_jsx(_components.strong,{children:`Check payment`}),` to refresh the status. While the payment is waiting, the dialog updates on its own, and you can click `,_jsx(_components.strong,{children:`Show QR code`}),` to pay it.`]}),`\n`,_jsxs(_components.p,{children:[`A successful top-up also appears in the `,_jsx(_components.strong,{children:`Transactions`}),` tab as a `,_jsx(_components.strong,{children:`Wallet top-up`}),`, with QRIS and the invoice number below it.`]}),`\n`,_jsx(Heading,{level:`2`,id:`invoice-numbers-and-receipts`,children:`Invoice numbers and receipts`}),`\n`,_jsxs(_components.p,{children:[`Every top-up gets an invoice number that starts with `,_jsx(_components.code,{children:`TOPUP`}),`. You can find it in the `,_jsx(_components.strong,{children:`Invoice`}),` column, in `,_jsx(_components.strong,{children:`Payment details`}),`, below the QR code and in the confirmation email. Keep it for your records, and include it whenever you contact support about a payment.`]}),`\n`,_jsx(_components.p,{children:`The console doesn’t create a downloadable invoice or receipt file. Keep the confirmation email and the receipt from your banking or e-wallet app as proof of payment.`}),`\n`,_jsx(Heading,{level:`2`,id:`if-your-balance-didn’t-update`,children:`If your balance didn’t update`}),`\n`,_jsx(_components.p,{children:`Confirmation can take up to a minute after you pay. Don’t pay a second time while you check.`}),`\n`,_jsxs(_components.ol,{children:[`\n`,_jsxs(_components.li,{children:[`Open the `,_jsx(_components.strong,{children:`Payments`}),` tab and click the payment.`]}),`\n`,_jsxs(_components.li,{children:[`Click `,_jsx(_components.strong,{children:`Check payment`}),`.`]}),`\n`,_jsxs(_components.li,{children:[`If the status still shows `,_jsx(_components.strong,{children:`Awaiting payment`}),`, or it shows `,_jsx(_components.strong,{children:`Failed`}),` or `,_jsx(_components.strong,{children:`Expired`}),` even though money left your account, contact support from the `,_jsx(_components.a,{href:`/help/support`,children:`Support page`}),`. Include the invoice number and your payment receipt.`]}),`\n`]}),`\n`,_jsxs(_components.p,{children:[`For other problems, see `,_jsx(_components.a,{href:`/help/troubleshooting`,children:`Troubleshooting`}),`.`]}),`\n`,_jsxs(CardGroup,{cols:2,children:[_jsx(Card,{title:`Redeem a coupon`,icon:`gift`,href:`/billing/coupons`,children:_jsx(_components.p,{children:`Add bonus balance with a coupon code.`})}),_jsx(Card,{title:`Balance and billing`,icon:`wallet`,href:`/billing/overview`,children:_jsx(_components.p,{children:`Learn how your balance pays for VPS and AI usage.`})})]})]})}function MDXContent(props={}){const{wrapper:MDXLayout}={..._provideComponents(),...props.components};return MDXLayout?_jsx(MDXLayout,{...props,children:_jsx(_createMdxContent,{...props})}):_createMdxContent(props)}return{default:MDXContent};function _missingMdxReference(id,component){throw new Error(`Expected `+(component?`component`:`object`)+\" `\"+id+\"` to be defined: you likely forgot to import, pass, or provide it.\")}","frontmatter":{},"scope":{"config":{},"pageMetadata":{"title":"Add balance","sidebarTitle":"Add balance","description":"Add money to your balance with QRIS, from Rp 15,000 with no fee. Scan and pay without leaving the page. Added balance is non-refundable.","icon":"credit-card","href":"/billing/top-up"}}},"mdxSourceWithNoJs":null},"mdxExtracts":{"tableOfContents":[{"title":"Amounts and fees","slug":"amounts-and-fees","depth":2,"children":[]},{"title":"Where you can top up","slug":"where-you-can-top-up","depth":2,"children":[]},{"title":"Add balance","slug":"add-balance","depth":2,"children":[]},{"title":"If a server is suspended","slug":"if-a-server-is-suspended","depth":2,"children":[]},{"title":"If you close the dialog","slug":"if-you-close-the-dialog","depth":2,"children":[]},{"title":"If the QR code expires","slug":"if-the-qr-code-expires","depth":2,"children":[]},{"title":"Payment statuses","slug":"payment-statuses","depth":2,"children":[]},{"title":"Review your payments","slug":"review-your-payments","depth":2,"children":[]},{"title":"Invoice numbers and receipts","slug":"invoice-numbers-and-receipts","depth":2,"children":[]},{"title":"If your balance didn’t update","slug":"if-your-balance-didn’t-update","depth":2,"children":[]}],"codeExamples":{}},"jsLinks":[],"subdomain":"sinar-cloud","siteName":"SinarCloud","title":"Add balance - SinarCloud","navMaps":{"firstHrefInVersion":{},"firstHrefInLanguage":{}},"lastModified":"2026-10-27T01:49:54.131Z","originalFileLocation":"billing/top-up.mdx"},"headHtml":"\u003cscript data-mint-head>(function(){var d=document.documentElement,p=null;if(!p){try{p=localStorage.getItem(\"isDarkMode\")}catch(e){}if(p==='true')p='dark';else if(p==='false')p='light';if(p!=='light'\u0026\u0026p!=='dark'\u0026\u0026p!=='system')p=\"system\"}var r=p==='system'?(matchMedia(\"(prefers-color-scheme: dark)\").matches?'dark':'light'):p;d.classList.remove(r==='dark'?'light':'dark');d.classList.add(r);d.setAttribute(\"data-theme-preference\",p)})();\u003c/script>\u003cmeta data-mint-head name=\"description\" content=\"Add money to your balance with QRIS, from Rp 15,000 with no fee. Scan and pay without leaving the page. Added balance is non-refundable.\">\u003cmeta data-mint-head name=\"application-name\" content=\"SinarCloud\">\u003cmeta data-mint-head name=\"generator\" content=\"Mintlify\">\u003clink data-mint-head rel=\"icon\" type=\"image/png\" sizes=\"192x192\" href=\"/mintlify-assets/_mintlify/favicons/sinar-cloud/qYYrDQEL49wjTG-a/_generated/favicon/android-chrome-192x192.png\" media=\"(prefers-color-scheme: light)\">\u003clink data-mint-head rel=\"apple-touch-icon\" type=\"image/png\" sizes=\"180x180\" href=\"/mintlify-assets/_mintlify/favicons/sinar-cloud/qYYrDQEL49wjTG-a/_generated/favicon/apple-touch-icon.png\">\u003clink data-mint-head rel=\"icon\" type=\"image/png\" sizes=\"16x16\" href=\"/mintlify-assets/_mintlify/favicons/sinar-cloud/qYYrDQEL49wjTG-a/_generated/favicon/favicon-16x16.png\" media=\"(prefers-color-scheme: light)\">\u003clink data-mint-head rel=\"icon\" type=\"image/png\" sizes=\"32x32\" href=\"/mintlify-assets/_mintlify/favicons/sinar-cloud/qYYrDQEL49wjTG-a/_generated/favicon/favicon-32x32.png\" media=\"(prefers-color-scheme: light)\">\u003clink data-mint-head rel=\"shortcut icon\" type=\"image/x-icon\" href=\"/mintlify-assets/_mintlify/favicons/sinar-cloud/qYYrDQEL49wjTG-a/_generated/favicon/favicon.ico\" media=\"(prefers-color-scheme: light)\">\u003clink data-mint-head rel=\"icon\" type=\"image/png\" sizes=\"192x192\" href=\"/mintlify-assets/_mintlify/favicons/sinar-cloud/qYYrDQEL49wjTG-a/_generated/favicon-dark/android-chrome-192x192.png\" media=\"(prefers-color-scheme: dark)\">\u003clink data-mint-head rel=\"icon\" type=\"image/png\" sizes=\"16x16\" href=\"/mintlify-assets/_mintlify/favicons/sinar-cloud/qYYrDQEL49wjTG-a/_generated/favicon-dark/favicon-16x16.png\" media=\"(prefers-color-scheme: dark)\">\u003clink data-mint-head rel=\"icon\" type=\"image/png\" sizes=\"32x32\" href=\"/mintlify-assets/_mintlify/favicons/sinar-cloud/qYYrDQEL49wjTG-a/_generated/favicon-dark/favicon-32x32.png\" media=\"(prefers-color-scheme: dark)\">\u003clink data-mint-head rel=\"shortcut icon\" type=\"image/x-icon\" href=\"/mintlify-assets/_mintlify/favicons/sinar-cloud/qYYrDQEL49wjTG-a/_generated/favicon-dark/favicon.ico\" media=\"(prefers-color-scheme: dark)\">\u003cmeta data-mint-head property=\"og:title\" content=\"Add balance - SinarCloud\">\u003cmeta data-mint-head property=\"og:description\" content=\"Add money to your balance with QRIS, from Rp 15,000 with no fee. Scan and pay without leaving the page. Added balance is non-refundable.\">\u003cmeta data-mint-head property=\"og:site_name\" content=\"SinarCloud\">\u003cmeta data-mint-head property=\"og:url\" content=\"https://docs.sinarcloud.com/billing/top-up\">\u003cmeta data-mint-head property=\"og:type\" content=\"website\">\u003cmeta data-mint-head property=\"og:image\" content=\"https://sinar-cloud.mintlify.app/_mintlify/api/og/v2?division=Billing\u0026amp;title=Add+balance\u0026amp;description=Add+money+to+your+balance+with+QRIS%2C+from+Rp+15%2C000+with+no+fee.+Scan+and+pay+without+leaving+the+page.+Added+balance+is+non-refundable.\u0026amp;theme=d3d561d856c05a6395bfee2d\u0026amp;signature=8a53f90841ee2c0b825d522f68b2895ef6c6fe20d58b3f0984f903a971378a7e\">\u003cmeta data-mint-head property=\"og:image:width\" content=\"1200\">\u003cmeta data-mint-head property=\"og:image:height\" content=\"630\">\u003cmeta data-mint-head name=\"twitter:card\" content=\"summary_large_image\">\u003cmeta data-mint-head name=\"twitter:title\" content=\"Add balance - SinarCloud\">\u003cmeta data-mint-head name=\"twitter:description\" content=\"Add money to your balance with QRIS, from Rp 15,000 with no fee. Scan and pay without leaving the page. Added balance is non-refundable.\">\u003cmeta data-mint-head name=\"twitter:image\" content=\"https://sinar-cloud.mintlify.app/_mintlify/api/og/v2?division=Billing\u0026amp;title=Add+balance\u0026amp;description=Add+money+to+your+balance+with+QRIS%2C+from+Rp+15%2C000+with+no+fee.+Scan+and+pay+without+leaving+the+page.+Added+balance+is+non-refundable.\u0026amp;theme=d3d561d856c05a6395bfee2d\u0026amp;signature=8a53f90841ee2c0b825d522f68b2895ef6c6fe20d58b3f0984f903a971378a7e\">\u003cmeta data-mint-head name=\"twitter:image:width\" content=\"1200\">\u003cmeta data-mint-head name=\"twitter:image:height\" content=\"630\">\u003cmeta data-mint-head name=\"msapplication-config\" content=\"/mintlify-assets/_mintlify/favicons/sinar-cloud/qYYrDQEL49wjTG-a/_generated/favicon/browserconfig.xml\">\u003cmeta data-mint-head name=\"apple-mobile-web-app-title\" content=\"SinarCloud\">\u003cmeta data-mint-head name=\"msapplication-TileColor\" content=\"#0066CC\">\u003clink data-mint-head rel=\"canonical\" href=\"https://docs.sinarcloud.com/billing/top-up\">\u003clink data-mint-head rel=\"alternate\" type=\"application/xml\" href=\"/sitemap.xml\">\u003clink data-mint-head rel=\"alternate\" type=\"text/markdown\" href=\"/billing/top-up.md\">\u003cscript data-mint-head type=\"application/ld+json\">{\"@context\":\"https://schema.org\",\"@graph\":[{\"@type\":\"Organization\",\"@id\":\"https://docs.sinarcloud.com/#organization\",\"name\":\"SinarCloud\",\"url\":\"https://docs.sinarcloud.com\",\"logo\":{\"@type\":\"ImageObject\",\"url\":\"https://mintcdn.com/sinar-cloud/B5Imz7vUklgE_ozS/logo/light.svg?fit=max\u0026auto=format\u0026n=B5Imz7vUklgE_ozS\u0026q=85\u0026s=e9d750a5729c82b08c0c002770ca98b0\"}},{\"@type\":\"WebSite\",\"@id\":\"https://docs.sinarcloud.com#website\",\"name\":\"SinarCloud\",\"url\":\"https://docs.sinarcloud.com\",\"publisher\":{\"@id\":\"https://docs.sinarcloud.com/#organization\"}},{\"@type\":\"WebPage\",\"@id\":\"https://docs.sinarcloud.com/billing/top-up#webpage\",\"url\":\"https://docs.sinarcloud.com/billing/top-up\",\"name\":\"Add balance\",\"description\":\"Add money to your balance with QRIS, from Rp 15,000 with no fee. Scan and pay without leaving the page. Added balance is non-refundable.\",\"dateModified\":\"2026-10-27T01:49:54.131Z\",\"isPartOf\":{\"@id\":\"https://docs.sinarcloud.com#website\"},\"breadcrumb\":{\"@id\":\"https://docs.sinarcloud.com/billing/top-up#breadcrumb\"}},{\"@type\":\"BreadcrumbList\",\"@id\":\"https://docs.sinarcloud.com/billing/top-up#breadcrumb\",\"itemListElement\":[{\"@type\":\"ListItem\",\"position\":1,\"name\":\"Billing\",\"item\":\"https://docs.sinarcloud.com/billing/overview\"},{\"@type\":\"ListItem\",\"position\":2,\"name\":\"Add balance\",\"item\":\"https://docs.sinarcloud.com/billing/top-up\"}]},{\"@type\":[\"Article\",\"TechArticle\"],\"@id\":\"https://docs.sinarcloud.com/billing/top-up#article\",\"headline\":\"Add balance\",\"name\":\"Add balance\",\"description\":\"Add money to your balance with QRIS, from Rp 15,000 with no fee. Scan and pay without leaving the page. Added balance is non-refundable.\",\"url\":\"https://docs.sinarcloud.com/billing/top-up\",\"mainEntityOfPage\":{\"@id\":\"https://docs.sinarcloud.com/billing/top-up#webpage\"},\"dateModified\":\"2026-10-27T01:49:54.131Z\",\"publisher\":{\"@id\":\"https://docs.sinarcloud.com/#organization\"},\"isPartOf\":{\"@id\":\"https://docs.sinarcloud.com#website\"}}]}\u003c/script>\u003cscript data-mint-head type=\"application/ld+json\">{\"@context\":\"https://schema.org\",\"@type\":\"WebSite\",\"name\":\"SinarCloud\",\"creator\":{\"@type\":\"Organization\",\"name\":\"Mintlify\",\"url\":\"https://mintlify.com\"}}\u003c/script>","siteName":"SinarCloud","nav":{"global":null,"tabs":[{"tab":"Guides","pages":[{"group":"Get started","icon":"rocket","pages":[{"title":"Introduction","icon":"book-open","href":""},{"title":"Deploy your first VPS","sidebarTitle":"Deploy your first VPS","icon":"rocket","href":"/quickstart"},{"title":"Make your first AI request","sidebarTitle":"AI quickstart","icon":"sparkles","href":"/ai-quickstart"}]},{"group":"VPS","icon":"server","pages":[{"title":"Virtual servers overview","sidebarTitle":"Overview","icon":"server","href":"/vps/overview"},{"title":"Create a VPS","sidebarTitle":"Create a VPS","icon":"server","href":"/vps/create"},{"title":"Connect to your VPS","sidebarTitle":"Connect","icon":"terminal","href":"/vps/connect"},{"title":"Manage a VPS","sidebarTitle":"Manage","icon":"sliders","href":"/vps/manage"},{"title":"Configure the firewall","sidebarTitle":"Firewall","icon":"shield-halved","href":"/vps/firewall"},{"title":"Renewals and expiry","icon":"calendar","href":"/vps/renewals"}]},{"group":"Billing","icon":"wallet","pages":[{"title":"Balance and billing","description":"How your prepaid rupiah balance pays for VPS and AI usage, what happens when it runs low or prices change, and how to read the Billing page.","icon":"wallet","href":"/billing/overview"},{"title":"Add balance","sidebarTitle":"Add balance","icon":"credit-card","href":"/billing/top-up"},{"title":"Redeem a coupon","sidebarTitle":"Redeem a coupon","description":"Redeem a coupon for balance or an AI usage discount, claim a gift with a gift code, use a promo code at VPS checkout, and fix common errors.","icon":"gift","href":"/billing/coupons"},{"title":"Orders","sidebarTitle":"Orders","icon":"receipt","href":"/billing/orders"}]},{"group":"AI API","icon":"sparkles","pages":[{"title":"AI API overview","sidebarTitle":"Overview","icon":"sparkles","href":"/ai/overview"},{"title":"Models and pricing","sidebarTitle":"Models and pricing","icon":"robot","href":"/ai/models"},{"title":"How tokens are counted","sidebarTitle":"Token counting","icon":"calculator","href":"/ai/tokens"},{"title":"API keys","icon":"key","href":"/ai/api-keys"},{"title":"Send requests","sidebarTitle":"Send requests","icon":"terminal","href":"/ai/requests"},{"title":"Playground","icon":"comments","href":"/ai/playground"},{"title":"Usage and spending","sidebarTitle":"Usage","icon":"chart-line","href":"/ai/usage"},{"title":"Token credits","icon":"coins","href":"/ai/token-credits"},{"title":"AI subscription plans","sidebarTitle":"Subscription plans","icon":"repeat","href":"/ai/subscriptions"}]},{"group":"Account","icon":"user","pages":[{"title":"Account settings","sidebarTitle":"Settings","icon":"gear","href":"/account/settings"},{"title":"Affiliate program","sidebarTitle":"Affiliate program","icon":"gift","href":"/account/affiliate"}]},{"group":"Help","icon":"life-ring","pages":[{"title":"Get support","sidebarTitle":"Get support","icon":"life-ring","href":"/help/support"},{"title":"Troubleshooting","icon":"wrench","href":"/help/troubleshooting"}]}]},{"tab":"Integrations","pages":[{"title":"Integrations","href":"/integrations/overview"}]}]},"basePath":"","title":"Add balance - SinarCloud","buildId":"dpl_345ReqzYaAjzS9QpeJemsKdb7KDj","deploymentId":"dpl_345ReqzYaAjzS9QpeJemsKdb7KDj","dynamics":["07c022d89b","a74be98ba7"],"chunks":["Frame-PS-3COT9.js","DynamicMarkdown-BcnBltEQ.js","zoom-image-lightbox-B4-wUcHm.js","lightbox-handle-r17bVUz3.js"]}