Create, copy, rename, and revoke the API keys your applications use to call the SinarCloud AI API, and try a key with the quick start.
API keys let your applications call the SinarCloud AI API. Every request carries a key, and SinarCloud charges the request to your balance or, if you have them for that model, to your token credits. You can see your AI spending on Usage and spending. You create and manage keys in the console: in the sidebar, under AI, click API keys.The API Keys page has two parts: a quick start with the API endpoint and a sample request, and below it, Your API keys.
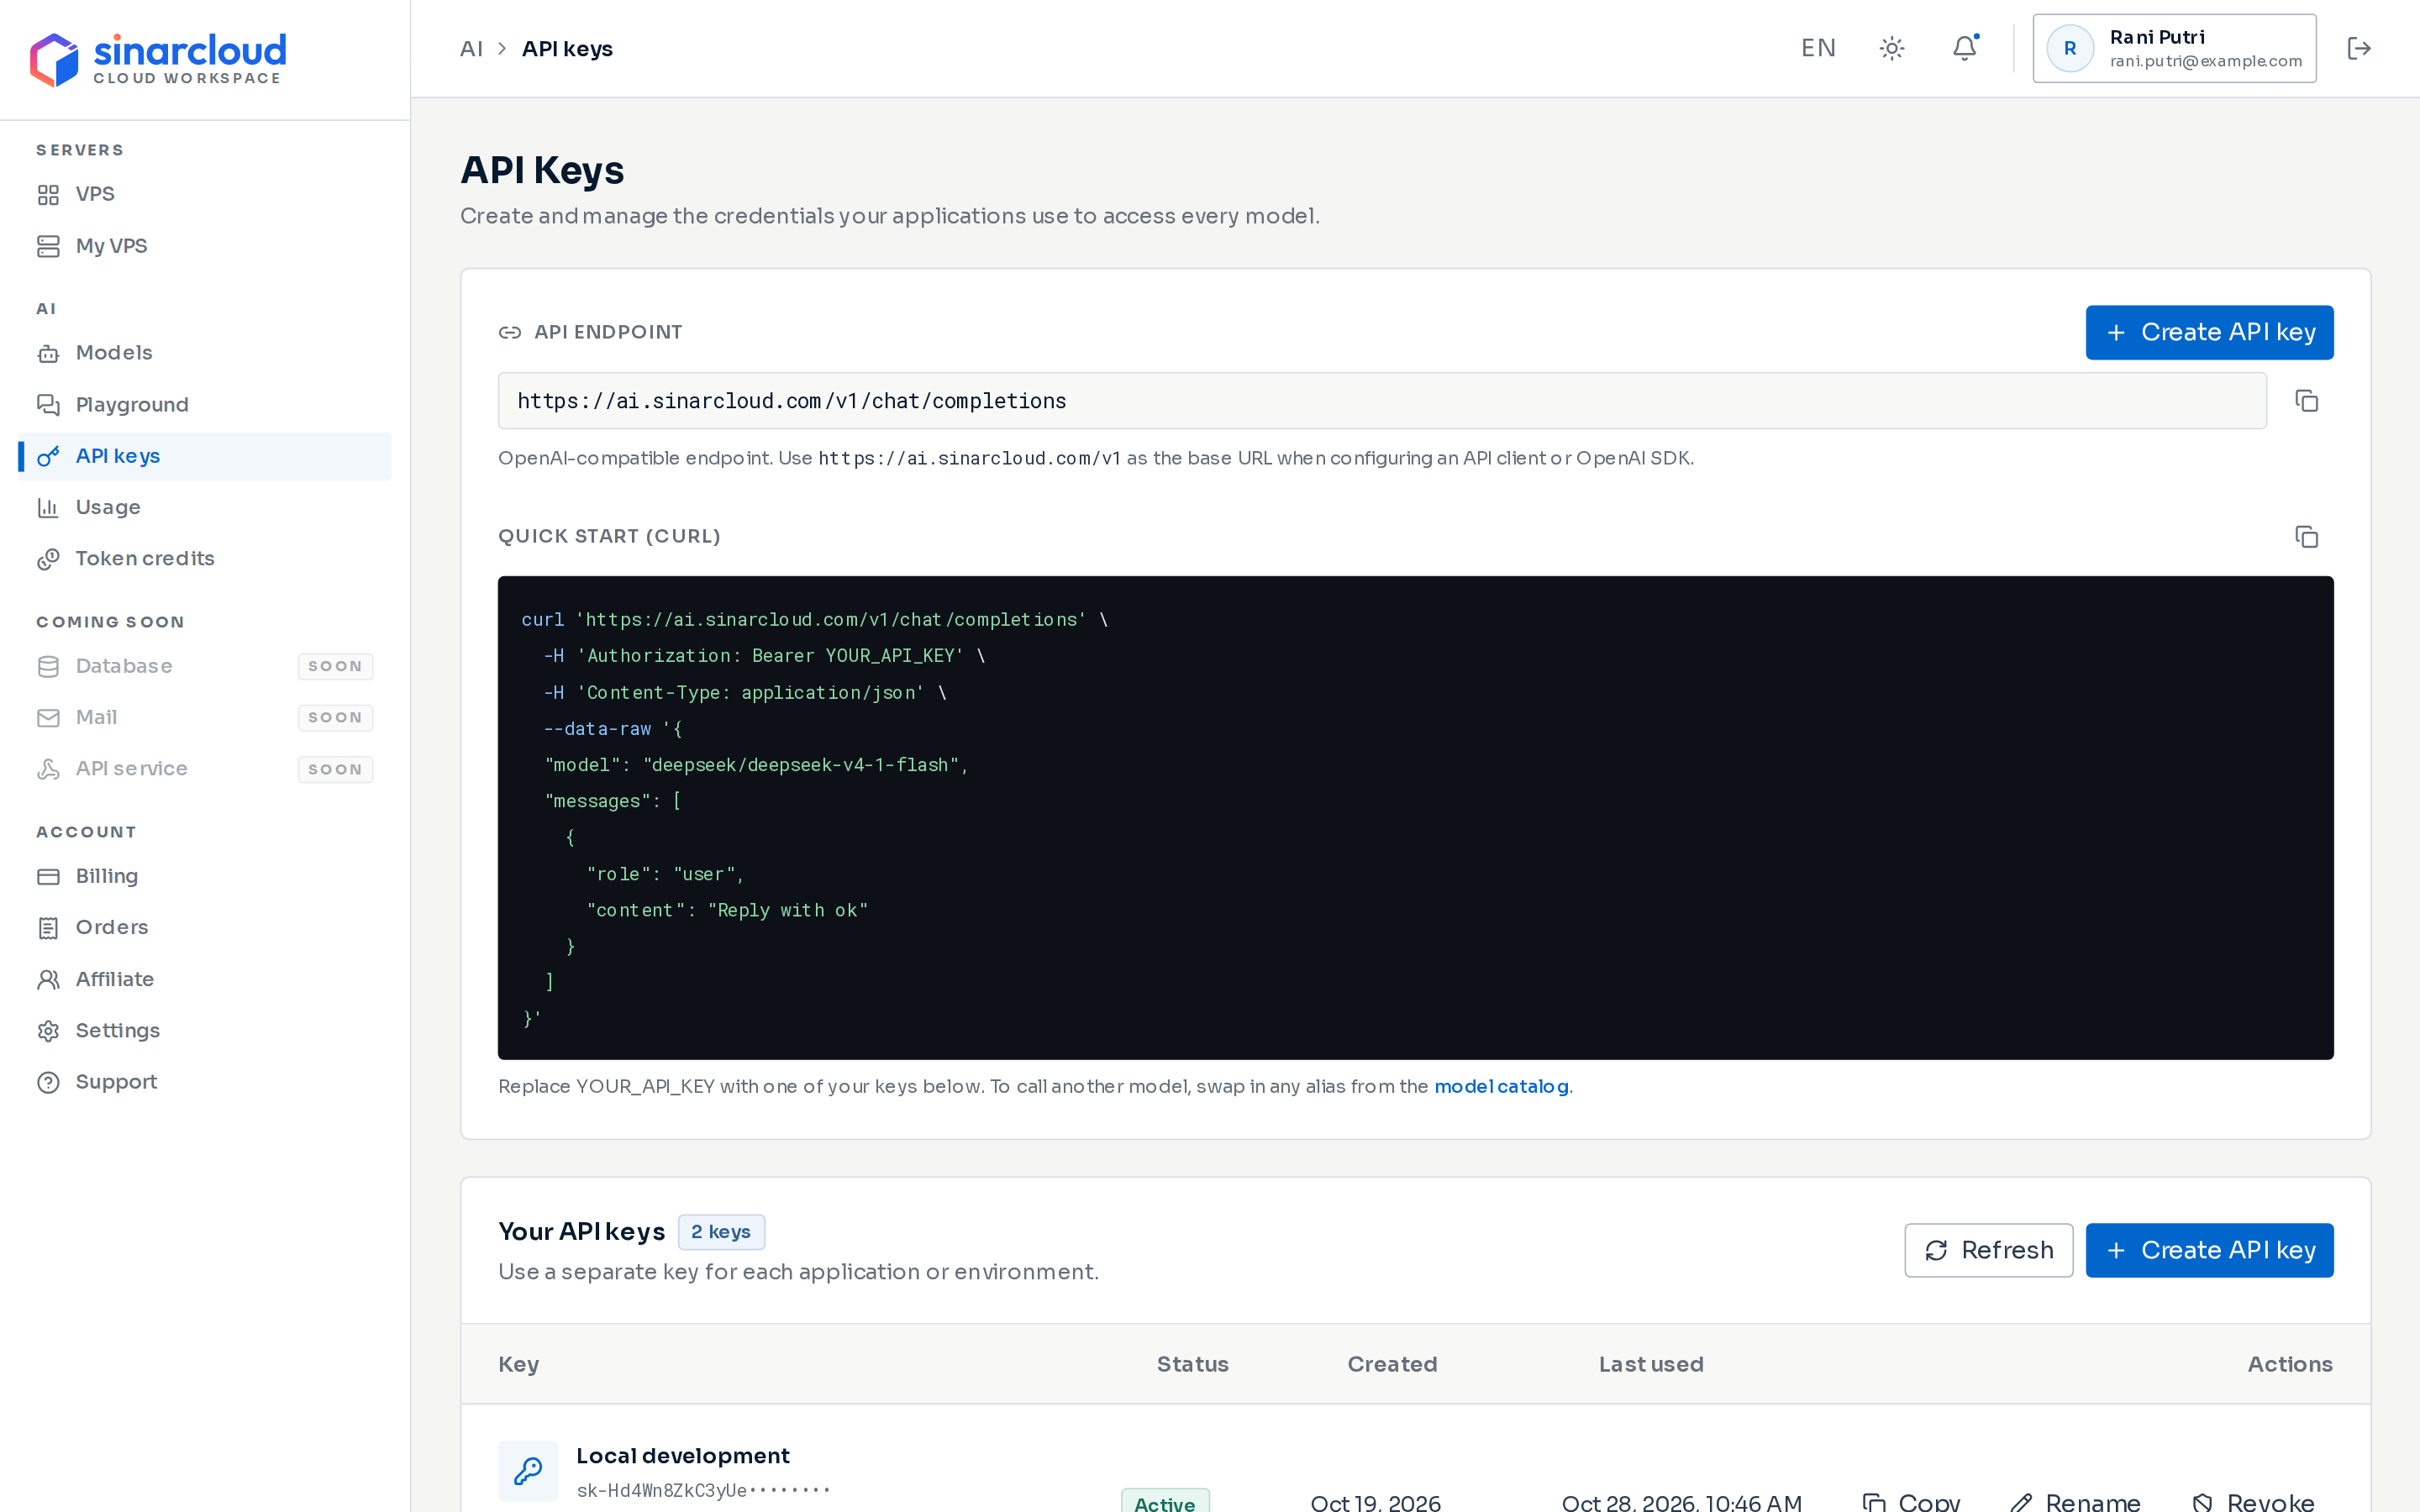
The API Keys page, with the quick start above your key list
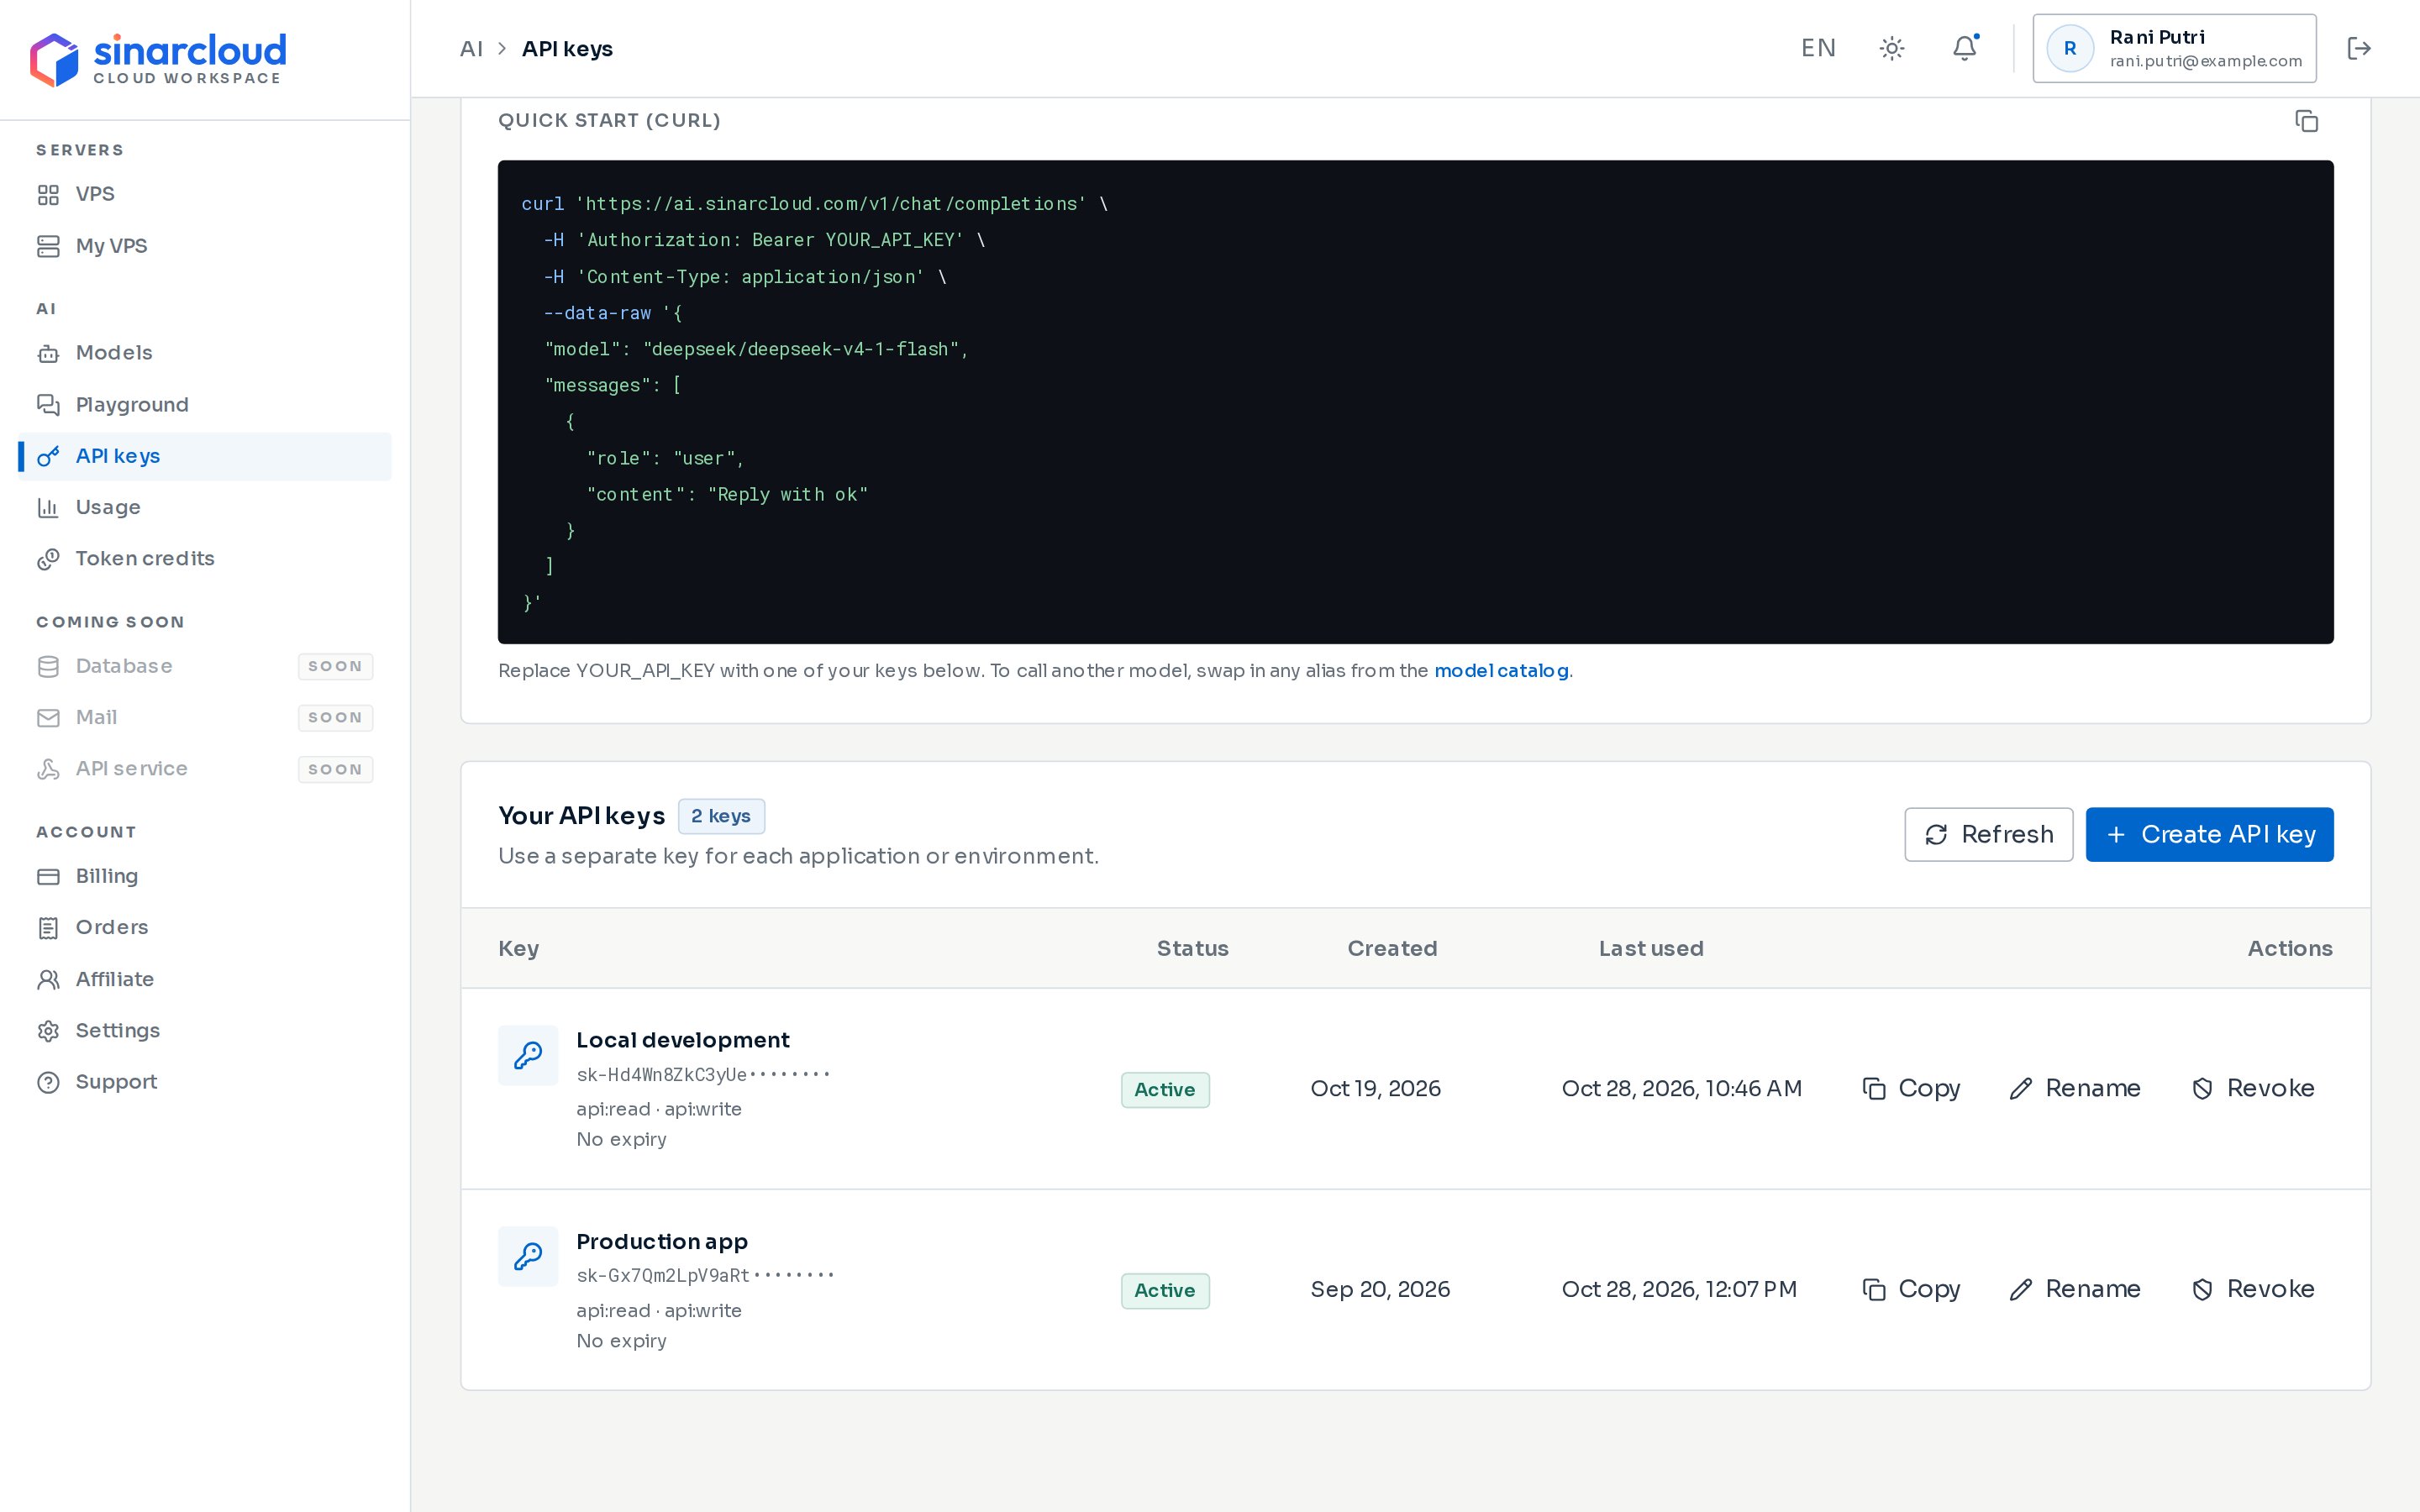
The key name and the first few characters of the key, followed by dots. The list never shows the full key.
The key’s scopes, api:read and api:write, separated by a dot. Every key you create in the console has both: api:read lets it list models, and api:write lets it send requests to models. You can’t choose scopes in the console.
Expires with a date, or No expiry.
Status, Created, and Last used. A key that has never made a request shows Never used.
The list also keeps your revoked keys, so you have a record of them. If you don’t have any keys yet, the list shows No API keys yet with a Create API key button. The list doesn’t update by itself while the page is open. Click Refresh to reload it.
The quick start at the top of the page helps you send a first request with a new key. It’s always there, whether or not you have keys.
API endpoint shows the full URL for chat completions requests. Click the copy icon next to it (Copy endpoint) to copy it. The hint under the endpoint shows the base URL. Use the base URL, https://ai.sinarcloud.com/v1, not the full endpoint, when you set up an OpenAI SDK or another API client.
Create API key, beside API endpoint, opens the same dialog as the button above your key list. See Create an API key.
Quick start (cURL) shows a sample cURL request for a chat model. Click the copy icon next to it (Copy cURL) to copy it.
To try a key with the sample:
1
Copy the sample
Under Quick start (cURL), click the copy icon.
2
Add your key
Paste the request into a text editor and replace YOUR_API_KEY with one of your keys. To call a different model, replace the model alias in the request with one from the model catalog.
3
Run it
Run the request in a terminal. The response contains the model’s reply.
The sample sends a real model request, so it’s charged like any other request. If it fails with HTTP 404 and the error code model_not_found, the model in the sample isn’t available. Replace its alias with one from the model catalog and try again.
On the API Keys page, click Create API key. There’s one beside API endpoint in the quick start and one above your key list.
2
Name the key
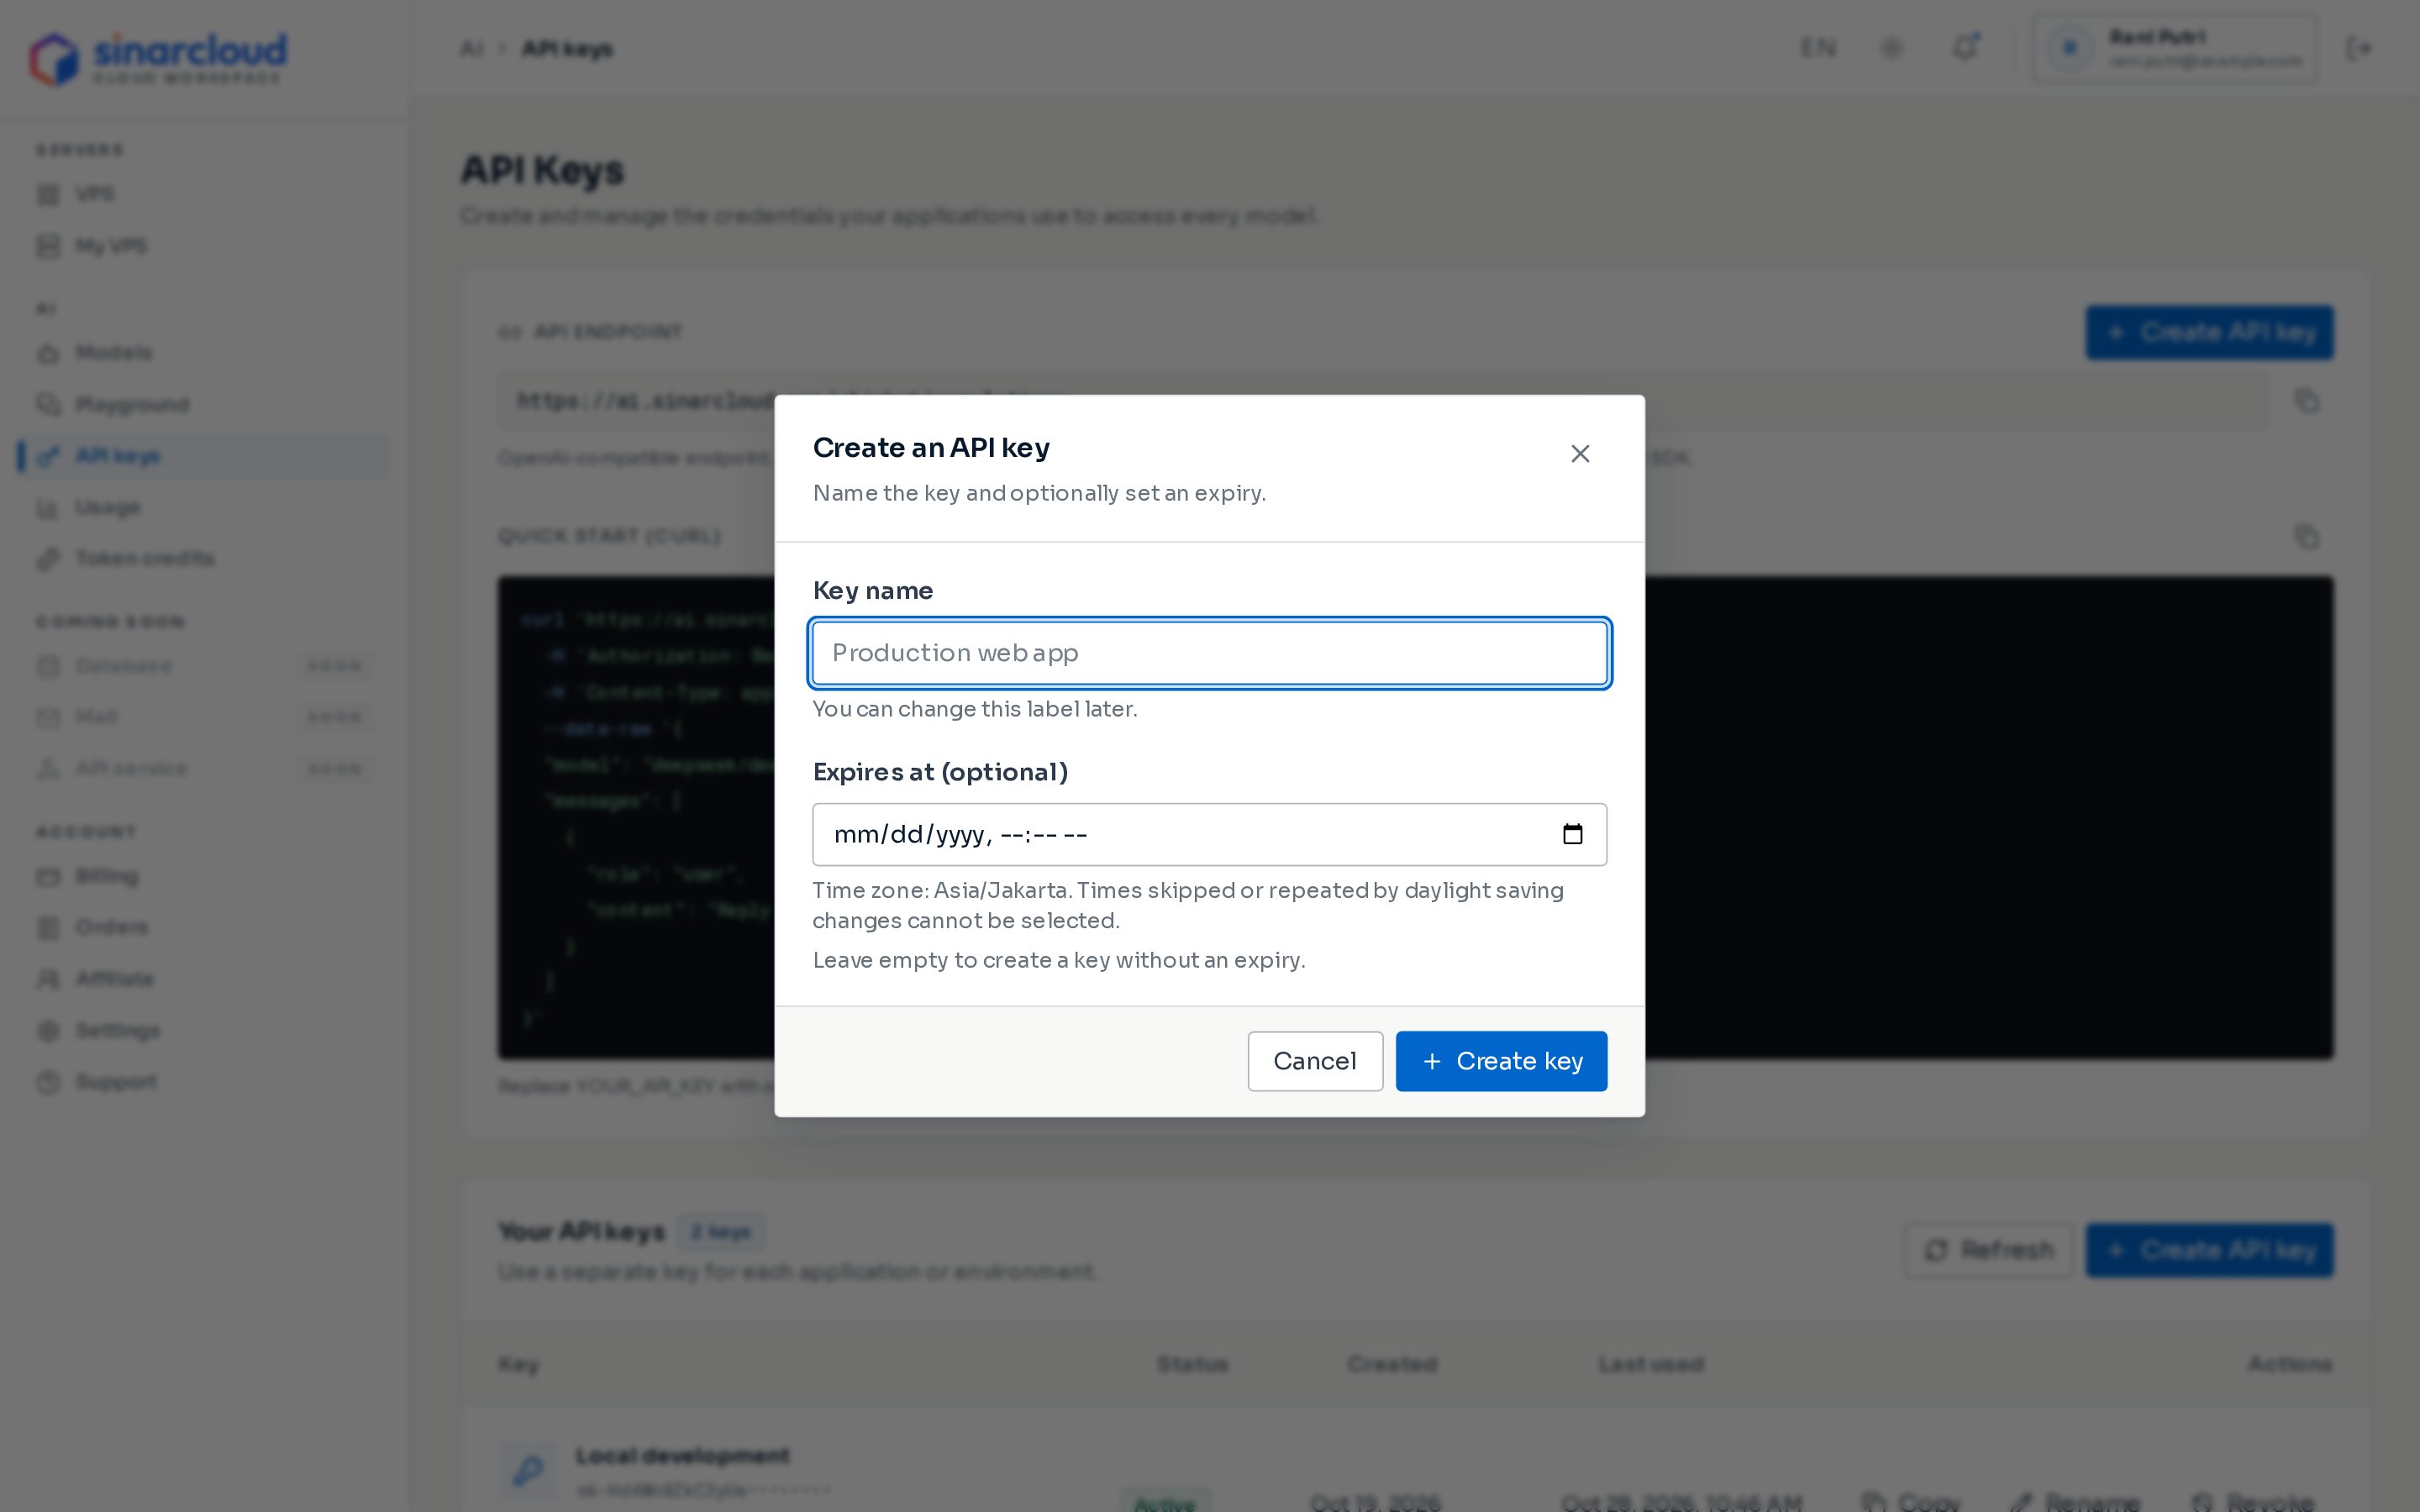
Enter a Key name, such as the app and environment that will use it. Names can be up to 120 characters, and you can change them later.
The Create an API key dialog
3
Set an expiry (optional)
In Expires at (optional), pick a date and time in the future. The time uses the time zone shown under the field, which is the Time Zone in your account settings. Leave the field empty to create a key that never expires.
4
Copy the key
Click Create key. The Your key is ready dialog shows the full key under New secret key. Click Copy secret, store the key somewhere safe, and then click Done.If you close the dialog before copying, you can still copy the key later. See Copy a key again.
Keep your key private. Anyone who has it can send requests that you pay for.
You can copy the full key of an Active key at any time. Click Copy on its row, and the console puts the key on your clipboard.Copy is unavailable for expired and revoked keys. If a key shows Create a new key to enable copying., the console can’t retrieve that key. Create a new key and use it instead.
Your application sends the key in the Authorization header as a bearer token. Keep the key in an environment variable instead of in your code.The base URL is https://ai.sinarcloud.com/v1.
Copy endpoint on the API Keys page copies the full chat completions URL, not the base URL. OpenAI SDKs add /chat/completions themselves, so give them https://ai.sinarcloud.com/v1.
export SINARCLOUD_API_KEY="paste-your-api-key"
Listing models is a quick way to check that a key works, and it isn’t charged:
import osfrom openai import OpenAIclient = OpenAI( base_url="https://ai.sinarcloud.com/v1", api_key=os.environ["SINARCLOUD_API_KEY"],)for model in client.models.list(): print(model.id)
import OpenAI from "openai";const client = new OpenAI({ baseURL: "https://ai.sinarcloud.com/v1", apiKey: process.env.SINARCLOUD_API_KEY,});const models = await client.models.list();for (const model of models.data) console.log(model.id);
The Node.js example uses import and top-level await. Save it as index.mjs, or set "type": "module" in your package.json.To send model requests, see Send requests. In the Playground, you choose one of your active keys, and its requests are billed like any other request.
Click Rename on the key’s row, edit the Key name, and click Save name. Renaming changes only the label. The key itself stays the same, so your applications keep working.
Click Revoke on the key’s row. In the Revoke this API key? dialog, click Revoke key, or click Keep key to cancel.Revoking takes effect immediately. SinarCloud checks the key on every request, so the next request that uses it fails with HTTP 401 and the error code invalid_api_key. You can’t undo a revocation. The key stays in your list with the status Revoked, and you can’t copy it again.
Click Refresh and check that Last used on the new key shows a recent time. The time can lag by up to a minute. A recent time shows that your application is sending the new key, not that every request succeeds.
Check the key’s status on the API Keys page. Expired and revoked keys can’t make requests. Also check that the request sends exactly one Authorization header in the form Bearer followed by a space and the key, with no extra spaces or line breaks copied along with the key. If you’re running the quick-start sample, check that you replaced YOUR_API_KEY with your key. If the key is Active and the header is correct, contact support.
A key says it is still being provisioned
If a key’s row says This API key is still being provisioned., the key can’t make requests. Requests with it fail with HTTP 503 and the error code key_provisioning_pending, and the key doesn’t appear in the Playground’s API key list. The key won’t become usable by itself. Create a new key and use it instead. The pending key may change to Revoked later, and you can ignore it. If new keys also show this message, contact support.
Creating a key fails
The dialog shows Unable to create API key with the reason. Try again. A failed attempt can leave an entry with the status Revoked in your list. That entry can’t make requests, and you can ignore it. To mark it, click Rename and give it a name such as failed - ignore.
The key list doesn't load
If the page shows Unable to load API keys, click Try again. If it shows a Sign in button instead, your session has ended. Sign in again, and the console brings you back to the API Keys page.
The Copy button doesn't work
If the console shows Copy failed, click Refresh and check that the key is still Active. If it is, allow clipboard access for the console in your browser and try again. If a copy icon in the quick start shows Copy failed or a warning icon, allow clipboard access and try again.
{"docsConfig":{"theme":"mint","$schema":"https://mintlify.com/docs.json","name":"SinarCloud","description":"Documentation for SinarCloud: deploy VPS in Southeast Asia, call AI models through one OpenAI-compatible API, and manage your prepaid IDR balance.","colors":{"primary":"#0066CC","light":"#6AAAEB","dark":"#004D99"},"logo":{"light":"https://mintcdn.com/sinar-cloud/B5Imz7vUklgE_ozS/logo/light.svg?fit=max\u0026auto=format\u0026n=B5Imz7vUklgE_ozS\u0026q=85\u0026s=e9d750a5729c82b08c0c002770ca98b0","dark":"https://mintcdn.com/sinar-cloud/B5Imz7vUklgE_ozS/logo/dark.svg?fit=max\u0026auto=format\u0026n=B5Imz7vUklgE_ozS\u0026q=85\u0026s=73748aa26054037a0788d4f33711e8fc","href":"https://sinarcloud.com"},"favicon":"https://mintcdn.com/sinar-cloud/B5Imz7vUklgE_ozS/favicon.svg?fit=max\u0026auto=format\u0026n=B5Imz7vUklgE_ozS\u0026q=85\u0026s=3a8c6e463fff5c4bbd253aa1aa394f3a","navbar":{"links":[{"href":"mailto:support@sinarcloud.com","label":"Support"}],"primary":{"type":"button","label":"Open console","href":"https://console.sinarcloud.com"}},"footer":{"links":[{"header":"SinarCloud","items":[{"label":"Website","href":"https://sinarcloud.com"},{"label":"Console","href":"https://console.sinarcloud.com"},{"label":"VPS pricing","href":"https://sinarcloud.com/vps"}]},{"header":"Help","items":[{"label":"Email support","href":"mailto:support@sinarcloud.com"},{"label":"Legal","href":"https://sinarcloud.com/legal"}]}]},"contextual":{"options":["copy","view","chatgpt","claude","perplexity","mcp","cursor","vscode"],"display":"header"},"styling":{"latex":false},"navigation":{"pages":[]}},"deployment":{"deploymentMetadataValue":{"subdomain":"sinar-cloud","hasAudioNarration":false,"actualSubdomain":"sinar-cloud","customDomains":["docs.sinarcloud.com"],"gitSource":{"type":"github","owner":"mintlify-community","repo":"docs-sinar-cloud-bc5a92e3","deployBranch":"main","contentDirectory":"","isPrivate":true,"mountPath":"","label":""},"chroma":{"latestBuiltDeploymentHistoryId":"6ae76f01039e90b0fea263d5","collectionId":"78c6943e-12ad-464b-8ab6-c16ab533d6c1","liveDeploymentHistoryId":"6ae76f01039e90b0fea263d5","schemaVersion":"v3"},"entitlements":{"AI_CHAT":{"status":"DISABLED"},"WEB_MCP":{"status":"DISABLED"},"NARRATION":{"status":"DISABLED"}},"buildId":"6ae76f01039e90b0fea263d5","clientVersion":"0.0.4054","searchFilterCounts":[{"language":"default","tag":"Guides","count":26},{"language":"default","tag":"AI API","count":9},{"language":"default","tag":"Integrations","count":9},{"language":"default","tag":"VPS","count":6},{"language":"default","tag":"Billing","count":4},{"language":"default","tag":"VS Code","count":4},{"language":"default","tag":"Get started","count":3},{"language":"default","tag":"Start here","count":3},{"language":"default","tag":"Account","count":2},{"language":"default","tag":"Help","count":2}]},"assistantConfig":{"enableAskAiButton":false,"enableStarterQuestions":false,"enableContextualStarterQuestions":false,"enableAskAiSearchBar":true},"basePath":"","hasChatPermissions":false,"hasWebMcpPermissions":false,"toggles":[{"name":"kill-isr","enabled":true,"variant":{"name":"disabled","enabled":false,"feature_enabled":true},"impressionData":false},{"name":"agent-mintlify-slack","enabled":true,"variant":{"name":"disabled","enabled":false,"feature_enabled":true},"impressionData":false},{"name":"agent-integrations-settings","enabled":true,"variant":{"name":"disabled","enabled":false,"feature_enabled":true},"impressionData":false},{"name":"automations-pr-grouping","enabled":true,"variant":{"name":"disabled","enabled":false,"feature_enabled":true},"impressionData":false},{"name":"custom-prefix","enabled":true,"variant":{"name":"disabled","enabled":false,"feature_enabled":true},"impressionData":false},{"name":"analytics-v7","enabled":true,"variant":{"name":"disabled","enabled":false,"feature_enabled":true},"impressionData":false},{"name":"user-flows-analytics","enabled":true,"variant":{"name":"disabled","enabled":false,"feature_enabled":true},"impressionData":false},{"name":"no-publish-flow","enabled":true,"variant":{"name":"disabled","enabled":false,"feature_enabled":true},"impressionData":false},{"name":"workos-onboarding","enabled":true,"variant":{"name":"disabled","enabled":false,"feature_enabled":true},"impressionData":false},{"name":"llms-txt-v2","enabled":true,"variant":{"name":"disabled","enabled":false,"feature_enabled":true},"impressionData":false},{"name":"snapshot-serving-live","enabled":true,"variant":{"name":"disabled","enabled":false,"feature_enabled":true},"impressionData":false},{"name":"stripTemperatureMiddleware","enabled":true,"variant":{"name":"disabled","enabled":false,"feature_enabled":true},"impressionData":false},{"name":"support-platform-pylon-zendesk","enabled":true,"variant":{"name":"disabled","enabled":false,"feature_enabled":true},"impressionData":false},{"name":"snapshot-serving","enabled":true,"variant":{"name":"disabled","enabled":false,"feature_enabled":true},"impressionData":false},{"name":"instant-rollback","enabled":true,"variant":{"name":"disabled","enabled":false,"feature_enabled":true},"impressionData":false},{"name":"granular-notifications-server","enabled":true,"variant":{"name":"disabled","enabled":false,"feature_enabled":true},"impressionData":false},{"name":"granular-notifications","enabled":true,"variant":{"name":"disabled","enabled":false,"feature_enabled":true},"impressionData":false},{"name":"automations-fable","enabled":true,"variant":{"name":"disabled","enabled":false,"feature_enabled":true},"impressionData":false},{"name":"fixed-ai-action-pricing","enabled":true,"variant":{"name":"disabled","enabled":false,"feature_enabled":true},"impressionData":false},{"name":"automation-resolve-merge-conflict","enabled":true,"variant":{"name":"disabled","enabled":false,"feature_enabled":true},"impressionData":false},{"name":"scoped-publishing","enabled":true,"variant":{"name":"disabled","enabled":false,"feature_enabled":true},"impressionData":false},{"name":"mintql","enabled":true,"variant":{"name":"disabled","enabled":false,"feature_enabled":true},"impressionData":false},{"name":"page-level-analytics","enabled":true,"variant":{"name":"disabled","enabled":false,"feature_enabled":true},"impressionData":false},{"name":"editor-version-history-v2","enabled":true,"variant":{"name":"disabled","enabled":false,"feature_enabled":true},"impressionData":false},{"name":"billing-page-v2","enabled":true,"variant":{"name":"disabled","enabled":false,"feature_enabled":true},"impressionData":false},{"name":"full-page-search","enabled":true,"variant":{"name":"disabled","enabled":false,"feature_enabled":true},"impressionData":false},{"name":"workspace-projects","enabled":true,"variant":{"name":"disabled","enabled":false,"feature_enabled":true},"impressionData":false},{"name":"assistant-v5","enabled":true,"variant":{"name":"disabled","enabled":false,"feature_enabled":true},"impressionData":false},{"name":"byok-sep-25","enabled":true,"variant":{"name":"disabled","enabled":false,"feature_enabled":true},"impressionData":false},{"name":"fork-pr-previews","enabled":true,"variant":{"name":"disabled","enabled":false,"feature_enabled":true},"impressionData":false},{"name":"revalidation-jwt","enabled":true,"variant":{"name":"disabled","enabled":false,"feature_enabled":true},"impressionData":false},{"name":"vite-origin","enabled":true,"variant":{"name":"disabled","enabled":false,"feature_enabled":true},"impressionData":false},{"name":"billing-updated-9-15","enabled":true,"variant":{"name":"disabled","enabled":false,"feature_enabled":true},"impressionData":false},{"name":"workos-sso-scim","enabled":true,"variant":{"name":"disabled","enabled":false,"feature_enabled":true},"impressionData":false},{"name":"hobby-abuse-scan","enabled":true,"variant":{"name":"disabled","enabled":false,"feature_enabled":true},"impressionData":false},{"name":"dashboard-inbox","enabled":true,"variant":{"name":"disabled","enabled":false,"feature_enabled":true},"impressionData":false},{"name":"workos-signup","enabled":true,"variant":{"name":"disabled","enabled":false,"feature_enabled":true},"impressionData":false},{"name":"turbopuffer-dual-write","enabled":true,"variant":{"name":"disabled","enabled":false,"feature_enabled":true},"impressionData":false},{"name":"workos-enabled","enabled":true,"variant":{"name":"disabled","enabled":false,"feature_enabled":true},"impressionData":false},{"name":"approve-review-flow","enabled":true,"variant":{"name":"disabled","enabled":false,"feature_enabled":true},"impressionData":false},{"name":"sso-setup-deadline-banner","enabled":true,"variant":{"name":"disabled","enabled":false,"feature_enabled":true},"impressionData":false},{"name":"rbac-expansion","enabled":true,"variant":{"name":"disabled","enabled":false,"feature_enabled":true},"impressionData":false}],"googleFontsInlined":false},"customCss":[],"page":{"pagePath":"ai/api-keys","slug":"/ai/api-keys","pageMetadata":{"title":"API keys","description":"Create, copy, rename, and revoke the API keys your applications use to call the SinarCloud AI API, and try a key with the quick start.","icon":"key","href":"/ai/api-keys"},"description":{"compiledSource":"\"use strict\";\nconst {jsx: _jsx} = arguments[0];\nconst {useMDXComponents: _provideComponents} = arguments[0];\nfunction _createMdxContent(props) {\n const _components = {\n p: \"p\",\n ..._provideComponents(),\n ...props.components\n };\n return _jsx(_components.p, {\n children: \"Create, copy, rename, and revoke the API keys your applications use to call the SinarCloud AI API, and try a key with the quick start.\"\n });\n}\nfunction MDXContent(props = {}) {\n const {wrapper: MDXLayout} = {\n ..._provideComponents(),\n ...props.components\n };\n return MDXLayout ? _jsx(MDXLayout, {\n ...props,\n children: _jsx(_createMdxContent, {\n ...props\n })\n }) : _createMdxContent(props);\n}\nreturn {\n default: MDXContent\n};\n","frontmatter":{},"scope":{}},"pageType":"default","mdx":{"mdxSource":{"compiledSource":"\"use strict\";const{Fragment:_Fragment,jsx:_jsx,jsxs:_jsxs}=arguments[0];const{useMDXComponents:_provideComponents}=arguments[0];function _createMdxContent(props){const _components={a:`a`,code:`code`,li:`li`,ol:`ol`,p:`p`,pre:`pre`,span:`span`,strong:`strong`,tbody:`tbody`,td:`td`,th:`th`,thead:`thead`,tr:`tr`,ul:`ul`,..._provideComponents(),...props.components},{Accordion,AccordionGroup,CodeBlock,CodeGroup,Frame,Heading,Note,OptimizedImage,Step,Steps,Table,Tip,Warning}=_components;if(!Accordion)_missingMdxReference(`Accordion`,true);if(!AccordionGroup)_missingMdxReference(`AccordionGroup`,true);if(!CodeBlock)_missingMdxReference(`CodeBlock`,true);if(!CodeGroup)_missingMdxReference(`CodeGroup`,true);if(!Frame)_missingMdxReference(`Frame`,true);if(!Heading)_missingMdxReference(`Heading`,true);if(!Note)_missingMdxReference(`Note`,true);if(!OptimizedImage)_missingMdxReference(`OptimizedImage`,true);if(!Step)_missingMdxReference(`Step`,true);if(!Steps)_missingMdxReference(`Steps`,true);if(!Table)_missingMdxReference(`Table`,true);if(!Tip)_missingMdxReference(`Tip`,true);if(!Warning)_missingMdxReference(`Warning`,true);return _jsxs(_Fragment,{children:[_jsxs(_components.p,{children:[`API keys let your applications call the SinarCloud AI API. Every request carries a key, and SinarCloud charges the request to your balance or, if you have them for that model, to your `,_jsx(_components.a,{href:`/ai/token-credits`,children:`token credits`}),`. You can see your AI spending on `,_jsx(_components.a,{href:`/ai/usage`,children:`Usage and spending`}),`. You create and manage keys in the console: in the sidebar, under `,_jsx(_components.strong,{children:`AI`}),`, click `,_jsx(_components.strong,{children:`API keys`}),`.`]}),`\n`,_jsxs(_components.p,{children:[`The `,_jsx(_components.strong,{children:`API Keys`}),` page has two parts: a quick start with the API endpoint and a sample request, and below it, `,_jsx(_components.strong,{children:`Your API keys`}),`.`]}),`\n`,_jsx(Frame,{caption:`The API Keys page, with the quick start above your key list`,children:_jsx(OptimizedImage,{src:`https://mintcdn.com/sinar-cloud/ShOrAB8ikH3IKe3Y/images/ai-api-keys.png?fit=max\u0026auto=format\u0026n=ShOrAB8ikH3IKe3Y\u0026q=85\u0026s=120f522a148d183a67e641d660a89697`,alt:`The API Keys page. The quick start shows the API endpoint field with a copy icon and a Create API key button, the hint with the base URL, and a Quick start (cURL) sample request for deepseek/deepseek-v4-1-flash with its own copy icon. Below it, the Your API keys list has Refresh and Create API key buttons and an Active key with Copy, Rename and Revoke actions.`,\"data-og-width\":`2880`,width:`2880`,\"data-og-height\":`1800`,height:`1800`,\"data-path\":`images/ai-api-keys.png`,\"data-optimize\":`true`,\"data-opv\":`3`,srcset:`https://mintcdn.com/sinar-cloud/ShOrAB8ikH3IKe3Y/images/ai-api-keys.png?w=280\u0026fit=max\u0026auto=format\u0026n=ShOrAB8ikH3IKe3Y\u0026q=85\u0026s=762c78aa84ac0b83c9fa162cce98c9de 280w, https://mintcdn.com/sinar-cloud/ShOrAB8ikH3IKe3Y/images/ai-api-keys.png?w=560\u0026fit=max\u0026auto=format\u0026n=ShOrAB8ikH3IKe3Y\u0026q=85\u0026s=1ec771ced275edc8a34448cce5cfa331 560w, https://mintcdn.com/sinar-cloud/ShOrAB8ikH3IKe3Y/images/ai-api-keys.png?w=840\u0026fit=max\u0026auto=format\u0026n=ShOrAB8ikH3IKe3Y\u0026q=85\u0026s=e8088c5a860e1d8e775dd6a223e69f01 840w, https://mintcdn.com/sinar-cloud/ShOrAB8ikH3IKe3Y/images/ai-api-keys.png?w=1100\u0026fit=max\u0026auto=format\u0026n=ShOrAB8ikH3IKe3Y\u0026q=85\u0026s=ca38fe1f91b4545e9a7854f7da45f5b1 1100w, https://mintcdn.com/sinar-cloud/ShOrAB8ikH3IKe3Y/images/ai-api-keys.png?w=1650\u0026fit=max\u0026auto=format\u0026n=ShOrAB8ikH3IKe3Y\u0026q=85\u0026s=487ea97128528cd4a5ba277cc5922cf3 1650w, https://mintcdn.com/sinar-cloud/ShOrAB8ikH3IKe3Y/images/ai-api-keys.png?w=2500\u0026fit=max\u0026auto=format\u0026n=ShOrAB8ikH3IKe3Y\u0026q=85\u0026s=44d2e6dd40a00093944959d773d14df8 2500w`})}),`\n`,_jsx(Heading,{level:`2`,id:`your-api-keys`,children:`Your API keys`}),`\n`,_jsx(Frame,{caption:`Your API keys, below the quick start`,children:_jsx(OptimizedImage,{src:`https://mintcdn.com/sinar-cloud/ShOrAB8ikH3IKe3Y/images/ai-api-keys-list.png?fit=max\u0026auto=format\u0026n=ShOrAB8ikH3IKe3Y\u0026q=85\u0026s=485f41be9c2f3561f06d7acf80adde1d`,alt:`The end of the Quick start (cURL) sample, followed by the Your API keys list with the number of keys, Refresh and Create API key buttons, and Key, Status, Created, Last used and Actions columns. Each key shows its name, the first characters of the key followed by dots, the scopes api:read and api:write, No expiry, the Active status, and Copy, Rename and Revoke actions.`,\"data-og-width\":`2880`,width:`2880`,\"data-og-height\":`1800`,height:`1800`,\"data-path\":`images/ai-api-keys-list.png`,\"data-optimize\":`true`,\"data-opv\":`3`,srcset:`https://mintcdn.com/sinar-cloud/ShOrAB8ikH3IKe3Y/images/ai-api-keys-list.png?w=280\u0026fit=max\u0026auto=format\u0026n=ShOrAB8ikH3IKe3Y\u0026q=85\u0026s=cccb067fb93f85eeab49dfcafe51ee6d 280w, https://mintcdn.com/sinar-cloud/ShOrAB8ikH3IKe3Y/images/ai-api-keys-list.png?w=560\u0026fit=max\u0026auto=format\u0026n=ShOrAB8ikH3IKe3Y\u0026q=85\u0026s=adc7e9a56b29f40fa2b038b5293c0b15 560w, https://mintcdn.com/sinar-cloud/ShOrAB8ikH3IKe3Y/images/ai-api-keys-list.png?w=840\u0026fit=max\u0026auto=format\u0026n=ShOrAB8ikH3IKe3Y\u0026q=85\u0026s=6345d3235a487b8d269be05bbde39d03 840w, https://mintcdn.com/sinar-cloud/ShOrAB8ikH3IKe3Y/images/ai-api-keys-list.png?w=1100\u0026fit=max\u0026auto=format\u0026n=ShOrAB8ikH3IKe3Y\u0026q=85\u0026s=bc0e5747e6180b0e67686ba23535ea2c 1100w, https://mintcdn.com/sinar-cloud/ShOrAB8ikH3IKe3Y/images/ai-api-keys-list.png?w=1650\u0026fit=max\u0026auto=format\u0026n=ShOrAB8ikH3IKe3Y\u0026q=85\u0026s=cb99e0819ef4b747c1d655e74b70a094 1650w, https://mintcdn.com/sinar-cloud/ShOrAB8ikH3IKe3Y/images/ai-api-keys-list.png?w=2500\u0026fit=max\u0026auto=format\u0026n=ShOrAB8ikH3IKe3Y\u0026q=85\u0026s=d0686e853f748035f0a40e26529a7e54 2500w`})}),`\n`,_jsxs(_components.p,{children:[`Each row in `,_jsx(_components.strong,{children:`Your API keys`}),` shows:`]}),`\n`,_jsxs(_components.ul,{children:[`\n`,_jsx(_components.li,{children:`The key name and the first few characters of the key, followed by dots. The list never shows the full key.`}),`\n`,_jsxs(_components.li,{children:[`The key’s scopes, `,_jsx(_components.code,{children:`api:read`}),` and `,_jsx(_components.code,{children:`api:write`}),`, separated by a dot. Every key you create in the console has both: `,_jsx(_components.code,{children:`api:read`}),` lets it list models, and `,_jsx(_components.code,{children:`api:write`}),` lets it send requests to models. You can’t choose scopes in the console.`]}),`\n`,_jsxs(_components.li,{children:[_jsx(_components.strong,{children:`Expires`}),` with a date, or `,_jsx(_components.strong,{children:`No expiry`}),`.`]}),`\n`,_jsxs(_components.li,{children:[_jsx(_components.strong,{children:`Status`}),`, `,_jsx(_components.strong,{children:`Created`}),`, and `,_jsx(_components.strong,{children:`Last used`}),`. A key that has never made a request shows `,_jsx(_components.strong,{children:`Never used`}),`.`]}),`\n`]}),`\n`,_jsxs(_components.p,{children:[`The list also keeps your revoked keys, so you have a record of them. If you don’t have any keys yet, the list shows `,_jsx(_components.strong,{children:`No API keys yet`}),` with a `,_jsx(_components.strong,{children:`Create API key`}),` button. The list doesn’t update by itself while the page is open. Click `,_jsx(_components.strong,{children:`Refresh`}),` to reload it.`]}),`\n`,_jsx(Heading,{level:`2`,id:`try-the-api-with-the-quick-start`,children:`Try the API with the quick start`}),`\n`,_jsx(_components.p,{children:`The quick start at the top of the page helps you send a first request with a new key. It’s always there, whether or not you have keys.`}),`\n`,_jsxs(_components.ul,{children:[`\n`,_jsxs(_components.li,{children:[_jsx(_components.strong,{children:`API endpoint`}),` shows the full URL for chat completions requests. Click the copy icon next to it (`,_jsx(_components.strong,{children:`Copy endpoint`}),`) to copy it. The hint under the endpoint shows the base URL. Use the base URL, `,_jsx(_components.code,{children:`https://ai.sinarcloud.com/v1`}),`, not the full endpoint, when you set up an OpenAI SDK or another API client.`]}),`\n`,_jsxs(_components.li,{children:[_jsx(_components.strong,{children:`Create API key`}),`, beside `,_jsx(_components.strong,{children:`API endpoint`}),`, opens the same dialog as the button above your key list. See `,_jsx(_components.a,{href:`#create-an-api-key`,children:`Create an API key`}),`.`]}),`\n`,_jsxs(_components.li,{children:[_jsx(_components.strong,{children:`Quick start (cURL)`}),` shows a sample cURL request for a chat model. Click the copy icon next to it (`,_jsx(_components.strong,{children:`Copy cURL`}),`) to copy it.`]}),`\n`]}),`\n`,_jsx(_components.p,{children:`To try a key with the sample:`}),`\n`,_jsxs(Steps,{children:[_jsx(Step,{title:`Copy the sample`,children:_jsxs(_components.p,{children:[`Under `,_jsx(_components.strong,{children:`Quick start (cURL)`}),`, click the copy icon.`]})}),_jsx(Step,{title:`Add your key`,children:_jsxs(_components.p,{children:[`Paste the request into a text editor and replace `,_jsx(_components.code,{children:`YOUR_API_KEY`}),` with one of your keys. To call a different model, replace the model alias in the request with one from the `,_jsx(_components.a,{href:`/ai/models`,children:`model catalog`}),`.`]})}),_jsx(Step,{title:`Run it`,children:_jsx(_components.p,{children:`Run the request in a terminal. The response contains the model’s reply.`})})]}),`\n`,_jsx(Note,{children:_jsxs(_components.p,{children:[`The sample sends a real model request, so it’s charged like any other request. If it fails with HTTP `,_jsx(_components.code,{children:`404`}),` and the error code `,_jsx(_components.code,{children:`model_not_found`}),`, the model in the sample isn’t available. Replace its alias with one from the `,_jsx(_components.a,{href:`/ai/models`,children:`model catalog`}),` and try again.`]})}),`\n`,_jsx(Heading,{level:`2`,id:`create-an-api-key`,children:`Create an API key`}),`\n`,_jsxs(Steps,{children:[_jsx(Step,{title:`Open the create dialog`,children:_jsxs(_components.p,{children:[`On the `,_jsx(_components.strong,{children:`API Keys`}),` page, click `,_jsx(_components.strong,{children:`Create API key`}),`. There’s one beside `,_jsx(_components.strong,{children:`API endpoint`}),` in the quick start and one above your key list.`]})}),_jsxs(Step,{title:`Name the key`,children:[_jsxs(_components.p,{children:[`Enter a `,_jsx(_components.strong,{children:`Key name`}),`, such as the app and environment that will use it. Names can be up to 120 characters, and you can change them later.`]}),_jsx(Frame,{caption:`The Create an API key dialog`,children:_jsx(OptimizedImage,{src:`https://mintcdn.com/sinar-cloud/ShOrAB8ikH3IKe3Y/images/ai-api-key-create.png?fit=max\u0026auto=format\u0026n=ShOrAB8ikH3IKe3Y\u0026q=85\u0026s=5856c63de285ff4a1b440fae4c588b91`,alt:`The Create an API key dialog with a Key name field and an Expires at (optional) date and time field, with a time zone hint under it. Cancel and Create key buttons are at the bottom.`,\"data-og-width\":`2880`,width:`2880`,\"data-og-height\":`1800`,height:`1800`,\"data-path\":`images/ai-api-key-create.png`,\"data-optimize\":`true`,\"data-opv\":`3`,srcset:`https://mintcdn.com/sinar-cloud/ShOrAB8ikH3IKe3Y/images/ai-api-key-create.png?w=280\u0026fit=max\u0026auto=format\u0026n=ShOrAB8ikH3IKe3Y\u0026q=85\u0026s=28057a1dc74d01a08a70681627737337 280w, https://mintcdn.com/sinar-cloud/ShOrAB8ikH3IKe3Y/images/ai-api-key-create.png?w=560\u0026fit=max\u0026auto=format\u0026n=ShOrAB8ikH3IKe3Y\u0026q=85\u0026s=fe1752349432a75289e1c220181b7921 560w, https://mintcdn.com/sinar-cloud/ShOrAB8ikH3IKe3Y/images/ai-api-key-create.png?w=840\u0026fit=max\u0026auto=format\u0026n=ShOrAB8ikH3IKe3Y\u0026q=85\u0026s=4e36702061ab55a306bc0190b39f31e9 840w, https://mintcdn.com/sinar-cloud/ShOrAB8ikH3IKe3Y/images/ai-api-key-create.png?w=1100\u0026fit=max\u0026auto=format\u0026n=ShOrAB8ikH3IKe3Y\u0026q=85\u0026s=162531712f5e1b0efbbcf9762191b585 1100w, https://mintcdn.com/sinar-cloud/ShOrAB8ikH3IKe3Y/images/ai-api-key-create.png?w=1650\u0026fit=max\u0026auto=format\u0026n=ShOrAB8ikH3IKe3Y\u0026q=85\u0026s=d55812e9d225c23960c4cb65b999b849 1650w, https://mintcdn.com/sinar-cloud/ShOrAB8ikH3IKe3Y/images/ai-api-key-create.png?w=2500\u0026fit=max\u0026auto=format\u0026n=ShOrAB8ikH3IKe3Y\u0026q=85\u0026s=399cfcccc60b6c4c66dba0548da9b904 2500w`})})]}),_jsx(Step,{title:`Set an expiry (optional)`,children:_jsxs(_components.p,{children:[`In `,_jsx(_components.strong,{children:`Expires at (optional)`}),`, pick a date and time in the future. The time uses the time zone shown under the field, which is the `,_jsx(_components.strong,{children:`Time Zone`}),` in your `,_jsx(_components.a,{href:`/account/settings`,children:`account settings`}),`. Leave the field empty to create a key that never expires.`]})}),_jsxs(Step,{title:`Copy the key`,children:[_jsxs(_components.p,{children:[`Click `,_jsx(_components.strong,{children:`Create key`}),`. The `,_jsx(_components.strong,{children:`Your key is ready`}),` dialog shows the full key under `,_jsx(_components.strong,{children:`New secret key`}),`. Click `,_jsx(_components.strong,{children:`Copy secret`}),`, store the key somewhere safe, and then click `,_jsx(_components.strong,{children:`Done`}),`.`]}),_jsxs(_components.p,{children:[`If you close the dialog before copying, you can still copy the key later. See `,_jsx(_components.a,{href:`#copy-a-key-again`,children:`Copy a key again`}),`.`]})]})]}),`\n`,_jsx(Warning,{children:_jsx(_components.p,{children:`Keep your key private. Anyone who has it can send requests that you pay for.`})}),`\n`,_jsx(Heading,{level:`2`,id:`copy-a-key-again`,children:`Copy a key again`}),`\n`,_jsxs(_components.p,{children:[`You can copy the full key of an `,_jsx(_components.strong,{children:`Active`}),` key at any time. Click `,_jsx(_components.strong,{children:`Copy`}),` on its row, and the console puts the key on your clipboard.`]}),`\n`,_jsxs(_components.p,{children:[_jsx(_components.strong,{children:`Copy`}),` is unavailable for expired and revoked keys. If a key shows `,_jsx(_components.strong,{children:`Create a new key to enable copying.`}),`, the console can’t retrieve that key. Create a new key and use it instead.`]}),`\n`,_jsx(Heading,{level:`2`,id:`use-your-key`,children:`Use your key`}),`\n`,_jsxs(_components.p,{children:[`Your application sends the key in the `,_jsx(_components.code,{children:`Authorization`}),` header as a bearer token. Keep the key in an environment variable instead of in your code.`]}),`\n`,_jsxs(_components.p,{children:[`The base URL is `,_jsx(_components.code,{children:`https://ai.sinarcloud.com/v1`}),`.`]}),`\n`,_jsx(Tip,{children:_jsxs(_components.p,{children:[_jsx(_components.strong,{children:`Copy endpoint`}),` on the `,_jsx(_components.strong,{children:`API Keys`}),` page copies the full chat completions URL, not the base URL. OpenAI SDKs add `,_jsx(_components.code,{children:`/chat/completions`}),` themselves, so give them `,_jsx(_components.code,{children:`https://ai.sinarcloud.com/v1`}),`.`]})}),`\n`,_jsx(CodeBlock,{filename:``,numberOfLines:`1`,language:`shellscript`,children:_jsx(_components.pre,{className:`shiki shiki-themes github-light-default dark-plus`,style:{backgroundColor:`#ffffff`,\"--shiki-dark-bg\":`#0B0C0E`,color:`#1f2328`,\"--shiki-dark\":`#D4D4D4`},language:`shellscript`,children:_jsxs(_components.code,{language:`shellscript`,numberOfLines:`1`,children:[_jsxs(_components.span,{className:`line`,children:[_jsx(_components.span,{style:{color:`#CF222E`,\"--shiki-dark\":`#569CD6`},children:`export`}),_jsx(_components.span,{style:{color:`#1F2328`,\"--shiki-dark\":`#9CDCFE`},children:` SINARCLOUD_API_KEY`}),_jsx(_components.span,{style:{color:`#CF222E`,\"--shiki-dark\":`#D4D4D4`},children:`=`}),_jsx(_components.span,{style:{color:`#0A3069`,\"--shiki-dark\":`#CE9178`},children:`\"paste-your-api-key\"`})]}),`\n`]})})}),`\n`,_jsx(_components.p,{children:`Listing models is a quick way to check that a key works, and it isn’t charged:`}),`\n`,_jsxs(CodeGroup,{children:[_jsx(CodeBlock,{filename:`cURL`,numberOfLines:`2`,language:`shellscript`,children:_jsx(_components.pre,{className:`shiki shiki-themes github-light-default dark-plus`,style:{backgroundColor:`#ffffff`,\"--shiki-dark-bg\":`#0B0C0E`,color:`#1f2328`,\"--shiki-dark\":`#D4D4D4`},language:`shellscript`,children:_jsxs(_components.code,{language:`shellscript`,numberOfLines:`2`,children:[_jsxs(_components.span,{className:`line`,children:[_jsx(_components.span,{style:{color:`#953800`,\"--shiki-dark\":`#DCDCAA`},children:`curl`}),_jsx(_components.span,{style:{color:`#0A3069`,\"--shiki-dark\":`#CE9178`},children:` \"https://ai.sinarcloud.com/v1/models\"`}),_jsx(_components.span,{style:{color:`#CF222E`,\"--shiki-dark\":`#D7BA7D`},children:` \\\\`})]}),`\n`,_jsxs(_components.span,{className:`line`,children:[_jsx(_components.span,{style:{color:`#0550AE`,\"--shiki-dark\":`#569CD6`},children:` -H`}),_jsx(_components.span,{style:{color:`#0A3069`,\"--shiki-dark\":`#CE9178`},children:` \"Authorization: Bearer `}),_jsx(_components.span,{style:{color:`#1F2328`,\"--shiki-dark\":`#9CDCFE`},children:`$SINARCLOUD_API_KEY`}),_jsx(_components.span,{style:{color:`#0A3069`,\"--shiki-dark\":`#CE9178`},children:`\"`})]}),`\n`]})})}),_jsx(CodeBlock,{filename:`Python`,numberOfLines:`10`,language:`python`,children:_jsx(_components.pre,{className:`shiki shiki-themes github-light-default dark-plus`,style:{backgroundColor:`#ffffff`,\"--shiki-dark-bg\":`#0B0C0E`,color:`#1f2328`,\"--shiki-dark\":`#D4D4D4`},language:`python`,children:_jsxs(_components.code,{language:`python`,numberOfLines:`10`,children:[_jsxs(_components.span,{className:`line`,children:[_jsx(_components.span,{style:{color:`#CF222E`,\"--shiki-dark\":`#C586C0`},children:`import`}),_jsx(_components.span,{style:{color:`#1F2328`,\"--shiki-dark\":`#D4D4D4`},children:` os`})]}),`\n`,_jsxs(_components.span,{className:`line`,children:[_jsx(_components.span,{style:{color:`#CF222E`,\"--shiki-dark\":`#C586C0`},children:`from`}),_jsx(_components.span,{style:{color:`#1F2328`,\"--shiki-dark\":`#D4D4D4`},children:` openai `}),_jsx(_components.span,{style:{color:`#CF222E`,\"--shiki-dark\":`#C586C0`},children:`import`}),_jsx(_components.span,{style:{color:`#1F2328`,\"--shiki-dark\":`#D4D4D4`},children:` OpenAI`})]}),`\n`,_jsx(_components.span,{className:`line`}),`\n`,_jsxs(_components.span,{className:`line`,children:[_jsx(_components.span,{style:{color:`#1F2328`,\"--shiki-dark\":`#D4D4D4`},children:`client `}),_jsx(_components.span,{style:{color:`#CF222E`,\"--shiki-dark\":`#D4D4D4`},children:`=`}),_jsx(_components.span,{style:{color:`#1F2328`,\"--shiki-dark\":`#D4D4D4`},children:` OpenAI(`})]}),`\n`,_jsxs(_components.span,{className:`line`,children:[_jsx(_components.span,{style:{color:`#953800`,\"--shiki-dark\":`#9CDCFE`},children:` base_url`}),_jsx(_components.span,{style:{color:`#CF222E`,\"--shiki-dark\":`#D4D4D4`},children:`=`}),_jsx(_components.span,{style:{color:`#0A3069`,\"--shiki-dark\":`#CE9178`},children:`\"https://ai.sinarcloud.com/v1\"`}),_jsx(_components.span,{style:{color:`#1F2328`,\"--shiki-dark\":`#D4D4D4`},children:`,`})]}),`\n`,_jsxs(_components.span,{className:`line`,children:[_jsx(_components.span,{style:{color:`#953800`,\"--shiki-dark\":`#9CDCFE`},children:` api_key`}),_jsx(_components.span,{style:{color:`#CF222E`,\"--shiki-dark\":`#D4D4D4`},children:`=`}),_jsx(_components.span,{style:{color:`#1F2328`,\"--shiki-dark\":`#D4D4D4`},children:`os.environ[`}),_jsx(_components.span,{style:{color:`#0A3069`,\"--shiki-dark\":`#CE9178`},children:`\"SINARCLOUD_API_KEY\"`}),_jsx(_components.span,{style:{color:`#1F2328`,\"--shiki-dark\":`#D4D4D4`},children:`],`})]}),`\n`,_jsx(_components.span,{className:`line`,children:_jsx(_components.span,{style:{color:`#1F2328`,\"--shiki-dark\":`#D4D4D4`},children:`)`})}),`\n`,_jsx(_components.span,{className:`line`}),`\n`,_jsxs(_components.span,{className:`line`,children:[_jsx(_components.span,{style:{color:`#CF222E`,\"--shiki-dark\":`#C586C0`},children:`for`}),_jsx(_components.span,{style:{color:`#1F2328`,\"--shiki-dark\":`#D4D4D4`},children:` model `}),_jsx(_components.span,{style:{color:`#CF222E`,\"--shiki-dark\":`#C586C0`},children:`in`}),_jsx(_components.span,{style:{color:`#1F2328`,\"--shiki-dark\":`#D4D4D4`},children:` client.models.list():`})]}),`\n`,_jsxs(_components.span,{className:`line`,children:[_jsx(_components.span,{style:{color:`#0550AE`,\"--shiki-dark\":`#DCDCAA`},children:` print`}),_jsx(_components.span,{style:{color:`#1F2328`,\"--shiki-dark\":`#D4D4D4`},children:`(model.id)`})]}),`\n`]})})}),_jsx(CodeBlock,{filename:`Node.js`,numberOfLines:`9`,language:`javascript`,children:_jsx(_components.pre,{className:`shiki shiki-themes github-light-default dark-plus`,style:{backgroundColor:`#ffffff`,\"--shiki-dark-bg\":`#0B0C0E`,color:`#1f2328`,\"--shiki-dark\":`#D4D4D4`},language:`javascript`,children:_jsxs(_components.code,{language:`javascript`,numberOfLines:`9`,children:[_jsxs(_components.span,{className:`line`,children:[_jsx(_components.span,{style:{color:`#CF222E`,\"--shiki-dark\":`#C586C0`},children:`import`}),_jsx(_components.span,{style:{color:`#1F2328`,\"--shiki-dark\":`#9CDCFE`},children:` OpenAI`}),_jsx(_components.span,{style:{color:`#CF222E`,\"--shiki-dark\":`#C586C0`},children:` from`}),_jsx(_components.span,{style:{color:`#0A3069`,\"--shiki-dark\":`#CE9178`},children:` \"openai\"`}),_jsx(_components.span,{style:{color:`#1F2328`,\"--shiki-dark\":`#D4D4D4`},children:`;`})]}),`\n`,_jsx(_components.span,{className:`line`}),`\n`,_jsxs(_components.span,{className:`line`,children:[_jsx(_components.span,{style:{color:`#CF222E`,\"--shiki-dark\":`#569CD6`},children:`const`}),_jsx(_components.span,{style:{color:`#0550AE`,\"--shiki-dark\":`#4FC1FF`},children:` client`}),_jsx(_components.span,{style:{color:`#CF222E`,\"--shiki-dark\":`#D4D4D4`},children:` =`}),_jsx(_components.span,{style:{color:`#CF222E`,\"--shiki-dark\":`#569CD6`},children:` new`}),_jsx(_components.span,{style:{color:`#8250DF`,\"--shiki-dark\":`#DCDCAA`},children:` OpenAI`}),_jsx(_components.span,{style:{color:`#1F2328`,\"--shiki-dark\":`#D4D4D4`},children:`({`})]}),`\n`,_jsxs(_components.span,{className:`line`,children:[_jsx(_components.span,{style:{color:`#1F2328`,\"--shiki-dark\":`#9CDCFE`},children:` baseURL:`}),_jsx(_components.span,{style:{color:`#0A3069`,\"--shiki-dark\":`#CE9178`},children:` \"https://ai.sinarcloud.com/v1\"`}),_jsx(_components.span,{style:{color:`#1F2328`,\"--shiki-dark\":`#D4D4D4`},children:`,`})]}),`\n`,_jsxs(_components.span,{className:`line`,children:[_jsx(_components.span,{style:{color:`#1F2328`,\"--shiki-dark\":`#9CDCFE`},children:` apiKey:`}),_jsx(_components.span,{style:{color:`#1F2328`,\"--shiki-dark\":`#9CDCFE`},children:` process`}),_jsx(_components.span,{style:{color:`#1F2328`,\"--shiki-dark\":`#D4D4D4`},children:`.`}),_jsx(_components.span,{style:{color:`#1F2328`,\"--shiki-dark\":`#9CDCFE`},children:`env`}),_jsx(_components.span,{style:{color:`#1F2328`,\"--shiki-dark\":`#D4D4D4`},children:`.`}),_jsx(_components.span,{style:{color:`#0550AE`,\"--shiki-dark\":`#4FC1FF`},children:`SINARCLOUD_API_KEY`}),_jsx(_components.span,{style:{color:`#1F2328`,\"--shiki-dark\":`#D4D4D4`},children:`,`})]}),`\n`,_jsx(_components.span,{className:`line`,children:_jsx(_components.span,{style:{color:`#1F2328`,\"--shiki-dark\":`#D4D4D4`},children:`});`})}),`\n`,_jsx(_components.span,{className:`line`}),`\n`,_jsxs(_components.span,{className:`line`,children:[_jsx(_components.span,{style:{color:`#CF222E`,\"--shiki-dark\":`#569CD6`},children:`const`}),_jsx(_components.span,{style:{color:`#0550AE`,\"--shiki-dark\":`#4FC1FF`},children:` models`}),_jsx(_components.span,{style:{color:`#CF222E`,\"--shiki-dark\":`#D4D4D4`},children:` =`}),_jsx(_components.span,{style:{color:`#CF222E`,\"--shiki-dark\":`#C586C0`},children:` await`}),_jsx(_components.span,{style:{color:`#1F2328`,\"--shiki-dark\":`#9CDCFE`},children:` client`}),_jsx(_components.span,{style:{color:`#1F2328`,\"--shiki-dark\":`#D4D4D4`},children:`.`}),_jsx(_components.span,{style:{color:`#1F2328`,\"--shiki-dark\":`#9CDCFE`},children:`models`}),_jsx(_components.span,{style:{color:`#1F2328`,\"--shiki-dark\":`#D4D4D4`},children:`.`}),_jsx(_components.span,{style:{color:`#8250DF`,\"--shiki-dark\":`#DCDCAA`},children:`list`}),_jsx(_components.span,{style:{color:`#1F2328`,\"--shiki-dark\":`#D4D4D4`},children:`();`})]}),`\n`,_jsxs(_components.span,{className:`line`,children:[_jsx(_components.span,{style:{color:`#CF222E`,\"--shiki-dark\":`#C586C0`},children:`for`}),_jsx(_components.span,{style:{color:`#1F2328`,\"--shiki-dark\":`#D4D4D4`},children:` (`}),_jsx(_components.span,{style:{color:`#CF222E`,\"--shiki-dark\":`#569CD6`},children:`const`}),_jsx(_components.span,{style:{color:`#0550AE`,\"--shiki-dark\":`#4FC1FF`},children:` model`}),_jsx(_components.span,{style:{color:`#CF222E`,\"--shiki-dark\":`#569CD6`},children:` of`}),_jsx(_components.span,{style:{color:`#1F2328`,\"--shiki-dark\":`#9CDCFE`},children:` models`}),_jsx(_components.span,{style:{color:`#1F2328`,\"--shiki-dark\":`#D4D4D4`},children:`.`}),_jsx(_components.span,{style:{color:`#1F2328`,\"--shiki-dark\":`#9CDCFE`},children:`data`}),_jsx(_components.span,{style:{color:`#1F2328`,\"--shiki-dark\":`#D4D4D4`},children:`) `}),_jsx(_components.span,{style:{color:`#1F2328`,\"--shiki-dark\":`#9CDCFE`},children:`console`}),_jsx(_components.span,{style:{color:`#1F2328`,\"--shiki-dark\":`#D4D4D4`},children:`.`}),_jsx(_components.span,{style:{color:`#8250DF`,\"--shiki-dark\":`#DCDCAA`},children:`log`}),_jsx(_components.span,{style:{color:`#1F2328`,\"--shiki-dark\":`#D4D4D4`},children:`(`}),_jsx(_components.span,{style:{color:`#1F2328`,\"--shiki-dark\":`#9CDCFE`},children:`model`}),_jsx(_components.span,{style:{color:`#1F2328`,\"--shiki-dark\":`#D4D4D4`},children:`.`}),_jsx(_components.span,{style:{color:`#1F2328`,\"--shiki-dark\":`#9CDCFE`},children:`id`}),_jsx(_components.span,{style:{color:`#1F2328`,\"--shiki-dark\":`#D4D4D4`},children:`);`})]}),`\n`]})})})]}),`\n`,_jsxs(_components.p,{children:[`The Node.js example uses `,_jsx(_components.code,{children:`import`}),` and top-level `,_jsx(_components.code,{children:`await`}),`. Save it as `,_jsx(_components.code,{children:`index.mjs`}),`, or set `,_jsx(_components.code,{children:`\"type\": \"module\"`}),` in your `,_jsx(_components.code,{children:`package.json`}),`.`]}),`\n`,_jsxs(_components.p,{children:[`To send model requests, see `,_jsx(_components.a,{href:`/ai/requests`,children:`Send requests`}),`. In the `,_jsx(_components.a,{href:`/ai/playground`,children:`Playground`}),`, you choose one of your active keys, and its requests are billed like any other request.`]}),`\n`,_jsx(Heading,{level:`2`,id:`rename-a-key`,children:`Rename a key`}),`\n`,_jsxs(_components.p,{children:[`Click `,_jsx(_components.strong,{children:`Rename`}),` on the key’s row, edit the `,_jsx(_components.strong,{children:`Key name`}),`, and click `,_jsx(_components.strong,{children:`Save name`}),`. Renaming changes only the label. The key itself stays the same, so your applications keep working.`]}),`\n`,_jsx(Heading,{level:`2`,id:`revoke-a-key`,children:`Revoke a key`}),`\n`,_jsxs(_components.p,{children:[`Click `,_jsx(_components.strong,{children:`Revoke`}),` on the key’s row. In the `,_jsx(_components.strong,{children:`Revoke this API key?`}),` dialog, click `,_jsx(_components.strong,{children:`Revoke key`}),`, or click `,_jsx(_components.strong,{children:`Keep key`}),` to cancel.`]}),`\n`,_jsxs(_components.p,{children:[`Revoking takes effect immediately. SinarCloud checks the key on every request, so the next request that uses it fails with HTTP `,_jsx(_components.code,{children:`401`}),` and the error code `,_jsx(_components.code,{children:`invalid_api_key`}),`. You can’t undo a revocation. The key stays in your list with the status `,_jsx(_components.strong,{children:`Revoked`}),`, and you can’t copy it again.`]}),`\n`,_jsx(Heading,{level:`2`,id:`key-status`,children:`Key status`}),`\n`,_jsxs(Table,{children:[_jsx(_components.thead,{children:_jsxs(_components.tr,{children:[_jsx(_components.th,{children:`Status`}),_jsx(_components.th,{children:`What it means`}),_jsx(_components.th,{children:`Actions available`})]})}),_jsxs(_components.tbody,{children:[_jsxs(_components.tr,{children:[_jsx(_components.td,{children:_jsx(_components.strong,{children:`Active`})}),_jsxs(_components.td,{children:[`The key can make requests, unless its row says `,_jsx(_components.strong,{children:`This API key is still being provisioned.`})]}),_jsxs(_components.td,{children:[_jsx(_components.strong,{children:`Copy`}),`, `,_jsx(_components.strong,{children:`Rename`}),`, `,_jsx(_components.strong,{children:`Revoke`})]})]}),_jsxs(_components.tr,{children:[_jsx(_components.td,{children:_jsx(_components.strong,{children:`Expired`})}),_jsx(_components.td,{children:`The expiry time has passed. Requests with the key fail.`}),_jsxs(_components.td,{children:[_jsx(_components.strong,{children:`Rename`}),`, `,_jsx(_components.strong,{children:`Revoke`})]})]}),_jsxs(_components.tr,{children:[_jsx(_components.td,{children:_jsx(_components.strong,{children:`Revoked`})}),_jsx(_components.td,{children:`The key was revoked, by you or automatically after a failed creation. Requests with the key fail.`}),_jsx(_components.td,{children:_jsx(_components.strong,{children:`Rename`})})]})]})]}),`\n`,_jsx(_components.p,{children:`You can’t change a key’s expiry after you create it. To keep access past the expiry, create a new key before the old one expires.`}),`\n`,_jsx(Heading,{level:`2`,id:`replace-a-key`,children:`Replace a key`}),`\n`,_jsx(_components.p,{children:`To replace a key without downtime:`}),`\n`,_jsxs(_components.ol,{children:[`\n`,_jsx(_components.li,{children:`Create a new key and copy it.`}),`\n`,_jsx(_components.li,{children:`Update your application to use the new key.`}),`\n`,_jsxs(_components.li,{children:[`Click `,_jsx(_components.strong,{children:`Refresh`}),` and check that `,_jsx(_components.strong,{children:`Last used`}),` on the new key shows a recent time. The time can lag by up to a minute. A recent time shows that your application is sending the new key, not that every request succeeds.`]}),`\n`,_jsx(_components.li,{children:`Revoke the old key.`}),`\n`]}),`\n`,_jsx(Heading,{level:`2`,id:`best-practices`,children:`Best practices`}),`\n`,_jsxs(_components.ul,{children:[`\n`,_jsxs(_components.li,{children:[_jsx(_components.strong,{children:`Use a separate key for each application or environment.`}),` You can then revoke one key without affecting the others.`]}),`\n`,_jsxs(_components.li,{children:[_jsx(_components.strong,{children:`Keep keys out of source code.`}),` Load them from environment variables or a secrets manager, and never commit them to a repository.`]}),`\n`,_jsxs(_components.li,{children:[_jsx(_components.strong,{children:`Call the API from your server.`}),` Don’t put keys in browser or mobile app code, where anyone can read them.`]}),`\n`,_jsxs(_components.li,{children:[_jsx(_components.strong,{children:`Set an expiry on temporary keys`}),`, such as keys for tests or short projects.`]}),`\n`,_jsxs(_components.li,{children:[_jsx(_components.strong,{children:`Revoke keys you no longer use.`}),` A key that shows `,_jsx(_components.strong,{children:`Never used`}),` or an old `,_jsx(_components.strong,{children:`Last used`}),` time is a good candidate.`]}),`\n`,_jsxs(_components.li,{children:[_jsx(_components.strong,{children:`If a key leaks, revoke it right away`}),` and create a new one.`]}),`\n`]}),`\n`,_jsx(Heading,{level:`2`,id:`troubleshooting`,children:`Troubleshooting`}),`\n`,_jsxs(AccordionGroup,{children:[_jsx(Accordion,{title:`Requests fail with 401 and invalid_api_key`,id:`requests-fail-with-401-and-invalid-api-key`,children:_jsxs(_components.p,{children:[`Check the key’s status on the `,_jsx(_components.strong,{children:`API Keys`}),` page. Expired and revoked keys can’t make requests. Also check that the request sends exactly one `,_jsx(_components.code,{children:`Authorization`}),` header in the form `,_jsx(_components.code,{children:`Bearer`}),` followed by a space and the key, with no extra spaces or line breaks copied along with the key. If you’re running the quick-start sample, check that you replaced `,_jsx(_components.code,{children:`YOUR_API_KEY`}),` with your key. If the key is `,_jsx(_components.strong,{children:`Active`}),` and the header is correct, `,_jsx(_components.a,{href:`/help/support`,children:`contact support`}),`.`]})}),_jsx(Accordion,{title:`A key says it is still being provisioned`,id:`a-key-says-it-is-still-being-provisioned`,children:_jsxs(_components.p,{children:[`If a key’s row says `,_jsx(_components.strong,{children:`This API key is still being provisioned.`}),`, the key can’t make requests. Requests with it fail with HTTP `,_jsx(_components.code,{children:`503`}),` and the error code `,_jsx(_components.code,{children:`key_provisioning_pending`}),`, and the key doesn’t appear in the Playground’s `,_jsx(_components.strong,{children:`API key`}),` list. The key won’t become usable by itself. Create a new key and use it instead. The pending key may change to `,_jsx(_components.strong,{children:`Revoked`}),` later, and you can ignore it. If new keys also show this message, `,_jsx(_components.a,{href:`/help/support`,children:`contact support`}),`.`]})}),_jsx(Accordion,{title:`Creating a key fails`,id:`creating-a-key-fails`,children:_jsxs(_components.p,{children:[`The dialog shows `,_jsx(_components.strong,{children:`Unable to create API key`}),` with the reason. Try again. A failed attempt can leave an entry with the status `,_jsx(_components.strong,{children:`Revoked`}),` in your list. That entry can’t make requests, and you can ignore it. To mark it, click `,_jsx(_components.strong,{children:`Rename`}),` and give it a name such as `,_jsx(_components.code,{children:`failed - ignore`}),`.`]})}),_jsx(Accordion,{title:`The key list doesn't load`,id:`the-key-list-doesnt-load`,children:_jsxs(_components.p,{children:[`If the page shows `,_jsx(_components.strong,{children:`Unable to load API keys`}),`, click `,_jsx(_components.strong,{children:`Try again`}),`. If it shows a `,_jsx(_components.strong,{children:`Sign in`}),` button instead, your session has ended. Sign in again, and the console brings you back to the `,_jsx(_components.strong,{children:`API Keys`}),` page.`]})}),_jsx(Accordion,{title:`The Copy button doesn't work`,id:`the-copy-button-doesnt-work`,children:_jsxs(_components.p,{children:[`If the console shows `,_jsx(_components.strong,{children:`Copy failed`}),`, click `,_jsx(_components.strong,{children:`Refresh`}),` and check that the key is still `,_jsx(_components.strong,{children:`Active`}),`. If it is, allow clipboard access for the console in your browser and try again. If a copy icon in the quick start shows `,_jsx(_components.strong,{children:`Copy failed`}),` or a warning icon, allow clipboard access and try again.`]})})]})]})}function MDXContent(props={}){const{wrapper:MDXLayout}={..._provideComponents(),...props.components};return MDXLayout?_jsx(MDXLayout,{...props,children:_jsx(_createMdxContent,{...props})}):_createMdxContent(props)}return{default:MDXContent};function _missingMdxReference(id,component){throw new Error(`Expected `+(component?`component`:`object`)+\" `\"+id+\"` to be defined: you likely forgot to import, pass, or provide it.\")}","frontmatter":{},"scope":{"config":{},"pageMetadata":{"title":"API keys","description":"Create, copy, rename, and revoke the API keys your applications use to call the SinarCloud AI API, and try a key with the quick start.","icon":"key","href":"/ai/api-keys"}}},"mdxSourceWithNoJs":null},"mdxExtracts":{"tableOfContents":[{"title":"Your API keys","slug":"your-api-keys","depth":2,"children":[]},{"title":"Try the API with the quick start","slug":"try-the-api-with-the-quick-start","depth":2,"children":[]},{"title":"Create an API key","slug":"create-an-api-key","depth":2,"children":[]},{"title":"Copy a key again","slug":"copy-a-key-again","depth":2,"children":[]},{"title":"Use your key","slug":"use-your-key","depth":2,"children":[]},{"title":"Rename a key","slug":"rename-a-key","depth":2,"children":[]},{"title":"Revoke a key","slug":"revoke-a-key","depth":2,"children":[]},{"title":"Key status","slug":"key-status","depth":2,"children":[]},{"title":"Replace a key","slug":"replace-a-key","depth":2,"children":[]},{"title":"Best practices","slug":"best-practices","depth":2,"children":[]},{"title":"Troubleshooting","slug":"troubleshooting","depth":2,"children":[]}],"codeExamples":{}},"jsLinks":[],"subdomain":"sinar-cloud","siteName":"SinarCloud","title":"API keys - SinarCloud","navMaps":{"firstHrefInVersion":{},"firstHrefInLanguage":{}},"lastModified":"2026-10-31T06:00:24.576Z","originalFileLocation":"ai/api-keys.mdx"},"headHtml":"\u003cscript data-mint-head>(function(){var d=document.documentElement,p=null;if(!p){try{p=localStorage.getItem(\"isDarkMode\")}catch(e){}if(p==='true')p='dark';else if(p==='false')p='light';if(p!=='light'\u0026\u0026p!=='dark'\u0026\u0026p!=='system')p=\"system\"}var r=p==='system'?(matchMedia(\"(prefers-color-scheme: dark)\").matches?'dark':'light'):p;d.classList.remove(r==='dark'?'light':'dark');d.classList.add(r);d.setAttribute(\"data-theme-preference\",p)})();\u003c/script>\u003cmeta data-mint-head name=\"description\" content=\"Create, copy, rename, and revoke the API keys your applications use to call the SinarCloud AI API, and try a key with the quick start.\">\u003cmeta data-mint-head name=\"application-name\" content=\"SinarCloud\">\u003cmeta data-mint-head name=\"generator\" content=\"Mintlify\">\u003clink data-mint-head rel=\"icon\" type=\"image/png\" sizes=\"192x192\" href=\"/mintlify-assets/_mintlify/favicons/sinar-cloud/qYYrDQEL49wjTG-a/_generated/favicon/android-chrome-192x192.png\" media=\"(prefers-color-scheme: light)\">\u003clink data-mint-head rel=\"apple-touch-icon\" type=\"image/png\" sizes=\"180x180\" href=\"/mintlify-assets/_mintlify/favicons/sinar-cloud/qYYrDQEL49wjTG-a/_generated/favicon/apple-touch-icon.png\">\u003clink data-mint-head rel=\"icon\" type=\"image/png\" sizes=\"16x16\" href=\"/mintlify-assets/_mintlify/favicons/sinar-cloud/qYYrDQEL49wjTG-a/_generated/favicon/favicon-16x16.png\" media=\"(prefers-color-scheme: light)\">\u003clink data-mint-head rel=\"icon\" type=\"image/png\" sizes=\"32x32\" href=\"/mintlify-assets/_mintlify/favicons/sinar-cloud/qYYrDQEL49wjTG-a/_generated/favicon/favicon-32x32.png\" media=\"(prefers-color-scheme: light)\">\u003clink data-mint-head rel=\"shortcut icon\" type=\"image/x-icon\" href=\"/mintlify-assets/_mintlify/favicons/sinar-cloud/qYYrDQEL49wjTG-a/_generated/favicon/favicon.ico\" media=\"(prefers-color-scheme: light)\">\u003clink data-mint-head rel=\"icon\" type=\"image/png\" sizes=\"192x192\" href=\"/mintlify-assets/_mintlify/favicons/sinar-cloud/qYYrDQEL49wjTG-a/_generated/favicon-dark/android-chrome-192x192.png\" media=\"(prefers-color-scheme: dark)\">\u003clink data-mint-head rel=\"icon\" type=\"image/png\" sizes=\"16x16\" href=\"/mintlify-assets/_mintlify/favicons/sinar-cloud/qYYrDQEL49wjTG-a/_generated/favicon-dark/favicon-16x16.png\" media=\"(prefers-color-scheme: dark)\">\u003clink data-mint-head rel=\"icon\" type=\"image/png\" sizes=\"32x32\" href=\"/mintlify-assets/_mintlify/favicons/sinar-cloud/qYYrDQEL49wjTG-a/_generated/favicon-dark/favicon-32x32.png\" media=\"(prefers-color-scheme: dark)\">\u003clink data-mint-head rel=\"shortcut icon\" type=\"image/x-icon\" href=\"/mintlify-assets/_mintlify/favicons/sinar-cloud/qYYrDQEL49wjTG-a/_generated/favicon-dark/favicon.ico\" media=\"(prefers-color-scheme: dark)\">\u003cmeta data-mint-head property=\"og:title\" content=\"API keys - SinarCloud\">\u003cmeta data-mint-head property=\"og:description\" content=\"Create, copy, rename, and revoke the API keys your applications use to call the SinarCloud AI API, and try a key with the quick start.\">\u003cmeta data-mint-head property=\"og:site_name\" content=\"SinarCloud\">\u003cmeta data-mint-head property=\"og:url\" content=\"https://docs.sinarcloud.com/ai/api-keys\">\u003cmeta data-mint-head property=\"og:type\" content=\"website\">\u003cmeta data-mint-head property=\"og:image\" content=\"https://sinar-cloud.mintlify.app/_mintlify/api/og/v2?division=AI+API\u0026amp;title=API+keys\u0026amp;description=Create%2C+copy%2C+rename%2C+and+revoke+the+API+keys+your+applications+use+to+call+the+SinarCloud+AI+API%2C+and+try+a+key+with+the+quick+start.\u0026amp;theme=d3d561d856c05a6395bfee2d\u0026amp;signature=948eb4c48387749d9bb4d814b4f838227cc7b9bd1e376a5ff9524cb5a5ca8e83\">\u003cmeta data-mint-head property=\"og:image:width\" content=\"1200\">\u003cmeta data-mint-head property=\"og:image:height\" content=\"630\">\u003cmeta data-mint-head name=\"twitter:card\" content=\"summary_large_image\">\u003cmeta data-mint-head name=\"twitter:title\" content=\"API keys - SinarCloud\">\u003cmeta data-mint-head name=\"twitter:description\" content=\"Create, copy, rename, and revoke the API keys your applications use to call the SinarCloud AI API, and try a key with the quick start.\">\u003cmeta data-mint-head name=\"twitter:image\" content=\"https://sinar-cloud.mintlify.app/_mintlify/api/og/v2?division=AI+API\u0026amp;title=API+keys\u0026amp;description=Create%2C+copy%2C+rename%2C+and+revoke+the+API+keys+your+applications+use+to+call+the+SinarCloud+AI+API%2C+and+try+a+key+with+the+quick+start.\u0026amp;theme=d3d561d856c05a6395bfee2d\u0026amp;signature=948eb4c48387749d9bb4d814b4f838227cc7b9bd1e376a5ff9524cb5a5ca8e83\">\u003cmeta data-mint-head name=\"twitter:image:width\" content=\"1200\">\u003cmeta data-mint-head name=\"twitter:image:height\" content=\"630\">\u003cmeta data-mint-head name=\"msapplication-config\" content=\"/mintlify-assets/_mintlify/favicons/sinar-cloud/qYYrDQEL49wjTG-a/_generated/favicon/browserconfig.xml\">\u003cmeta data-mint-head name=\"apple-mobile-web-app-title\" content=\"SinarCloud\">\u003cmeta data-mint-head name=\"msapplication-TileColor\" content=\"#0066CC\">\u003clink data-mint-head rel=\"canonical\" href=\"https://docs.sinarcloud.com/ai/api-keys\">\u003clink data-mint-head rel=\"alternate\" type=\"application/xml\" href=\"/sitemap.xml\">\u003clink data-mint-head rel=\"alternate\" type=\"text/markdown\" href=\"/ai/api-keys.md\">\u003cscript data-mint-head type=\"application/ld+json\">{\"@context\":\"https://schema.org\",\"@graph\":[{\"@type\":\"Organization\",\"@id\":\"https://docs.sinarcloud.com/#organization\",\"name\":\"SinarCloud\",\"url\":\"https://docs.sinarcloud.com\",\"logo\":{\"@type\":\"ImageObject\",\"url\":\"https://mintcdn.com/sinar-cloud/B5Imz7vUklgE_ozS/logo/light.svg?fit=max\u0026auto=format\u0026n=B5Imz7vUklgE_ozS\u0026q=85\u0026s=e9d750a5729c82b08c0c002770ca98b0\"}},{\"@type\":\"WebSite\",\"@id\":\"https://docs.sinarcloud.com#website\",\"name\":\"SinarCloud\",\"url\":\"https://docs.sinarcloud.com\",\"publisher\":{\"@id\":\"https://docs.sinarcloud.com/#organization\"}},{\"@type\":\"WebPage\",\"@id\":\"https://docs.sinarcloud.com/ai/api-keys#webpage\",\"url\":\"https://docs.sinarcloud.com/ai/api-keys\",\"name\":\"API keys\",\"description\":\"Create, copy, rename, and revoke the API keys your applications use to call the SinarCloud AI API, and try a key with the quick start.\",\"dateModified\":\"2026-10-31T06:00:24.576Z\",\"isPartOf\":{\"@id\":\"https://docs.sinarcloud.com#website\"},\"breadcrumb\":{\"@id\":\"https://docs.sinarcloud.com/ai/api-keys#breadcrumb\"}},{\"@type\":\"BreadcrumbList\",\"@id\":\"https://docs.sinarcloud.com/ai/api-keys#breadcrumb\",\"itemListElement\":[{\"@type\":\"ListItem\",\"position\":1,\"name\":\"AI API\",\"item\":\"https://docs.sinarcloud.com/ai/overview\"},{\"@type\":\"ListItem\",\"position\":2,\"name\":\"API keys\",\"item\":\"https://docs.sinarcloud.com/ai/api-keys\"}]},{\"@type\":[\"Article\",\"TechArticle\"],\"@id\":\"https://docs.sinarcloud.com/ai/api-keys#article\",\"headline\":\"API keys\",\"name\":\"API keys\",\"description\":\"Create, copy, rename, and revoke the API keys your applications use to call the SinarCloud AI API, and try a key with the quick start.\",\"url\":\"https://docs.sinarcloud.com/ai/api-keys\",\"mainEntityOfPage\":{\"@id\":\"https://docs.sinarcloud.com/ai/api-keys#webpage\"},\"dateModified\":\"2026-10-31T06:00:24.576Z\",\"publisher\":{\"@id\":\"https://docs.sinarcloud.com/#organization\"},\"isPartOf\":{\"@id\":\"https://docs.sinarcloud.com#website\"}}]}\u003c/script>\u003cscript data-mint-head type=\"application/ld+json\">{\"@context\":\"https://schema.org\",\"@type\":\"WebSite\",\"name\":\"SinarCloud\",\"creator\":{\"@type\":\"Organization\",\"name\":\"Mintlify\",\"url\":\"https://mintlify.com\"}}\u003c/script>","siteName":"SinarCloud","nav":{"global":null,"tabs":[{"tab":"Guides","pages":[{"group":"Get started","icon":"rocket","pages":[{"title":"Introduction","icon":"book-open","href":""},{"title":"Deploy your first VPS","sidebarTitle":"Deploy your first VPS","icon":"rocket","href":"/quickstart"},{"title":"Make your first AI request","sidebarTitle":"AI quickstart","icon":"sparkles","href":"/ai-quickstart"}]},{"group":"VPS","icon":"server","pages":[{"title":"Virtual servers overview","sidebarTitle":"Overview","icon":"server","href":"/vps/overview"},{"title":"Create a VPS","sidebarTitle":"Create a VPS","icon":"server","href":"/vps/create"},{"title":"Connect to your VPS","sidebarTitle":"Connect","icon":"terminal","href":"/vps/connect"},{"title":"Manage a VPS","sidebarTitle":"Manage","icon":"sliders","href":"/vps/manage"},{"title":"Configure the firewall","sidebarTitle":"Firewall","icon":"shield-halved","href":"/vps/firewall"},{"title":"Renewals and expiry","icon":"calendar","href":"/vps/renewals"}]},{"group":"Billing","icon":"wallet","pages":[{"title":"Balance and billing","icon":"wallet","href":"/billing/overview"},{"title":"Add balance","sidebarTitle":"Add balance","icon":"credit-card","href":"/billing/top-up"},{"title":"Redeem a coupon","sidebarTitle":"Redeem a coupon","icon":"gift","href":"/billing/coupons"},{"title":"Orders","sidebarTitle":"Orders","icon":"receipt","href":"/billing/orders"}]},{"group":"AI API","icon":"sparkles","pages":[{"title":"AI API overview","sidebarTitle":"Overview","icon":"sparkles","href":"/ai/overview"},{"title":"Models and pricing","sidebarTitle":"Models and pricing","icon":"robot","href":"/ai/models"},{"title":"How tokens are counted","sidebarTitle":"Token counting","description":"What input, output, cached and reasoning tokens are, how SinarCloud counts them and adds up total tokens, and how the counts become a charge, with worked examples.","icon":"calculator","href":"/ai/tokens"},{"title":"API keys","icon":"key","href":"/ai/api-keys"},{"title":"Send requests","sidebarTitle":"Send requests","description":"Call the SinarCloud AI API with your API key. Covers the base URL, endpoints, request rules, streaming, error codes, and how each request is charged.","icon":"terminal","href":"/ai/requests"},{"title":"Playground","icon":"comments","href":"/ai/playground"},{"title":"Usage and spending","sidebarTitle":"Usage","icon":"chart-line","href":"/ai/usage"},{"title":"Token credits","icon":"coins","href":"/ai/token-credits"},{"title":"AI subscription plans","sidebarTitle":"Subscription plans","icon":"repeat","href":"/ai/subscriptions"}]},{"group":"Account","icon":"user","pages":[{"title":"Account settings","sidebarTitle":"Settings","icon":"gear","href":"/account/settings"},{"title":"Affiliate program","sidebarTitle":"Affiliate program","icon":"gift","href":"/account/affiliate"}]},{"group":"Help","icon":"life-ring","pages":[{"title":"Get support","sidebarTitle":"Get support","icon":"life-ring","href":"/help/support"},{"title":"Troubleshooting","icon":"wrench","href":"/help/troubleshooting"}]}]},{"tab":"Integrations","pages":[{"title":"Integrations","href":"/integrations/overview"}]}]},"basePath":"","title":"API keys - SinarCloud","buildId":"dpl_345ReqzYaAjzS9QpeJemsKdb7KDj","deploymentId":"dpl_345ReqzYaAjzS9QpeJemsKdb7KDj","dynamics":["07c022d89b","a74be98ba7"],"chunks":["Frame-PS-3COT9.js","DynamicMarkdown-BcnBltEQ.js","zoom-image-lightbox-B4-wUcHm.js","lightbox-handle-r17bVUz3.js"]}