Create an API key for the tool, choose a model, and save your key as an environment variable that every integration guide uses.
Every integration needs the same three values: an API key, the base URL, and a model alias. Set them up once as described on this page, then follow the guide for your tool.Before you start, sign in to the console. AI requests are paid from your prepaid rupiah balance, so check that you have balance or token credits for the model you plan to use. To see your balance, click Billing under Account in the console sidebar. The Current Credits card shows it. To add balance, see Add balance.
1
Create an API key for the tool
In the console sidebar, under AI, click API keys. The API Keys page opens.
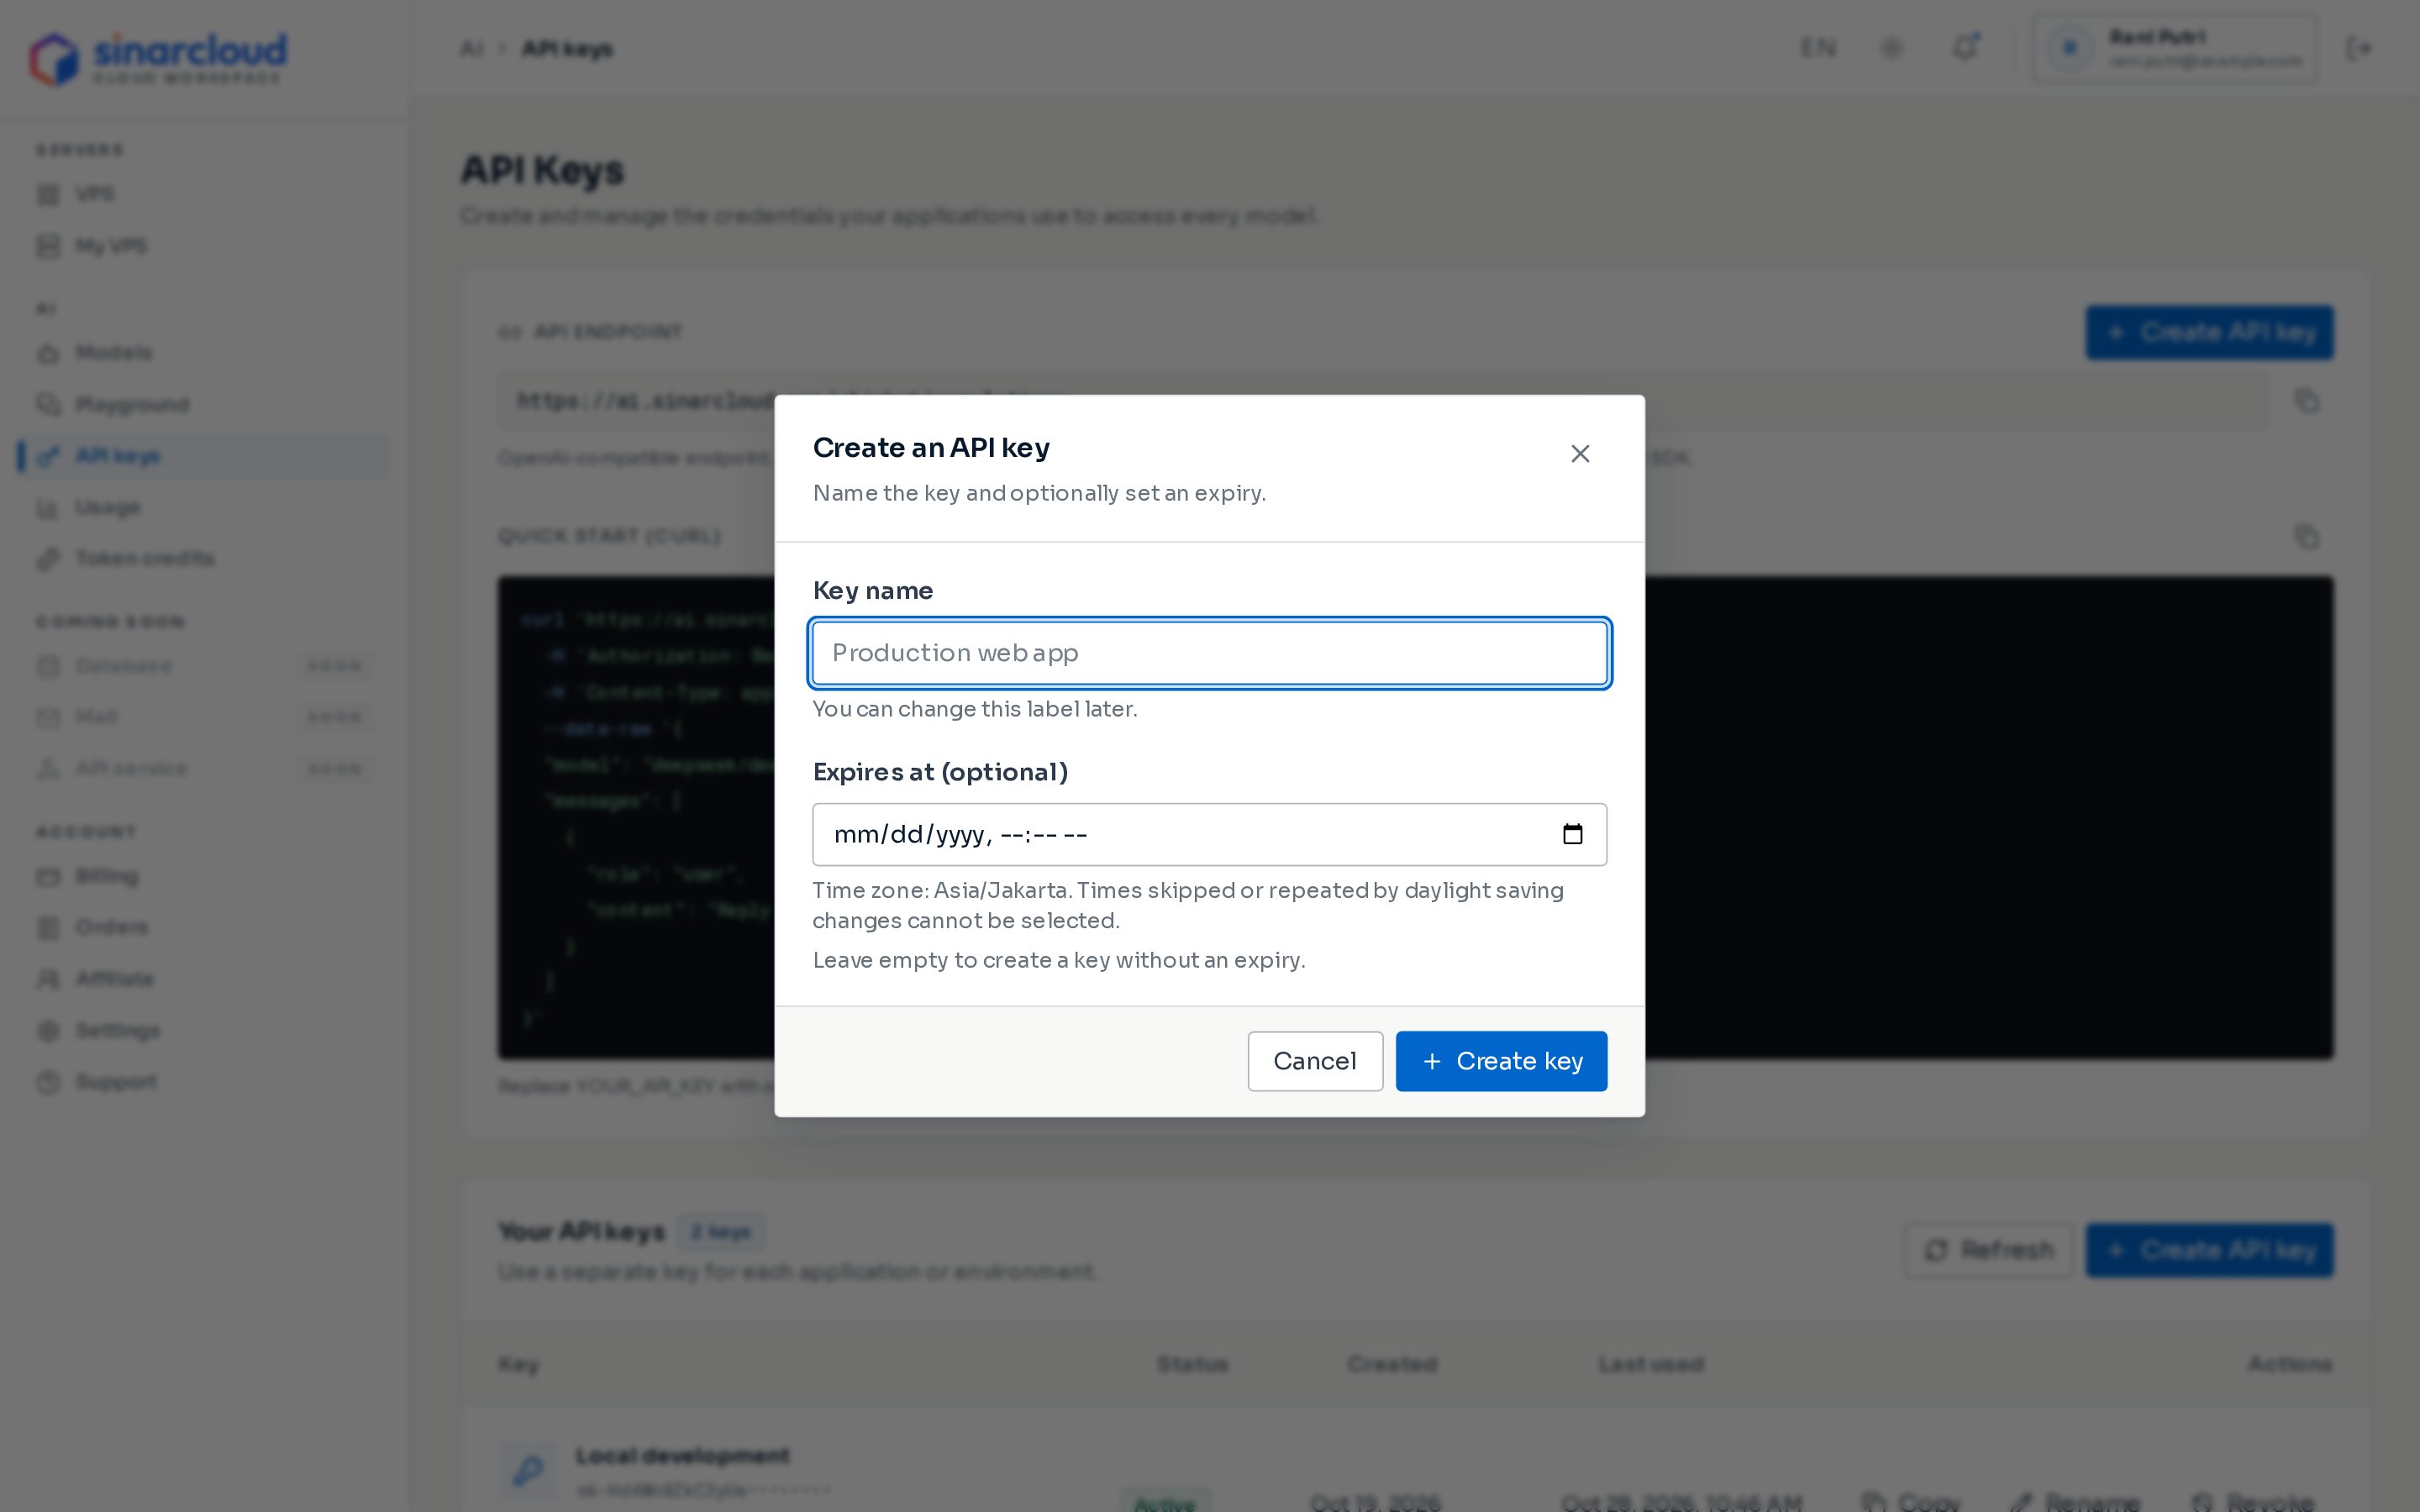
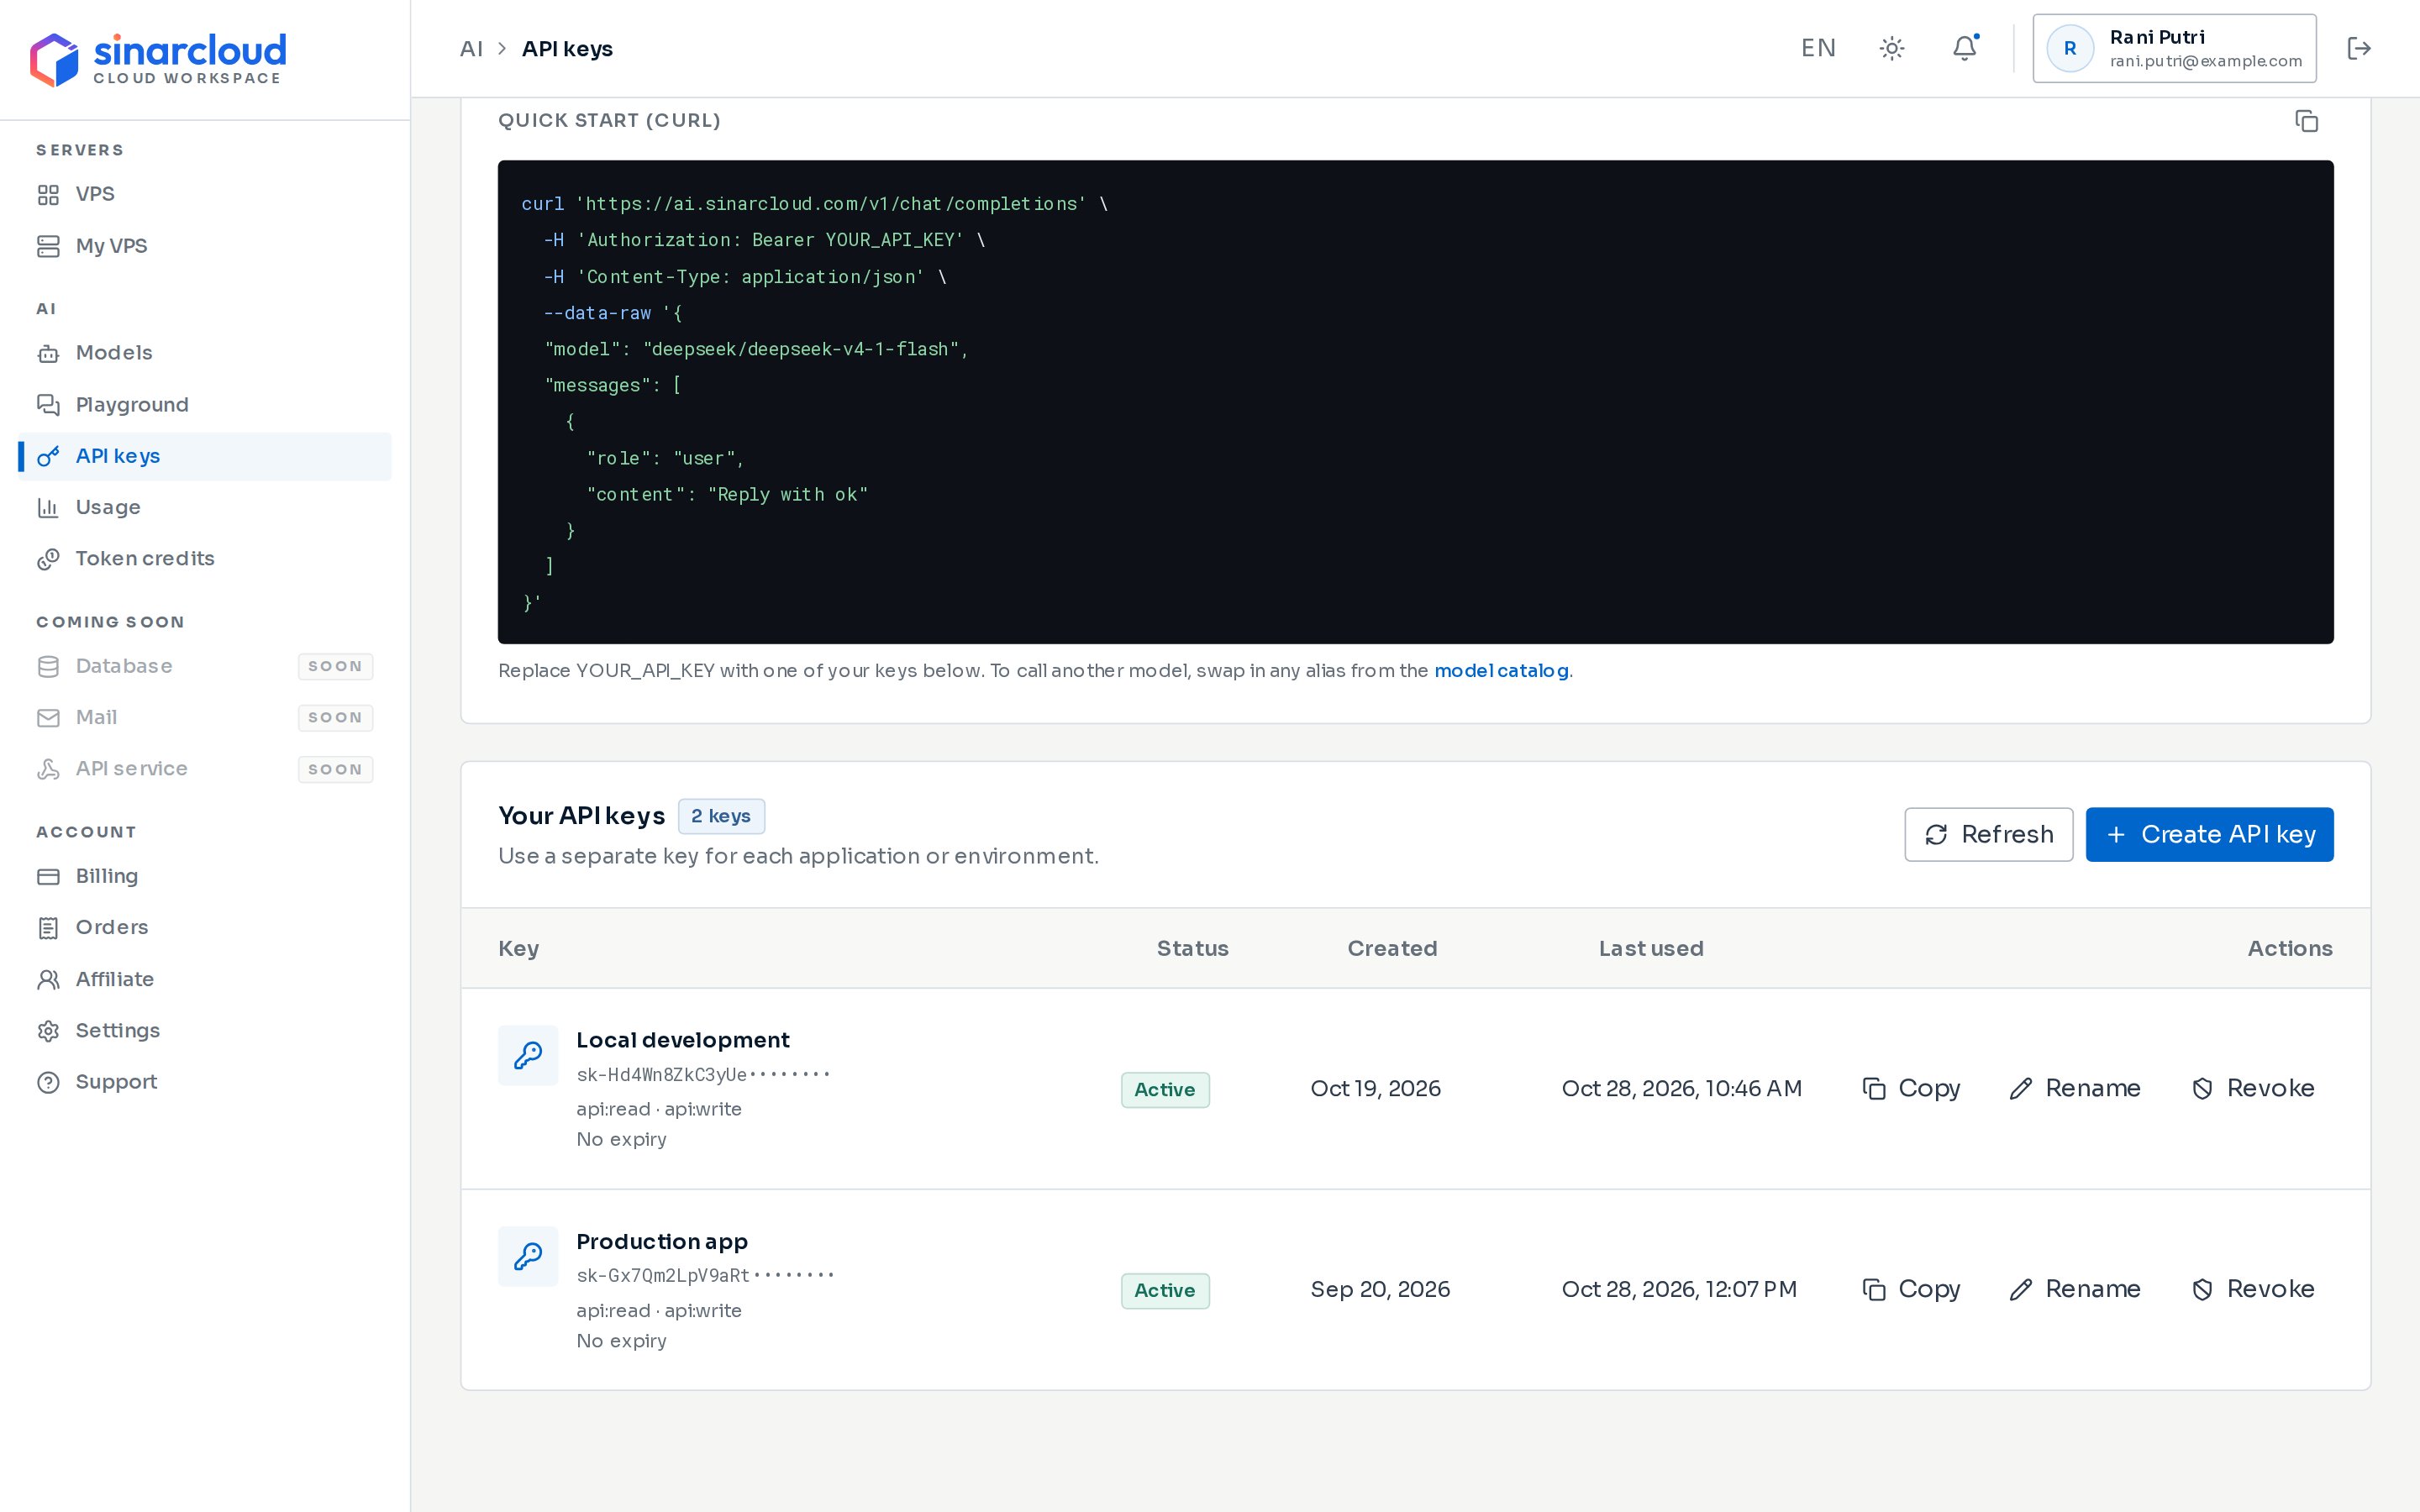
Click Create API key. You’ll find the button next to API endpoint at the top of the page and in the Your API keys section. Both open the same dialog.
In Key name, name the key after the tool and the computer that uses it, for example Claude Code - laptop. You can rename the key later.
To make the key stop working at a set time, fill in Expires at (optional). The field uses the time zone shown under it, which you can change in Account settings. Leave the field empty for a key that never expires.
Click Create key.
The dialog changes to Your key is ready and shows your key under New secret key. Click Copy secret, then click Done. If you close the dialog first, you can still copy the key later with Copy in the Your API keys list.
Name the key after the tool that uses it
A separate key for each tool lets you see what each tool spends, because the Usage page can filter by API key. If one key leaks, you can revoke it without breaking your other tools.
Keep your API key private. Anyone who has it can make API requests using your account. Don’t put the key in files that you commit to a repository. The guides read it from an environment variable instead. If a key leaks, click Revoke next to it, then click Revoke key to confirm.
2
Note the base URL
The base URL is the address a tool sends its requests to. The one you enter depends on the request format the tool uses:
Tool
Request format
Base URL
Claude Code, in the terminal or in VS Code
Anthropic Messages
https://ai.sinarcloud.com
OpenCode, Cline, Kilo Code, Continue, and the OpenAI SDKs
OpenAI
https://ai.sinarcloud.com/v1
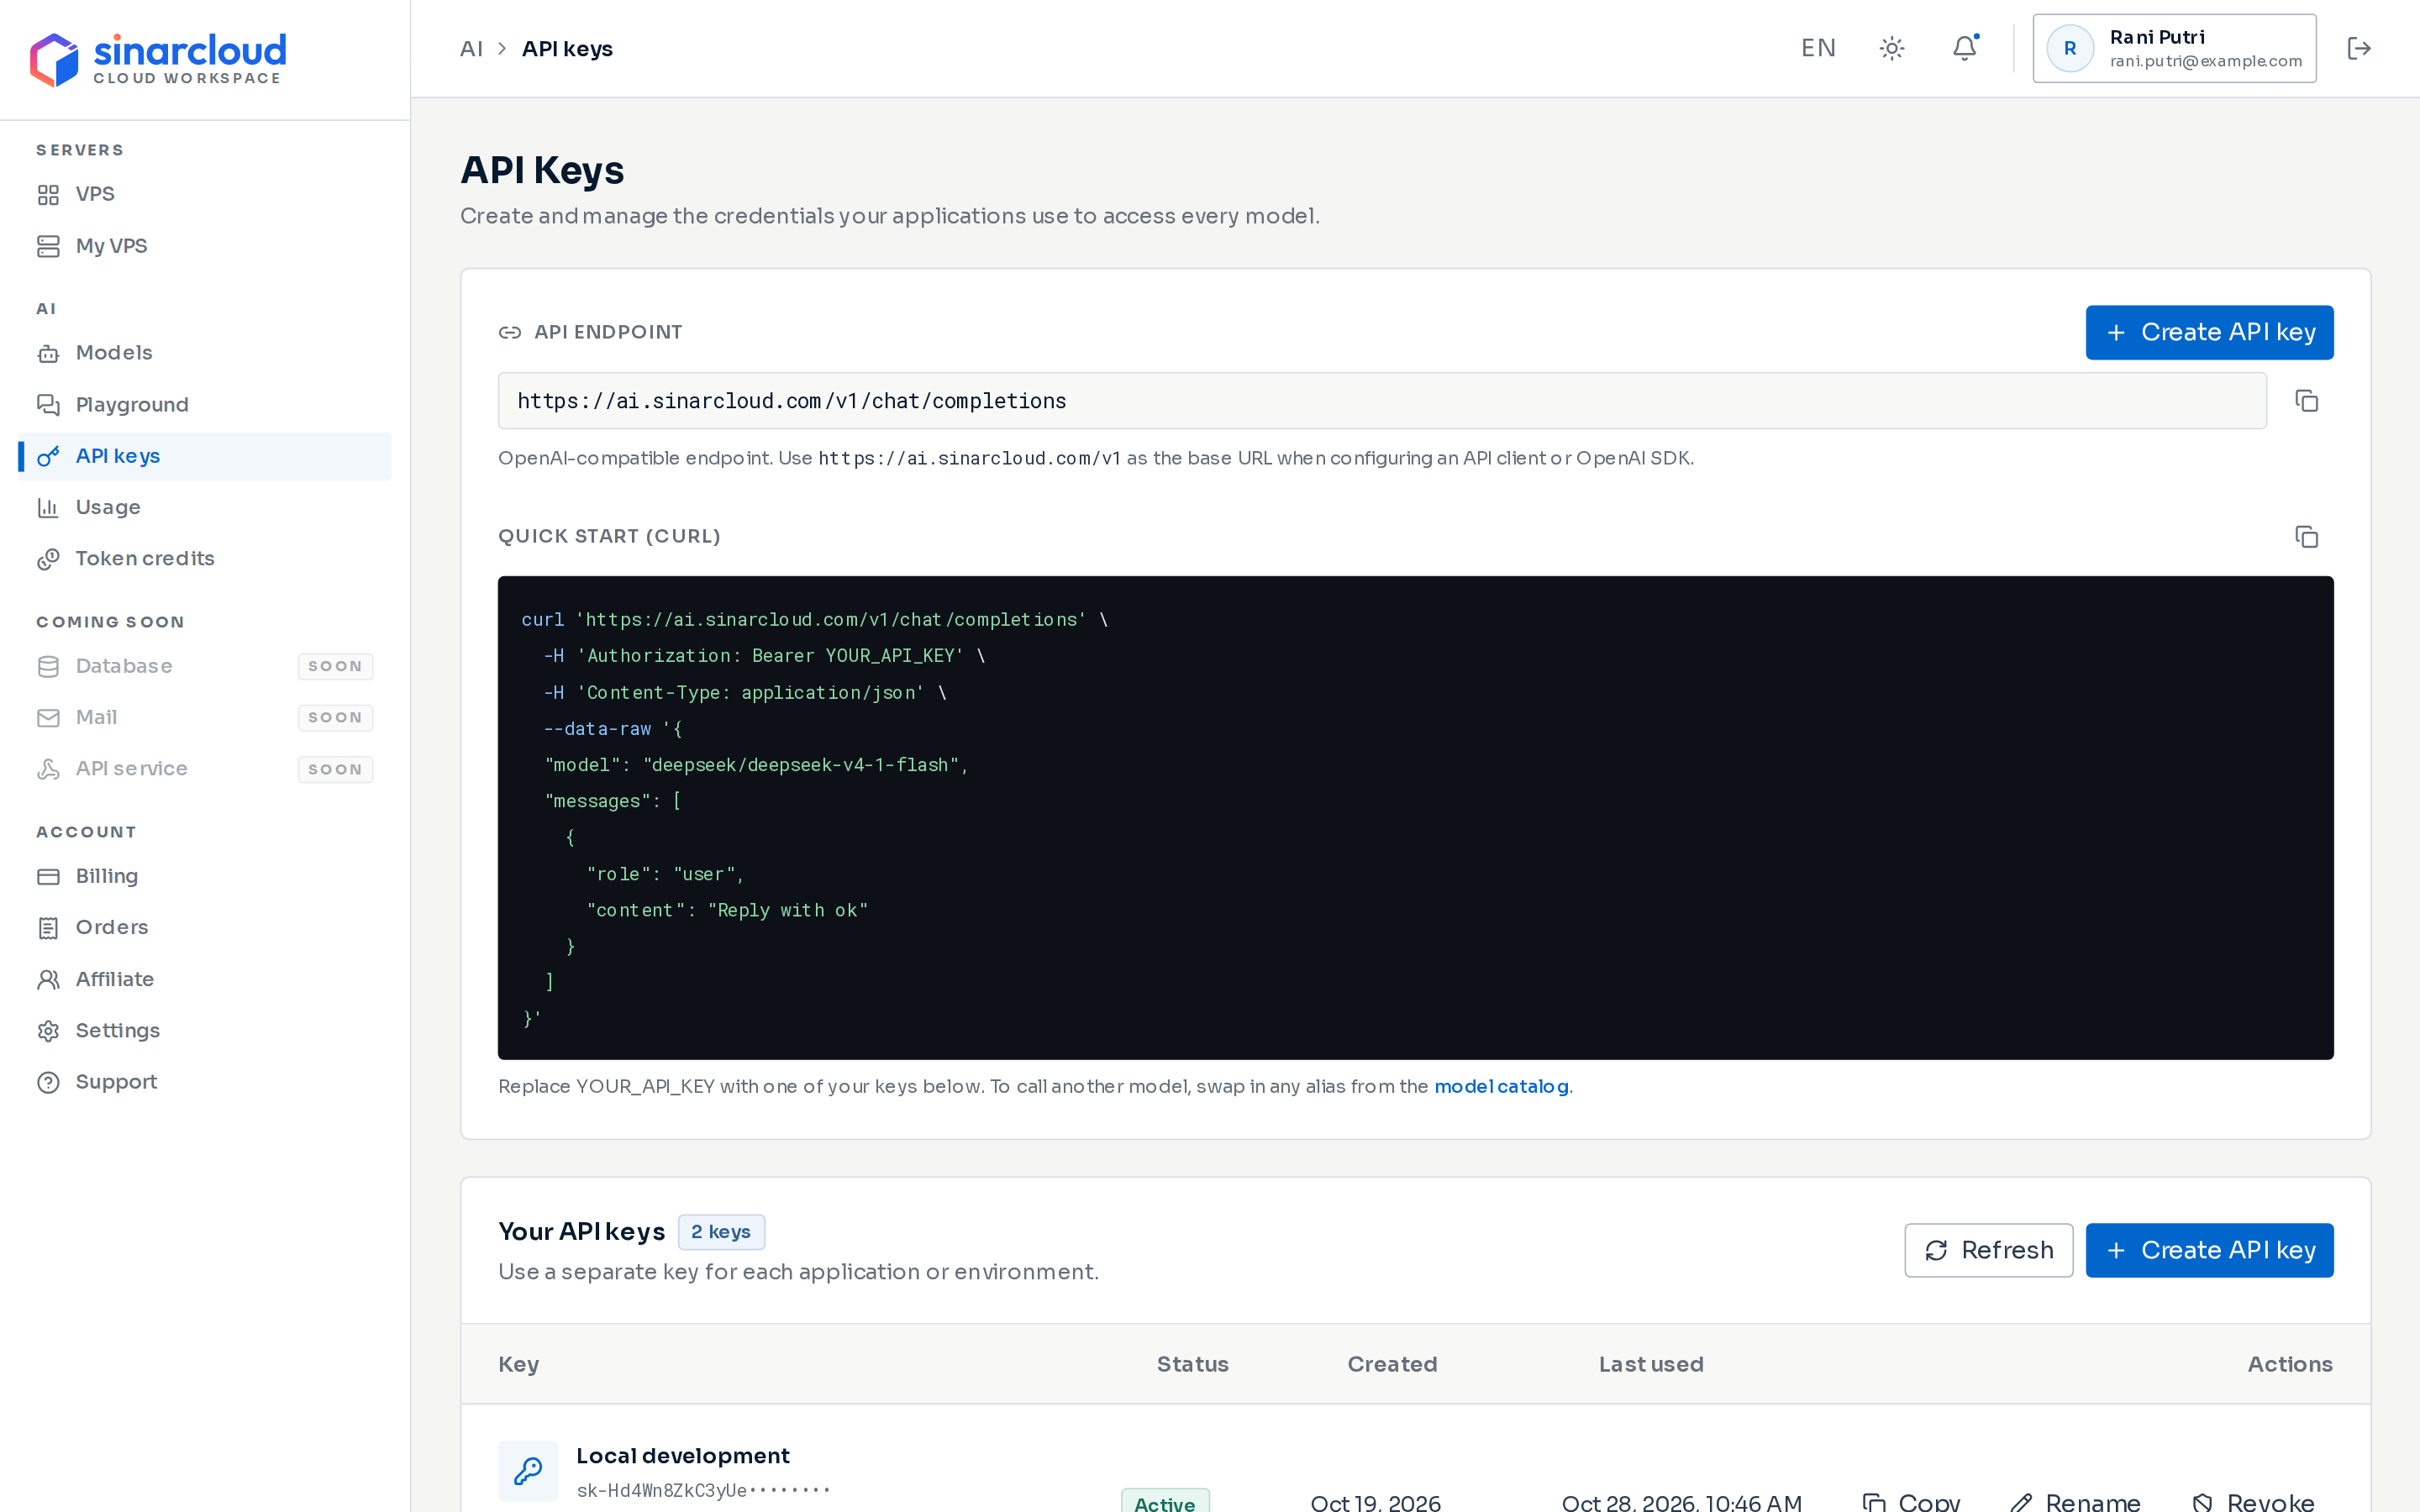
Each guide shows the exact value to enter.The console shows the OpenAI base URL too. At the top of the API Keys page, the API endpoint box shows the full chat completions endpoint, https://ai.sinarcloud.com/v1/chat/completions. The hint under the box gives the base URL, https://ai.sinarcloud.com/v1.
The base URL is in the hint under API endpoint
Don’t paste the full endpoint from the API endpoint box into a tool’s base URL field. Tools add /chat/completions to the base URL themselves, so their requests would go to the wrong address.
3
Choose a model
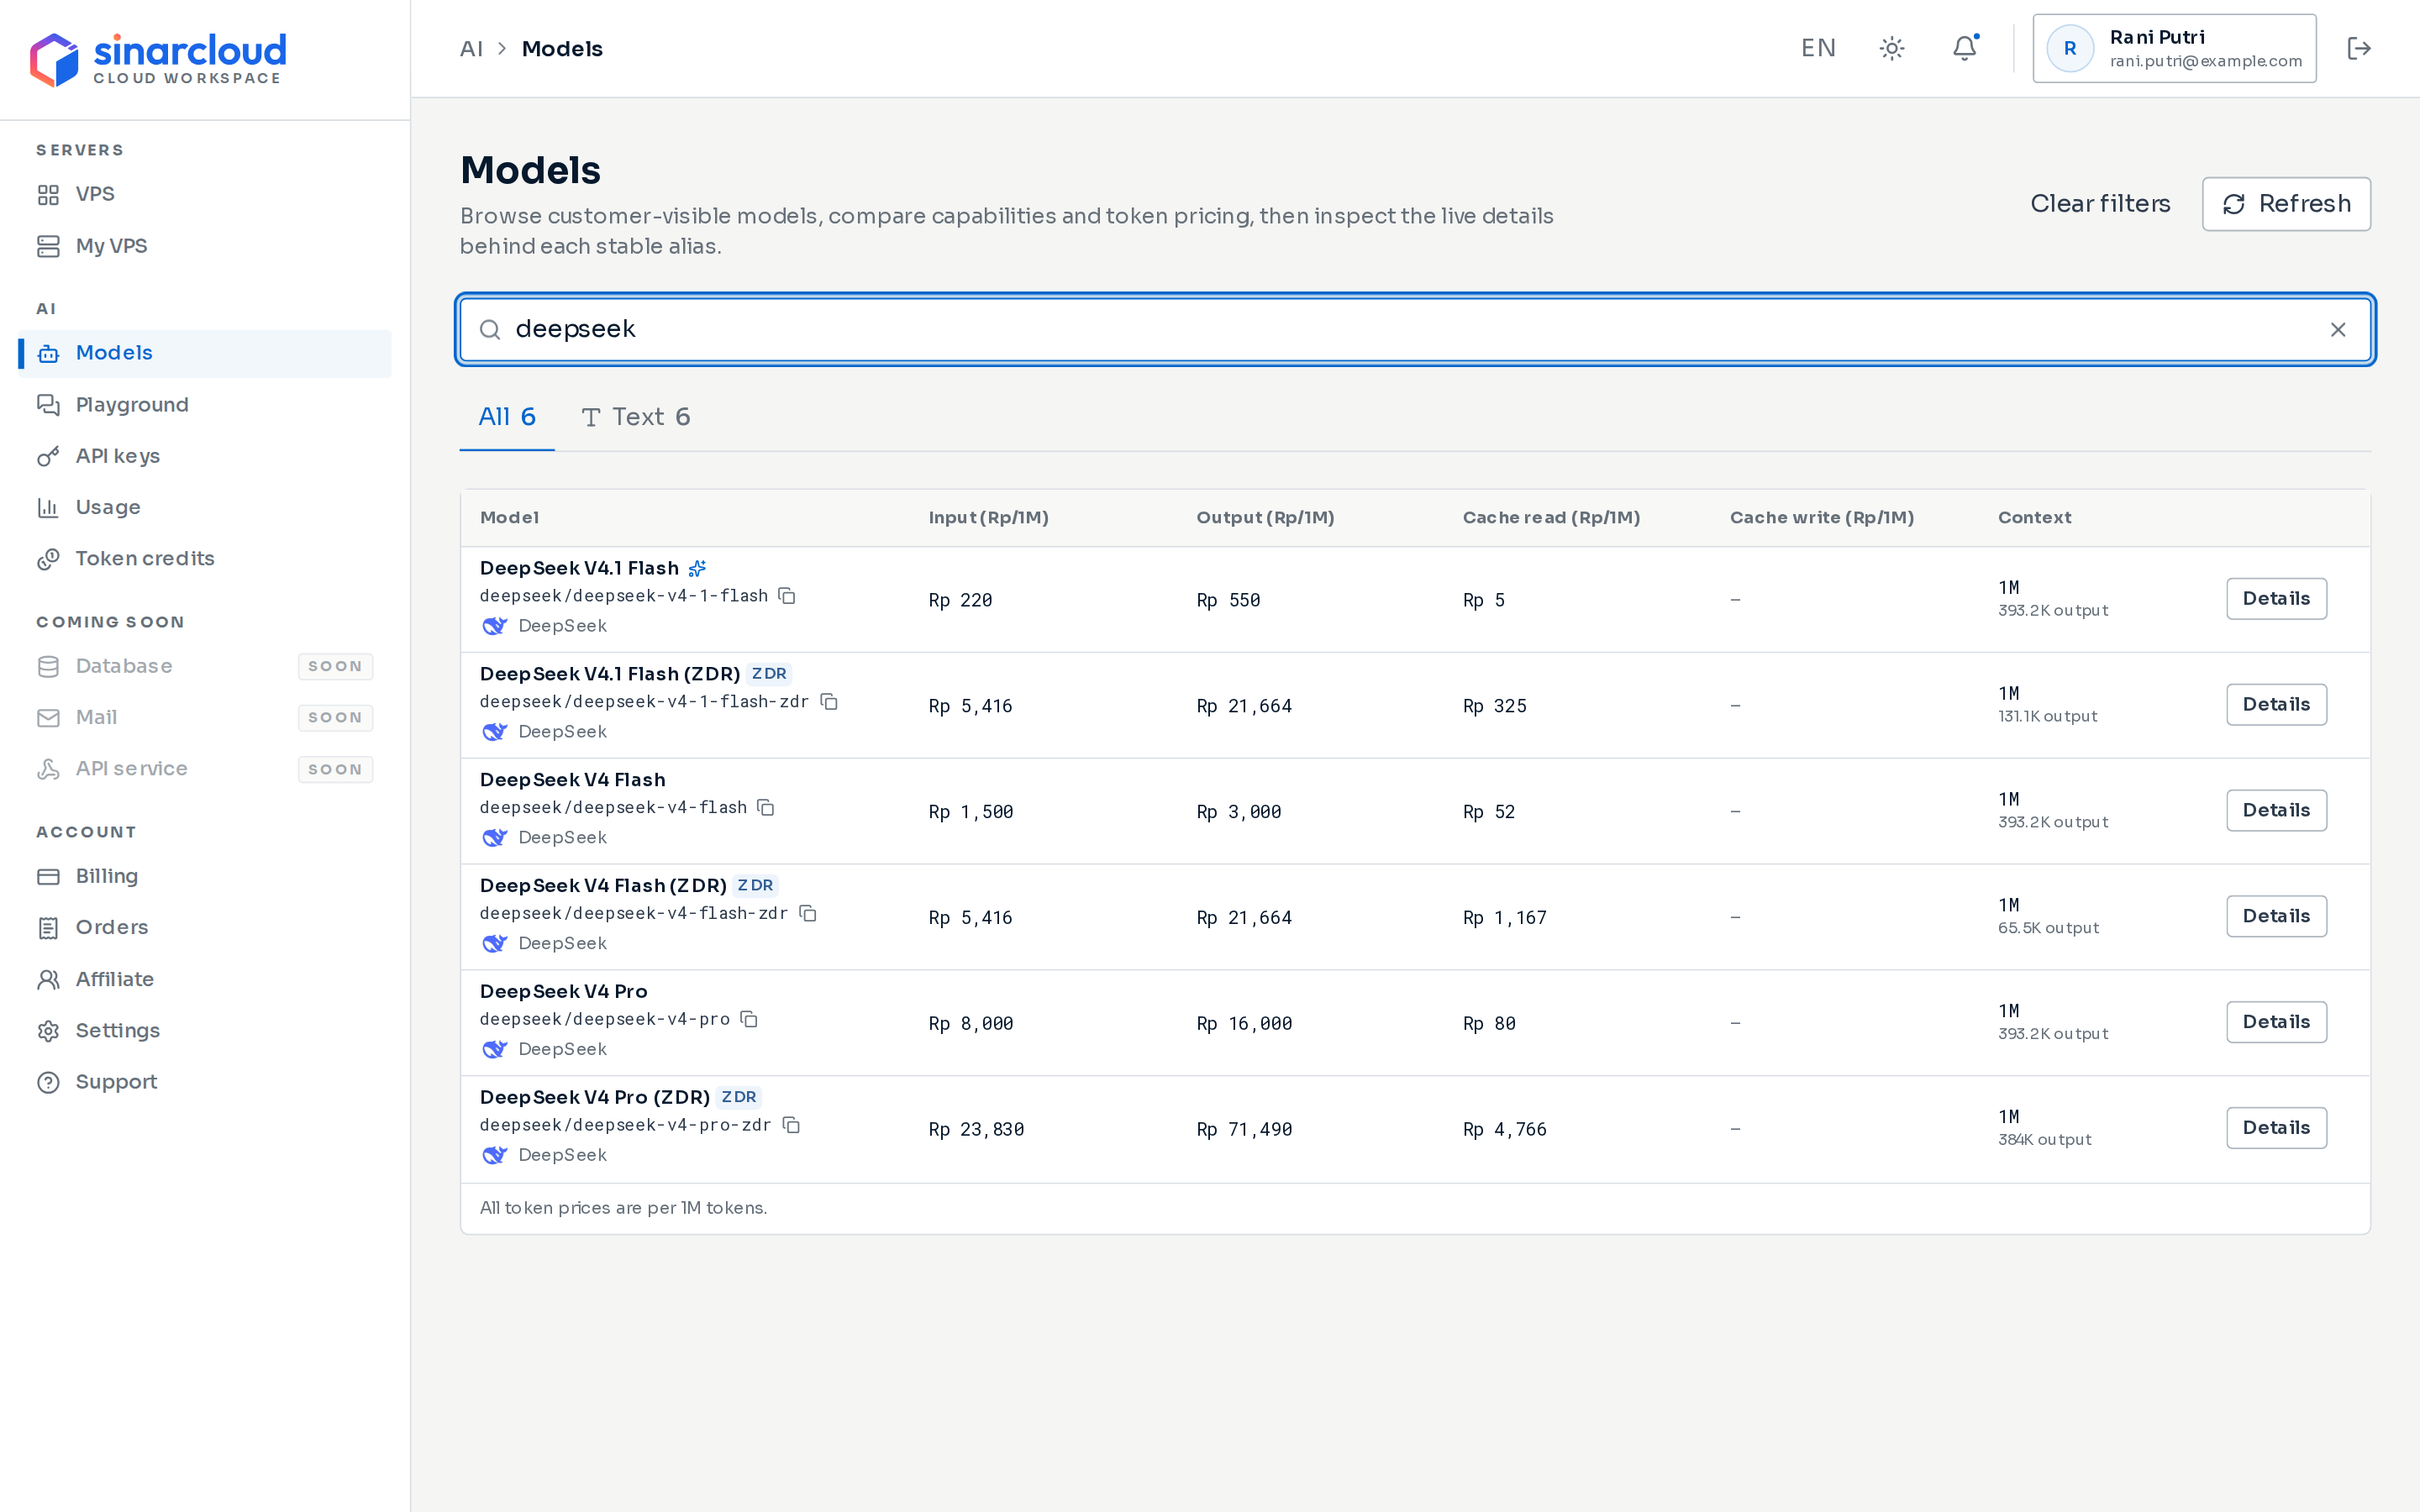
Under AI, click Models. The table shows each model’s price per 1M input and output tokens and its context window.
To find a model, type its name, alias, or publisher in the search box above the table, for example deepseek. To show chat models only, click Text under the search box.
Click Details on the model’s row. The model’s details open in a dialog.
Search for a model, then click Details
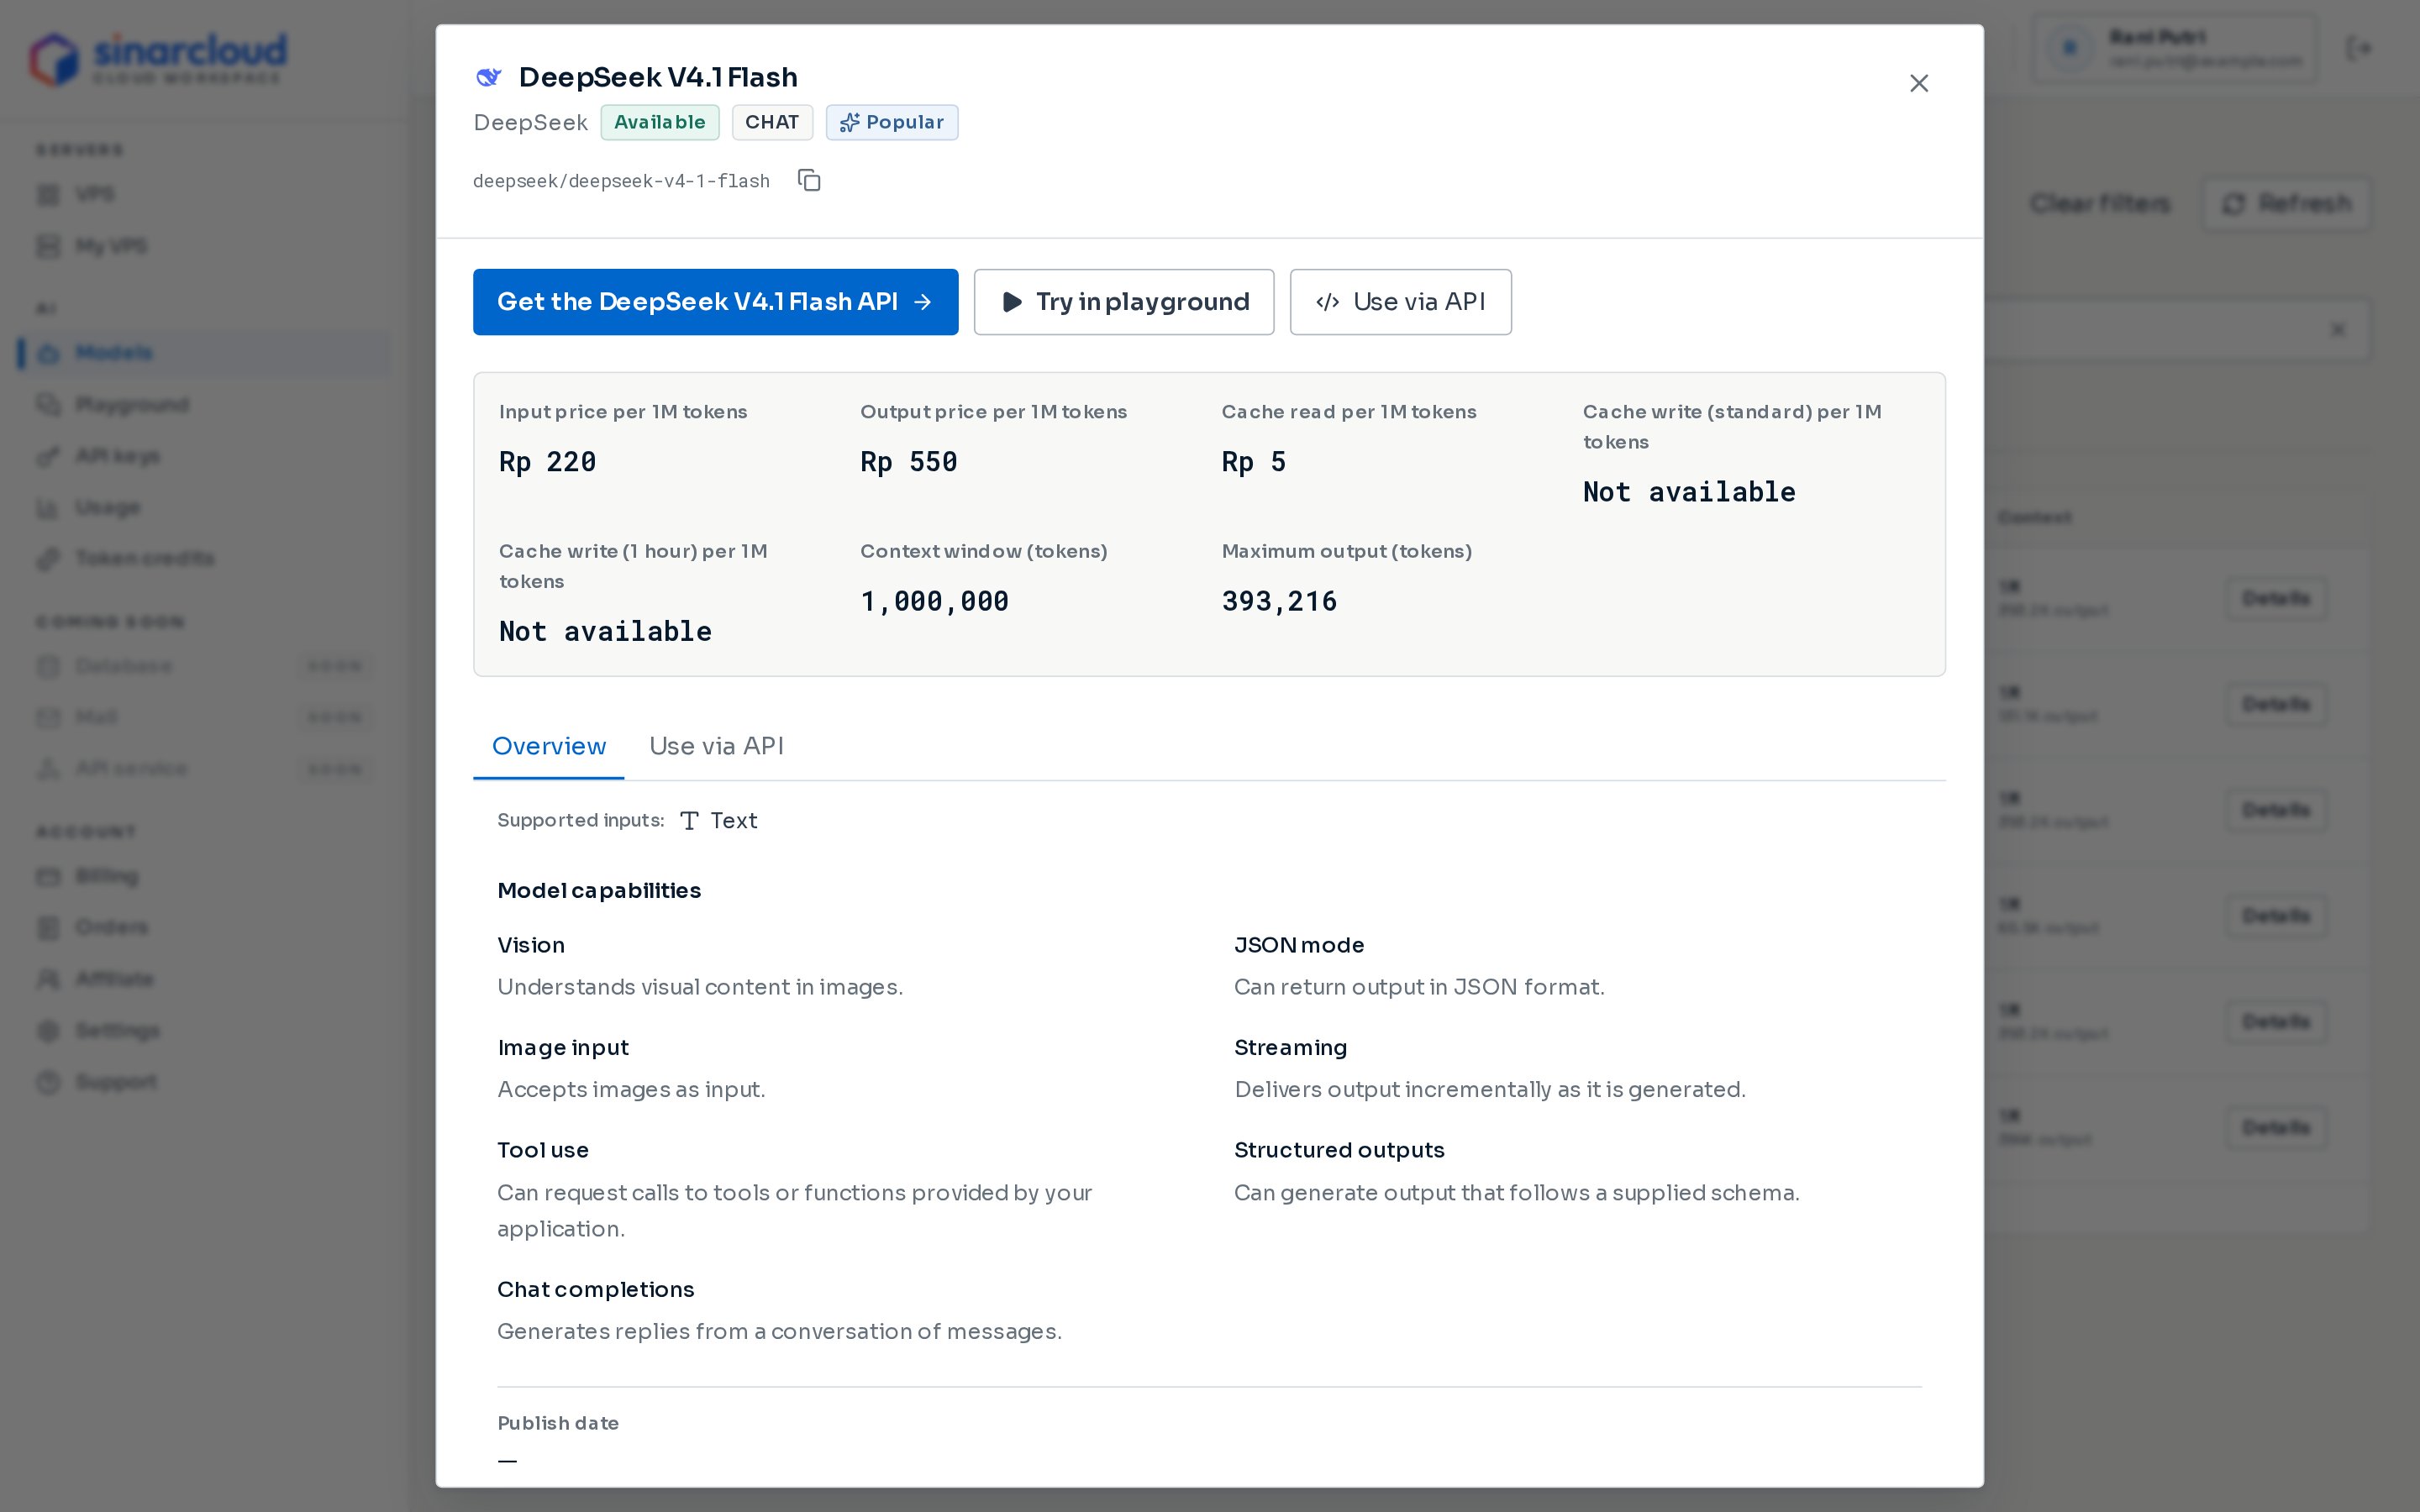
To run a coding agent, the Model capabilities on the Overview tab must list:
Chat completions, because both request formats run on it.
Tool use, because agents call tools to read files, edit code, and run commands.
Streaming, because agents show the reply while the model writes it.
To let a tool send images, such as screenshots, the model must also list Image input or Vision. Above the tabs, the details also show the model’s Context window (tokens) and Maximum output (tokens). Some tools ask you for these numbers.Below the model name is the model alias, such as deepseek/deepseek-v4-1-flash. Click the copy icon next to it (Copy model ID) to copy it. The guides use deepseek/deepseek-v4-1-flash in their examples. Replace it with the alias of the model you chose.
Check the model capabilities, then copy the alias
Models tagged ZDR are zero data retention versions, which don’t keep your prompts and responses after your request is complete. Each one has its own alias and prices. See Models and pricing.
4
Save your API key as an environment variable
The guides read your API key from the SINARCLOUD_API_KEY environment variable. Set it in the terminal where you will start the tool.
On the API Keys page, under Your API keys, click Copy next to your key.
In your terminal, run the command for your system. Replace paste-your-api-key-here with the key you copied, and keep the quotes.
Copy is turned off for expired and revoked keys. If an active key’s row says Create a new key to enable copying., the console can’t show that key again. Create a new key and use it instead.To check that the variable is set, run this in the same terminal. It prints set without showing your key. If it prints nothing, run the command above again.
macOS and Linux
Windows PowerShell
[ -n "$SINARCLOUD_API_KEY" ] && echo set
if ($env:SINARCLOUD_API_KEY) { "set" }
This variable lasts until you close the terminal. To keep it for every new terminal:
macOS and Linux
Windows PowerShell
Add the export line to your shell’s startup file, then open a new terminal. On macOS, the file is usually ~/.zshrc. On most Linux systems, it’s ~/.bashrc.
Coding agents send the conversation so far, including the files they’ve read, with every request. A long session can use millions of tokens.
Check each tool’s spending. Under AI, click Usage, then choose the tool’s key in the API key filter. See Usage and spending.
Start a new session for each new task. A new session doesn’t resend the earlier conversation.
Compare prices before you choose a model. The Models page shows each model’s price per 1M input and output tokens.
Use token credits.Token credits for a model pay for its requests before your balance is charged.
SinarCloud charges each request after it finishes, so a long agent session can take your balance below zero. A request starts only while your balance is above Rp 0, you have token credits left for the model, or the request can’t cost you anything. To keep working, add balance.
Connect Anthropic’s coding agent for the terminal.
OpenCode
Connect the open source coding agent for the terminal.
VS Code
Connect a coding agent in VS Code: Claude Code, Cline, Kilo Code, or Continue.
{"docsConfig":{"theme":"mint","$schema":"https://mintlify.com/docs.json","name":"SinarCloud","description":"Documentation for SinarCloud: deploy VPS in Southeast Asia, call AI models through one OpenAI-compatible API, and manage your prepaid IDR balance.","colors":{"primary":"#0066CC","light":"#6AAAEB","dark":"#004D99"},"logo":{"light":"https://mintcdn.com/sinar-cloud/B5Imz7vUklgE_ozS/logo/light.svg?fit=max\u0026auto=format\u0026n=B5Imz7vUklgE_ozS\u0026q=85\u0026s=e9d750a5729c82b08c0c002770ca98b0","dark":"https://mintcdn.com/sinar-cloud/B5Imz7vUklgE_ozS/logo/dark.svg?fit=max\u0026auto=format\u0026n=B5Imz7vUklgE_ozS\u0026q=85\u0026s=73748aa26054037a0788d4f33711e8fc","href":"https://sinarcloud.com"},"favicon":"https://mintcdn.com/sinar-cloud/B5Imz7vUklgE_ozS/favicon.svg?fit=max\u0026auto=format\u0026n=B5Imz7vUklgE_ozS\u0026q=85\u0026s=3a8c6e463fff5c4bbd253aa1aa394f3a","navbar":{"links":[{"href":"mailto:support@sinarcloud.com","label":"Support"}],"primary":{"type":"button","label":"Open console","href":"https://console.sinarcloud.com"}},"footer":{"links":[{"header":"SinarCloud","items":[{"label":"Website","href":"https://sinarcloud.com"},{"label":"Console","href":"https://console.sinarcloud.com"},{"label":"VPS pricing","href":"https://sinarcloud.com/vps"}]},{"header":"Help","items":[{"label":"Email support","href":"mailto:support@sinarcloud.com"},{"label":"Legal","href":"https://sinarcloud.com/legal"}]}]},"contextual":{"options":["copy","view","chatgpt","claude","perplexity","mcp","cursor","vscode"],"display":"header"},"styling":{"latex":false},"navigation":{"pages":[]}},"deployment":{"deploymentMetadataValue":{"subdomain":"sinar-cloud","hasAudioNarration":false,"actualSubdomain":"sinar-cloud","customDomains":["docs.sinarcloud.com"],"gitSource":{"type":"github","owner":"mintlify-community","repo":"docs-sinar-cloud-bc5a92e3","deployBranch":"main","contentDirectory":"","isPrivate":true,"mountPath":"","label":""},"chroma":{"latestBuiltDeploymentHistoryId":"6ae76f01039e90b0fea263d5","collectionId":"78c6943e-12ad-464b-8ab6-c16ab533d6c1","liveDeploymentHistoryId":"6ae76f01039e90b0fea263d5","schemaVersion":"v3"},"entitlements":{"AI_CHAT":{"status":"DISABLED"},"WEB_MCP":{"status":"DISABLED"},"NARRATION":{"status":"DISABLED"}},"buildId":"6ae76f01039e90b0fea263d5","clientVersion":"0.0.4054","searchFilterCounts":[{"language":"default","tag":"Guides","count":26},{"language":"default","tag":"AI API","count":9},{"language":"default","tag":"Integrations","count":9},{"language":"default","tag":"VPS","count":6},{"language":"default","tag":"Billing","count":4},{"language":"default","tag":"VS Code","count":4},{"language":"default","tag":"Get started","count":3},{"language":"default","tag":"Start here","count":3},{"language":"default","tag":"Account","count":2},{"language":"default","tag":"Help","count":2}]},"assistantConfig":{"enableAskAiButton":false,"enableStarterQuestions":false,"enableContextualStarterQuestions":false,"enableAskAiSearchBar":true},"basePath":"","hasChatPermissions":false,"hasWebMcpPermissions":false,"toggles":[{"name":"kill-isr","enabled":true,"variant":{"name":"disabled","enabled":false,"feature_enabled":true},"impressionData":false},{"name":"agent-mintlify-slack","enabled":true,"variant":{"name":"disabled","enabled":false,"feature_enabled":true},"impressionData":false},{"name":"agent-integrations-settings","enabled":true,"variant":{"name":"disabled","enabled":false,"feature_enabled":true},"impressionData":false},{"name":"automations-pr-grouping","enabled":true,"variant":{"name":"disabled","enabled":false,"feature_enabled":true},"impressionData":false},{"name":"custom-prefix","enabled":true,"variant":{"name":"disabled","enabled":false,"feature_enabled":true},"impressionData":false},{"name":"analytics-v7","enabled":true,"variant":{"name":"disabled","enabled":false,"feature_enabled":true},"impressionData":false},{"name":"user-flows-analytics","enabled":true,"variant":{"name":"disabled","enabled":false,"feature_enabled":true},"impressionData":false},{"name":"no-publish-flow","enabled":true,"variant":{"name":"disabled","enabled":false,"feature_enabled":true},"impressionData":false},{"name":"workos-onboarding","enabled":true,"variant":{"name":"disabled","enabled":false,"feature_enabled":true},"impressionData":false},{"name":"llms-txt-v2","enabled":true,"variant":{"name":"disabled","enabled":false,"feature_enabled":true},"impressionData":false},{"name":"snapshot-serving-live","enabled":true,"variant":{"name":"disabled","enabled":false,"feature_enabled":true},"impressionData":false},{"name":"stripTemperatureMiddleware","enabled":true,"variant":{"name":"disabled","enabled":false,"feature_enabled":true},"impressionData":false},{"name":"support-platform-pylon-zendesk","enabled":true,"variant":{"name":"disabled","enabled":false,"feature_enabled":true},"impressionData":false},{"name":"snapshot-serving","enabled":true,"variant":{"name":"disabled","enabled":false,"feature_enabled":true},"impressionData":false},{"name":"instant-rollback","enabled":true,"variant":{"name":"disabled","enabled":false,"feature_enabled":true},"impressionData":false},{"name":"granular-notifications-server","enabled":true,"variant":{"name":"disabled","enabled":false,"feature_enabled":true},"impressionData":false},{"name":"granular-notifications","enabled":true,"variant":{"name":"disabled","enabled":false,"feature_enabled":true},"impressionData":false},{"name":"automations-fable","enabled":true,"variant":{"name":"disabled","enabled":false,"feature_enabled":true},"impressionData":false},{"name":"fixed-ai-action-pricing","enabled":true,"variant":{"name":"disabled","enabled":false,"feature_enabled":true},"impressionData":false},{"name":"automation-resolve-merge-conflict","enabled":true,"variant":{"name":"disabled","enabled":false,"feature_enabled":true},"impressionData":false},{"name":"scoped-publishing","enabled":true,"variant":{"name":"disabled","enabled":false,"feature_enabled":true},"impressionData":false},{"name":"mintql","enabled":true,"variant":{"name":"disabled","enabled":false,"feature_enabled":true},"impressionData":false},{"name":"page-level-analytics","enabled":true,"variant":{"name":"disabled","enabled":false,"feature_enabled":true},"impressionData":false},{"name":"editor-version-history-v2","enabled":true,"variant":{"name":"disabled","enabled":false,"feature_enabled":true},"impressionData":false},{"name":"billing-page-v2","enabled":true,"variant":{"name":"disabled","enabled":false,"feature_enabled":true},"impressionData":false},{"name":"full-page-search","enabled":true,"variant":{"name":"disabled","enabled":false,"feature_enabled":true},"impressionData":false},{"name":"workspace-projects","enabled":true,"variant":{"name":"disabled","enabled":false,"feature_enabled":true},"impressionData":false},{"name":"assistant-v5","enabled":true,"variant":{"name":"disabled","enabled":false,"feature_enabled":true},"impressionData":false},{"name":"byok-sep-25","enabled":true,"variant":{"name":"disabled","enabled":false,"feature_enabled":true},"impressionData":false},{"name":"fork-pr-previews","enabled":true,"variant":{"name":"disabled","enabled":false,"feature_enabled":true},"impressionData":false},{"name":"revalidation-jwt","enabled":true,"variant":{"name":"disabled","enabled":false,"feature_enabled":true},"impressionData":false},{"name":"vite-origin","enabled":true,"variant":{"name":"disabled","enabled":false,"feature_enabled":true},"impressionData":false},{"name":"billing-updated-9-15","enabled":true,"variant":{"name":"disabled","enabled":false,"feature_enabled":true},"impressionData":false},{"name":"workos-sso-scim","enabled":true,"variant":{"name":"disabled","enabled":false,"feature_enabled":true},"impressionData":false},{"name":"hobby-abuse-scan","enabled":true,"variant":{"name":"disabled","enabled":false,"feature_enabled":true},"impressionData":false},{"name":"dashboard-inbox","enabled":true,"variant":{"name":"disabled","enabled":false,"feature_enabled":true},"impressionData":false},{"name":"workos-signup","enabled":true,"variant":{"name":"disabled","enabled":false,"feature_enabled":true},"impressionData":false},{"name":"turbopuffer-dual-write","enabled":true,"variant":{"name":"disabled","enabled":false,"feature_enabled":true},"impressionData":false},{"name":"workos-enabled","enabled":true,"variant":{"name":"disabled","enabled":false,"feature_enabled":true},"impressionData":false},{"name":"approve-review-flow","enabled":true,"variant":{"name":"disabled","enabled":false,"feature_enabled":true},"impressionData":false},{"name":"sso-setup-deadline-banner","enabled":true,"variant":{"name":"disabled","enabled":false,"feature_enabled":true},"impressionData":false},{"name":"rbac-expansion","enabled":true,"variant":{"name":"disabled","enabled":false,"feature_enabled":true},"impressionData":false}],"googleFontsInlined":false},"customCss":[],"page":{"pagePath":"integrations/before-you-connect","slug":"/integrations/before-you-connect","pageMetadata":{"title":"Before you connect a tool","sidebarTitle":"Before you connect","description":"Create an API key for the tool, choose a model, and save your key as an environment variable that every integration guide uses.","icon":"list-check","href":"/integrations/before-you-connect"},"description":{"compiledSource":"\"use strict\";\nconst {jsx: _jsx} = arguments[0];\nconst {useMDXComponents: _provideComponents} = arguments[0];\nfunction _createMdxContent(props) {\n const _components = {\n p: \"p\",\n ..._provideComponents(),\n ...props.components\n };\n return _jsx(_components.p, {\n children: \"Create an API key for the tool, choose a model, and save your key as an environment variable that every integration guide uses.\"\n });\n}\nfunction MDXContent(props = {}) {\n const {wrapper: MDXLayout} = {\n ..._provideComponents(),\n ...props.components\n };\n return MDXLayout ? _jsx(MDXLayout, {\n ...props,\n children: _jsx(_createMdxContent, {\n ...props\n })\n }) : _createMdxContent(props);\n}\nreturn {\n default: MDXContent\n};\n","frontmatter":{},"scope":{}},"pageType":"default","mdx":{"mdxSource":{"compiledSource":"\"use strict\";const{Fragment:_Fragment,jsx:_jsx,jsxs:_jsxs}=arguments[0];const{useMDXComponents:_provideComponents}=arguments[0];function _createMdxContent(props){const _components={a:`a`,code:`code`,li:`li`,ol:`ol`,p:`p`,pre:`pre`,span:`span`,strong:`strong`,tbody:`tbody`,td:`td`,th:`th`,thead:`thead`,tr:`tr`,ul:`ul`,..._provideComponents(),...props.components},{Card,CardGroup,CodeBlock,Frame,Heading,Note,OptimizedImage,Step,Steps,Tab,Table,Tabs,Warning}=_components;if(!Card)_missingMdxReference(`Card`,true);if(!CardGroup)_missingMdxReference(`CardGroup`,true);if(!CodeBlock)_missingMdxReference(`CodeBlock`,true);if(!Frame)_missingMdxReference(`Frame`,true);if(!Heading)_missingMdxReference(`Heading`,true);if(!Note)_missingMdxReference(`Note`,true);if(!OptimizedImage)_missingMdxReference(`OptimizedImage`,true);if(!Step)_missingMdxReference(`Step`,true);if(!Steps)_missingMdxReference(`Steps`,true);if(!Tab)_missingMdxReference(`Tab`,true);if(!Table)_missingMdxReference(`Table`,true);if(!Tabs)_missingMdxReference(`Tabs`,true);if(!Warning)_missingMdxReference(`Warning`,true);return _jsxs(_Fragment,{children:[_jsx(_components.p,{children:`Every integration needs the same three values: an API key, the base URL, and a model alias. Set them up once as described on this page, then follow the guide for your tool.`}),`\n`,_jsxs(_components.p,{children:[`Before you start, sign in to the `,_jsx(_components.a,{href:`https://console.sinarcloud.com`,children:`console`}),`. AI requests are paid from your prepaid rupiah balance, so check that you have balance or `,_jsx(_components.a,{href:`/ai/token-credits`,children:`token credits`}),` for the model you plan to use. To see your balance, click `,_jsx(_components.strong,{children:`Billing`}),` under `,_jsx(_components.strong,{children:`Account`}),` in the console sidebar. The `,_jsx(_components.strong,{children:`Current Credits`}),` card shows it. To add balance, see `,_jsx(_components.a,{href:`/billing/top-up`,children:`Add balance`}),`.`]}),`\n`,_jsxs(Steps,{children:[_jsxs(Step,{title:`Create an API key for the tool`,children:[_jsxs(_components.ol,{children:[`\n`,_jsxs(_components.li,{children:[`In the console sidebar, under `,_jsx(_components.strong,{children:`AI`}),`, click `,_jsx(_components.strong,{children:`API keys`}),`. The `,_jsx(_components.strong,{children:`API Keys`}),` page opens.`]}),`\n`,_jsxs(_components.li,{children:[`Click `,_jsx(_components.strong,{children:`Create API key`}),`. You’ll find the button next to `,_jsx(_components.strong,{children:`API endpoint`}),` at the top of the page and in the `,_jsx(_components.strong,{children:`Your API keys`}),` section. Both open the same dialog.`]}),`\n`,_jsxs(_components.li,{children:[`In `,_jsx(_components.strong,{children:`Key name`}),`, name the key after the tool and the computer that uses it, for example `,_jsx(_components.code,{children:`Claude Code - laptop`}),`. You can rename the key later.`]}),`\n`,_jsxs(_components.li,{children:[`To make the key stop working at a set time, fill in `,_jsx(_components.strong,{children:`Expires at (optional)`}),`. The field uses the time zone shown under it, which you can change in `,_jsx(_components.a,{href:`/account/settings`,children:`Account settings`}),`. Leave the field empty for a key that never expires.`]}),`\n`,_jsxs(_components.li,{children:[`Click `,_jsx(_components.strong,{children:`Create key`}),`.`]}),`\n`,_jsxs(_components.li,{children:[`The dialog changes to `,_jsx(_components.strong,{children:`Your key is ready`}),` and shows your key under `,_jsx(_components.strong,{children:`New secret key`}),`. Click `,_jsx(_components.strong,{children:`Copy secret`}),`, then click `,_jsx(_components.strong,{children:`Done`}),`. If you close the dialog first, you can still copy the key later with `,_jsx(_components.strong,{children:`Copy`}),` in the `,_jsx(_components.strong,{children:`Your API keys`}),` list.`]}),`\n`]}),_jsx(Frame,{caption:`Name the key after the tool that uses it`,children:_jsx(OptimizedImage,{src:`https://mintcdn.com/sinar-cloud/ShOrAB8ikH3IKe3Y/images/ai-api-key-create.png?fit=max\u0026auto=format\u0026n=ShOrAB8ikH3IKe3Y\u0026q=85\u0026s=5856c63de285ff4a1b440fae4c588b91`,alt:`Create an API key dialog open over the API Keys page, with a Key name field, an Expires at (optional) date and time field with the time zone shown under it, and Cancel and Create key buttons`,\"data-og-width\":`2880`,width:`2880`,\"data-og-height\":`1800`,height:`1800`,\"data-path\":`images/ai-api-key-create.png`,\"data-optimize\":`true`,\"data-opv\":`3`,srcset:`https://mintcdn.com/sinar-cloud/ShOrAB8ikH3IKe3Y/images/ai-api-key-create.png?w=280\u0026fit=max\u0026auto=format\u0026n=ShOrAB8ikH3IKe3Y\u0026q=85\u0026s=28057a1dc74d01a08a70681627737337 280w, https://mintcdn.com/sinar-cloud/ShOrAB8ikH3IKe3Y/images/ai-api-key-create.png?w=560\u0026fit=max\u0026auto=format\u0026n=ShOrAB8ikH3IKe3Y\u0026q=85\u0026s=fe1752349432a75289e1c220181b7921 560w, https://mintcdn.com/sinar-cloud/ShOrAB8ikH3IKe3Y/images/ai-api-key-create.png?w=840\u0026fit=max\u0026auto=format\u0026n=ShOrAB8ikH3IKe3Y\u0026q=85\u0026s=4e36702061ab55a306bc0190b39f31e9 840w, https://mintcdn.com/sinar-cloud/ShOrAB8ikH3IKe3Y/images/ai-api-key-create.png?w=1100\u0026fit=max\u0026auto=format\u0026n=ShOrAB8ikH3IKe3Y\u0026q=85\u0026s=162531712f5e1b0efbbcf9762191b585 1100w, https://mintcdn.com/sinar-cloud/ShOrAB8ikH3IKe3Y/images/ai-api-key-create.png?w=1650\u0026fit=max\u0026auto=format\u0026n=ShOrAB8ikH3IKe3Y\u0026q=85\u0026s=d55812e9d225c23960c4cb65b999b849 1650w, https://mintcdn.com/sinar-cloud/ShOrAB8ikH3IKe3Y/images/ai-api-key-create.png?w=2500\u0026fit=max\u0026auto=format\u0026n=ShOrAB8ikH3IKe3Y\u0026q=85\u0026s=399cfcccc60b6c4c66dba0548da9b904 2500w`})}),_jsxs(_components.p,{children:[`A separate key for each tool lets you see what each tool spends, because the `,_jsx(_components.strong,{children:`Usage`}),` page can filter by API key. If one key leaks, you can revoke it without breaking your other tools.`]}),_jsx(Warning,{children:_jsxs(_components.p,{children:[`Keep your API key private. Anyone who has it can make API requests using your account. Don’t put the key in files that you commit to a repository. The guides read it from an environment variable instead. If a key leaks, click `,_jsx(_components.strong,{children:`Revoke`}),` next to it, then click `,_jsx(_components.strong,{children:`Revoke key`}),` to confirm.`]})})]}),_jsxs(Step,{title:`Note the base URL`,children:[_jsx(_components.p,{children:`The base URL is the address a tool sends its requests to. The one you enter depends on the request format the tool uses:`}),_jsxs(Table,{children:[_jsx(_components.thead,{children:_jsxs(_components.tr,{children:[_jsx(_components.th,{children:`Tool`}),_jsx(_components.th,{children:`Request format`}),_jsx(_components.th,{children:`Base URL`})]})}),_jsxs(_components.tbody,{children:[_jsxs(_components.tr,{children:[_jsx(_components.td,{children:`Claude Code, in the terminal or in VS Code`}),_jsx(_components.td,{children:`Anthropic Messages`}),_jsx(_components.td,{children:_jsx(_components.code,{children:`https://ai.sinarcloud.com`})})]}),_jsxs(_components.tr,{children:[_jsx(_components.td,{children:`OpenCode, Cline, Kilo Code, Continue, and the OpenAI SDKs`}),_jsx(_components.td,{children:`OpenAI`}),_jsx(_components.td,{children:_jsx(_components.code,{children:`https://ai.sinarcloud.com/v1`})})]})]})]}),_jsx(_components.p,{children:`Each guide shows the exact value to enter.`}),_jsxs(_components.p,{children:[`The console shows the OpenAI base URL too. At the top of the `,_jsx(_components.strong,{children:`API Keys`}),` page, the `,_jsx(_components.strong,{children:`API endpoint`}),` box shows the full chat completions endpoint, `,_jsx(_components.code,{children:`https://ai.sinarcloud.com/v1/chat/completions`}),`. The hint under the box gives the base URL, `,_jsx(_components.code,{children:`https://ai.sinarcloud.com/v1`}),`.`]}),_jsx(Frame,{caption:`The base URL is in the hint under API endpoint`,children:_jsx(OptimizedImage,{src:`https://mintcdn.com/sinar-cloud/ShOrAB8ikH3IKe3Y/images/ai-api-keys.png?fit=max\u0026auto=format\u0026n=ShOrAB8ikH3IKe3Y\u0026q=85\u0026s=120f522a148d183a67e641d660a89697`,alt:`API Keys page with the quick start at the top: the API endpoint box showing https://ai.sinarcloud.com/v1/chat/completions with a copy icon and a Create API key button, the hint that gives https://ai.sinarcloud.com/v1 as the base URL, and a Quick start (cURL) sample request for deepseek/deepseek-v4-1-flash with its own copy icon. The Your API keys list starts below it.`,\"data-og-width\":`2880`,width:`2880`,\"data-og-height\":`1800`,height:`1800`,\"data-path\":`images/ai-api-keys.png`,\"data-optimize\":`true`,\"data-opv\":`3`,srcset:`https://mintcdn.com/sinar-cloud/ShOrAB8ikH3IKe3Y/images/ai-api-keys.png?w=280\u0026fit=max\u0026auto=format\u0026n=ShOrAB8ikH3IKe3Y\u0026q=85\u0026s=762c78aa84ac0b83c9fa162cce98c9de 280w, https://mintcdn.com/sinar-cloud/ShOrAB8ikH3IKe3Y/images/ai-api-keys.png?w=560\u0026fit=max\u0026auto=format\u0026n=ShOrAB8ikH3IKe3Y\u0026q=85\u0026s=1ec771ced275edc8a34448cce5cfa331 560w, https://mintcdn.com/sinar-cloud/ShOrAB8ikH3IKe3Y/images/ai-api-keys.png?w=840\u0026fit=max\u0026auto=format\u0026n=ShOrAB8ikH3IKe3Y\u0026q=85\u0026s=e8088c5a860e1d8e775dd6a223e69f01 840w, https://mintcdn.com/sinar-cloud/ShOrAB8ikH3IKe3Y/images/ai-api-keys.png?w=1100\u0026fit=max\u0026auto=format\u0026n=ShOrAB8ikH3IKe3Y\u0026q=85\u0026s=ca38fe1f91b4545e9a7854f7da45f5b1 1100w, https://mintcdn.com/sinar-cloud/ShOrAB8ikH3IKe3Y/images/ai-api-keys.png?w=1650\u0026fit=max\u0026auto=format\u0026n=ShOrAB8ikH3IKe3Y\u0026q=85\u0026s=487ea97128528cd4a5ba277cc5922cf3 1650w, https://mintcdn.com/sinar-cloud/ShOrAB8ikH3IKe3Y/images/ai-api-keys.png?w=2500\u0026fit=max\u0026auto=format\u0026n=ShOrAB8ikH3IKe3Y\u0026q=85\u0026s=44d2e6dd40a00093944959d773d14df8 2500w`})}),_jsx(Note,{children:_jsxs(_components.p,{children:[`Don’t paste the full endpoint from the `,_jsx(_components.strong,{children:`API endpoint`}),` box into a tool’s base URL field. Tools add `,_jsx(_components.code,{children:`/chat/completions`}),` to the base URL themselves, so their requests would go to the wrong address.`]})})]}),_jsxs(Step,{title:`Choose a model`,children:[_jsxs(_components.ol,{children:[`\n`,_jsxs(_components.li,{children:[`Under `,_jsx(_components.strong,{children:`AI`}),`, click `,_jsx(_components.strong,{children:`Models`}),`. The table shows each model’s price per 1M input and output tokens and its context window.`]}),`\n`,_jsxs(_components.li,{children:[`To find a model, type its name, alias, or publisher in the search box above the table, for example `,_jsx(_components.code,{children:`deepseek`}),`. To show chat models only, click `,_jsx(_components.strong,{children:`Text`}),` under the search box.`]}),`\n`,_jsxs(_components.li,{children:[`Click `,_jsx(_components.strong,{children:`Details`}),` on the model’s row. The model’s details open in a dialog.`]}),`\n`]}),_jsx(Frame,{caption:`Search for a model, then click Details`,children:_jsx(OptimizedImage,{src:`https://mintcdn.com/sinar-cloud/Zz311Jgf5s_A88RD/images/ai-models.png?fit=max\u0026auto=format\u0026n=Zz311Jgf5s_A88RD\u0026q=85\u0026s=62aacc42fd75bc459731e588f703775f`,alt:`The Models page with Clear filters and Refresh at the top right and the search box below them, with deepseek entered. Under the search box, the All and Text mode buttons with counts sit above a table of DeepSeek models, one marked with the Popular sparkle icon and some tagged ZDR. The table has Model, Input, Output, Cache read, Cache write, and Context columns and a Details button on each row.`,\"data-og-width\":`2880`,width:`2880`,\"data-og-height\":`1800`,height:`1800`,\"data-path\":`images/ai-models.png`,\"data-optimize\":`true`,\"data-opv\":`3`,srcset:`https://mintcdn.com/sinar-cloud/Zz311Jgf5s_A88RD/images/ai-models.png?w=280\u0026fit=max\u0026auto=format\u0026n=Zz311Jgf5s_A88RD\u0026q=85\u0026s=a153ad078b3f9902bb92814b75f9fbfc 280w, https://mintcdn.com/sinar-cloud/Zz311Jgf5s_A88RD/images/ai-models.png?w=560\u0026fit=max\u0026auto=format\u0026n=Zz311Jgf5s_A88RD\u0026q=85\u0026s=f66d533303a8a8b9b408613a6eea97ea 560w, https://mintcdn.com/sinar-cloud/Zz311Jgf5s_A88RD/images/ai-models.png?w=840\u0026fit=max\u0026auto=format\u0026n=Zz311Jgf5s_A88RD\u0026q=85\u0026s=cc6efe5d4be183f98293fbfc0fceead0 840w, https://mintcdn.com/sinar-cloud/Zz311Jgf5s_A88RD/images/ai-models.png?w=1100\u0026fit=max\u0026auto=format\u0026n=Zz311Jgf5s_A88RD\u0026q=85\u0026s=640e13a4ff657b23653fd4621d72038c 1100w, https://mintcdn.com/sinar-cloud/Zz311Jgf5s_A88RD/images/ai-models.png?w=1650\u0026fit=max\u0026auto=format\u0026n=Zz311Jgf5s_A88RD\u0026q=85\u0026s=6c9890eb2a308f3e3a9ce16b17c5f005 1650w, https://mintcdn.com/sinar-cloud/Zz311Jgf5s_A88RD/images/ai-models.png?w=2500\u0026fit=max\u0026auto=format\u0026n=Zz311Jgf5s_A88RD\u0026q=85\u0026s=0c25b3565f9c2b0c2199ffc60d4ad6d5 2500w`})}),_jsxs(_components.p,{children:[`To run a coding agent, the `,_jsx(_components.strong,{children:`Model capabilities`}),` on the `,_jsx(_components.strong,{children:`Overview`}),` tab must list:`]}),_jsxs(_components.ul,{children:[`\n`,_jsxs(_components.li,{children:[_jsx(_components.strong,{children:`Chat completions`}),`, because both request formats run on it.`]}),`\n`,_jsxs(_components.li,{children:[_jsx(_components.strong,{children:`Tool use`}),`, because agents call tools to read files, edit code, and run commands.`]}),`\n`,_jsxs(_components.li,{children:[_jsx(_components.strong,{children:`Streaming`}),`, because agents show the reply while the model writes it.`]}),`\n`]}),_jsxs(_components.p,{children:[`To let a tool send images, such as screenshots, the model must also list `,_jsx(_components.strong,{children:`Image input`}),` or `,_jsx(_components.strong,{children:`Vision`}),`. Above the tabs, the details also show the model’s `,_jsx(_components.strong,{children:`Context window (tokens)`}),` and `,_jsx(_components.strong,{children:`Maximum output (tokens)`}),`. Some tools ask you for these numbers.`]}),_jsxs(_components.p,{children:[`Below the model name is the model alias, such as `,_jsx(_components.code,{children:`deepseek/deepseek-v4-1-flash`}),`. Click the copy icon next to it (`,_jsx(_components.strong,{children:`Copy model ID`}),`) to copy it. The guides use `,_jsx(_components.code,{children:`deepseek/deepseek-v4-1-flash`}),` in their examples. Replace it with the alias of the model you chose.`]}),_jsx(Frame,{caption:`Check the model capabilities, then copy the alias`,children:_jsx(OptimizedImage,{src:`https://mintcdn.com/sinar-cloud/ShOrAB8ikH3IKe3Y/images/ai-model-details.png?fit=max\u0026auto=format\u0026n=ShOrAB8ikH3IKe3Y\u0026q=85\u0026s=b884851a91e53793346bdf6f50ad95af`,alt:`The model details dialog for a DeepSeek model, showing its publisher, the Available, CHAT, and Popular badges, its alias with a copy icon, a button to get the model's API, and the Try in playground and Use via API buttons. Below are the prices per 1M tokens, with both cache write prices showing Not available, the context window and maximum output, and the Overview tab open with Supported inputs, Model capabilities with a description of each, and Publish date.`,\"data-og-width\":`2880`,width:`2880`,\"data-og-height\":`1800`,height:`1800`,\"data-path\":`images/ai-model-details.png`,\"data-optimize\":`true`,\"data-opv\":`3`,srcset:`https://mintcdn.com/sinar-cloud/ShOrAB8ikH3IKe3Y/images/ai-model-details.png?w=280\u0026fit=max\u0026auto=format\u0026n=ShOrAB8ikH3IKe3Y\u0026q=85\u0026s=ff7f3eafa92f850280268c0503a03eb0 280w, https://mintcdn.com/sinar-cloud/ShOrAB8ikH3IKe3Y/images/ai-model-details.png?w=560\u0026fit=max\u0026auto=format\u0026n=ShOrAB8ikH3IKe3Y\u0026q=85\u0026s=b3a00011d8044b3bf33dfa9bbea36f30 560w, https://mintcdn.com/sinar-cloud/ShOrAB8ikH3IKe3Y/images/ai-model-details.png?w=840\u0026fit=max\u0026auto=format\u0026n=ShOrAB8ikH3IKe3Y\u0026q=85\u0026s=e81a8736cb8d16ea9225f144180d6fd8 840w, https://mintcdn.com/sinar-cloud/ShOrAB8ikH3IKe3Y/images/ai-model-details.png?w=1100\u0026fit=max\u0026auto=format\u0026n=ShOrAB8ikH3IKe3Y\u0026q=85\u0026s=a705d561c073e04d529f17da11012a4c 1100w, https://mintcdn.com/sinar-cloud/ShOrAB8ikH3IKe3Y/images/ai-model-details.png?w=1650\u0026fit=max\u0026auto=format\u0026n=ShOrAB8ikH3IKe3Y\u0026q=85\u0026s=28537d12ff878bacec10e5b5600fd357 1650w, https://mintcdn.com/sinar-cloud/ShOrAB8ikH3IKe3Y/images/ai-model-details.png?w=2500\u0026fit=max\u0026auto=format\u0026n=ShOrAB8ikH3IKe3Y\u0026q=85\u0026s=f64016bb6eb59d71bf3c852f5e8907ce 2500w`})}),_jsxs(_components.p,{children:[`Models tagged `,_jsx(_components.strong,{children:`ZDR`}),` are zero data retention versions, which don’t keep your prompts and responses after your request is complete. Each one has its own alias and prices. See `,_jsx(_components.a,{href:`/ai/models`,children:`Models and pricing`}),`.`]})]}),_jsxs(Step,{title:`Save your API key as an environment variable`,children:[_jsxs(_components.p,{children:[`The guides read your API key from the `,_jsx(_components.code,{children:`SINARCLOUD_API_KEY`}),` environment variable. Set it in the terminal where you will start the tool.`]}),_jsxs(_components.ol,{children:[`\n`,_jsxs(_components.li,{children:[`On the `,_jsx(_components.strong,{children:`API Keys`}),` page, under `,_jsx(_components.strong,{children:`Your API keys`}),`, click `,_jsx(_components.strong,{children:`Copy`}),` next to your key.`]}),`\n`,_jsxs(_components.li,{children:[`In your terminal, run the command for your system. Replace `,_jsx(_components.code,{children:`paste-your-api-key-here`}),` with the key you copied, and keep the quotes.`]}),`\n`]}),_jsx(Frame,{caption:`Copy is next to each key under Your API keys`,children:_jsx(OptimizedImage,{src:`https://mintcdn.com/sinar-cloud/ShOrAB8ikH3IKe3Y/images/ai-api-keys-list.png?fit=max\u0026auto=format\u0026n=ShOrAB8ikH3IKe3Y\u0026q=85\u0026s=485f41be9c2f3561f06d7acf80adde1d`,alt:`The end of the Quick start (cURL) sample, followed by the Your API keys list with the number of keys, Refresh and Create API key buttons, and Key, Status, Created, Last used and Actions columns. Each key shows its name, the first characters of the key followed by dots, the scopes api:read and api:write, No expiry, the Active status, and Copy, Rename and Revoke actions.`,\"data-og-width\":`2880`,width:`2880`,\"data-og-height\":`1800`,height:`1800`,\"data-path\":`images/ai-api-keys-list.png`,\"data-optimize\":`true`,\"data-opv\":`3`,srcset:`https://mintcdn.com/sinar-cloud/ShOrAB8ikH3IKe3Y/images/ai-api-keys-list.png?w=280\u0026fit=max\u0026auto=format\u0026n=ShOrAB8ikH3IKe3Y\u0026q=85\u0026s=cccb067fb93f85eeab49dfcafe51ee6d 280w, https://mintcdn.com/sinar-cloud/ShOrAB8ikH3IKe3Y/images/ai-api-keys-list.png?w=560\u0026fit=max\u0026auto=format\u0026n=ShOrAB8ikH3IKe3Y\u0026q=85\u0026s=adc7e9a56b29f40fa2b038b5293c0b15 560w, https://mintcdn.com/sinar-cloud/ShOrAB8ikH3IKe3Y/images/ai-api-keys-list.png?w=840\u0026fit=max\u0026auto=format\u0026n=ShOrAB8ikH3IKe3Y\u0026q=85\u0026s=6345d3235a487b8d269be05bbde39d03 840w, https://mintcdn.com/sinar-cloud/ShOrAB8ikH3IKe3Y/images/ai-api-keys-list.png?w=1100\u0026fit=max\u0026auto=format\u0026n=ShOrAB8ikH3IKe3Y\u0026q=85\u0026s=bc0e5747e6180b0e67686ba23535ea2c 1100w, https://mintcdn.com/sinar-cloud/ShOrAB8ikH3IKe3Y/images/ai-api-keys-list.png?w=1650\u0026fit=max\u0026auto=format\u0026n=ShOrAB8ikH3IKe3Y\u0026q=85\u0026s=cb99e0819ef4b747c1d655e74b70a094 1650w, https://mintcdn.com/sinar-cloud/ShOrAB8ikH3IKe3Y/images/ai-api-keys-list.png?w=2500\u0026fit=max\u0026auto=format\u0026n=ShOrAB8ikH3IKe3Y\u0026q=85\u0026s=d0686e853f748035f0a40e26529a7e54 2500w`})}),_jsxs(Tabs,{children:[_jsx(Tab,{title:`macOS and Linux`,id:`macos-and-linux`,children:_jsx(CodeBlock,{filename:``,numberOfLines:`1`,language:`shellscript`,children:_jsx(_components.pre,{className:`shiki shiki-themes github-light-default dark-plus`,style:{backgroundColor:`#ffffff`,\"--shiki-dark-bg\":`#0B0C0E`,color:`#1f2328`,\"--shiki-dark\":`#D4D4D4`},language:`shellscript`,children:_jsxs(_components.code,{language:`shellscript`,numberOfLines:`1`,children:[_jsxs(_components.span,{className:`line`,children:[_jsx(_components.span,{style:{color:`#CF222E`,\"--shiki-dark\":`#569CD6`},children:`export`}),_jsx(_components.span,{style:{color:`#1F2328`,\"--shiki-dark\":`#9CDCFE`},children:` SINARCLOUD_API_KEY`}),_jsx(_components.span,{style:{color:`#CF222E`,\"--shiki-dark\":`#D4D4D4`},children:`=`}),_jsx(_components.span,{style:{color:`#0A3069`,\"--shiki-dark\":`#CE9178`},children:`\"paste-your-api-key-here\"`})]}),`\n`]})})})}),_jsx(Tab,{title:`Windows PowerShell`,id:`windows-powershell`,children:_jsx(CodeBlock,{filename:``,numberOfLines:`1`,language:`powershell`,children:_jsx(_components.pre,{className:`shiki shiki-themes github-light-default dark-plus`,style:{backgroundColor:`#ffffff`,\"--shiki-dark-bg\":`#0B0C0E`,color:`#1f2328`,\"--shiki-dark\":`#D4D4D4`},language:`powershell`,children:_jsxs(_components.code,{language:`powershell`,numberOfLines:`1`,children:[_jsxs(_components.span,{className:`line`,children:[_jsx(_components.span,{style:{color:`#1F2328`,\"--shiki-dark\":`#9CDCFE`},children:`$`}),_jsx(_components.span,{style:{color:`#0550AE`,\"--shiki-dark\":`#9CDCFE`},children:`env:`}),_jsx(_components.span,{style:{color:`#1F2328`,\"--shiki-dark\":`#9CDCFE`},children:`SINARCLOUD_API_KEY`}),_jsx(_components.span,{style:{color:`#CF222E`,\"--shiki-dark\":`#D4D4D4`},children:` =`}),_jsx(_components.span,{style:{color:`#0A3069`,\"--shiki-dark\":`#CE9178`},children:` \"paste-your-api-key-here\"`})]}),`\n`]})})})})]}),_jsxs(_components.p,{children:[_jsx(_components.strong,{children:`Copy`}),` is turned off for expired and revoked keys. If an active key’s row says `,_jsx(_components.strong,{children:`Create a new key to enable copying.`}),`, the console can’t show that key again. Create a new key and use it instead.`]}),_jsxs(_components.p,{children:[`To check that the variable is set, run this in the same terminal. It prints `,_jsx(_components.code,{children:`set`}),` without showing your key. If it prints nothing, run the command above again.`]}),_jsxs(Tabs,{children:[_jsx(Tab,{title:`macOS and Linux`,id:`macos-and-linux-2`,children:_jsx(CodeBlock,{filename:``,numberOfLines:`1`,language:`shellscript`,children:_jsx(_components.pre,{className:`shiki shiki-themes github-light-default dark-plus`,style:{backgroundColor:`#ffffff`,\"--shiki-dark-bg\":`#0B0C0E`,color:`#1f2328`,\"--shiki-dark\":`#D4D4D4`},language:`shellscript`,children:_jsxs(_components.code,{language:`shellscript`,numberOfLines:`1`,children:[_jsxs(_components.span,{className:`line`,children:[_jsx(_components.span,{style:{color:`#1F2328`,\"--shiki-dark\":`#D4D4D4`},children:`[ `}),_jsx(_components.span,{style:{color:`#CF222E`,\"--shiki-dark\":`#D4D4D4`},children:`-n`}),_jsx(_components.span,{style:{color:`#0A3069`,\"--shiki-dark\":`#CE9178`},children:` \"`}),_jsx(_components.span,{style:{color:`#1F2328`,\"--shiki-dark\":`#9CDCFE`},children:`$SINARCLOUD_API_KEY`}),_jsx(_components.span,{style:{color:`#0A3069`,\"--shiki-dark\":`#CE9178`},children:`\"`}),_jsx(_components.span,{style:{color:`#1F2328`,\"--shiki-dark\":`#D4D4D4`},children:` ] \u0026\u0026 `}),_jsx(_components.span,{style:{color:`#0550AE`,\"--shiki-dark\":`#DCDCAA`},children:`echo`}),_jsx(_components.span,{style:{color:`#0A3069`,\"--shiki-dark\":`#CE9178`},children:` set`})]}),`\n`]})})})}),_jsx(Tab,{title:`Windows PowerShell`,id:`windows-powershell-2`,children:_jsx(CodeBlock,{filename:``,numberOfLines:`1`,language:`powershell`,children:_jsx(_components.pre,{className:`shiki shiki-themes github-light-default dark-plus`,style:{backgroundColor:`#ffffff`,\"--shiki-dark-bg\":`#0B0C0E`,color:`#1f2328`,\"--shiki-dark\":`#D4D4D4`},language:`powershell`,children:_jsxs(_components.code,{language:`powershell`,numberOfLines:`1`,children:[_jsxs(_components.span,{className:`line`,children:[_jsx(_components.span,{style:{color:`#CF222E`,\"--shiki-dark\":`#C586C0`},children:`if`}),_jsx(_components.span,{style:{color:`#1F2328`,\"--shiki-dark\":`#D4D4D4`},children:` (`}),_jsx(_components.span,{style:{color:`#1F2328`,\"--shiki-dark\":`#9CDCFE`},children:`$`}),_jsx(_components.span,{style:{color:`#0550AE`,\"--shiki-dark\":`#9CDCFE`},children:`env:`}),_jsx(_components.span,{style:{color:`#1F2328`,\"--shiki-dark\":`#9CDCFE`},children:`SINARCLOUD_API_KEY`}),_jsx(_components.span,{style:{color:`#1F2328`,\"--shiki-dark\":`#D4D4D4`},children:`) { `}),_jsx(_components.span,{style:{color:`#0A3069`,\"--shiki-dark\":`#CE9178`},children:`\"set\"`}),_jsx(_components.span,{style:{color:`#1F2328`,\"--shiki-dark\":`#D4D4D4`},children:` }`})]}),`\n`]})})})})]}),_jsx(_components.p,{children:`This variable lasts until you close the terminal. To keep it for every new terminal:`}),_jsxs(Tabs,{children:[_jsx(Tab,{title:`macOS and Linux`,id:`macos-and-linux-3`,children:_jsxs(_components.p,{children:[`Add the `,_jsx(_components.code,{children:`export`}),` line to your shell’s startup file, then open a new terminal. On macOS, the file is usually `,_jsx(_components.code,{children:`~/.zshrc`}),`. On most Linux systems, it’s `,_jsx(_components.code,{children:`~/.bashrc`}),`.`]})}),_jsxs(Tab,{title:`Windows PowerShell`,id:`windows-powershell-3`,children:[_jsx(_components.p,{children:`Run this command once, then open a new terminal:`}),_jsx(CodeBlock,{filename:``,numberOfLines:`1`,language:`powershell`,children:_jsx(_components.pre,{className:`shiki shiki-themes github-light-default dark-plus`,style:{backgroundColor:`#ffffff`,\"--shiki-dark-bg\":`#0B0C0E`,color:`#1f2328`,\"--shiki-dark\":`#D4D4D4`},language:`powershell`,children:_jsxs(_components.code,{language:`powershell`,numberOfLines:`1`,children:[_jsxs(_components.span,{className:`line`,children:[_jsx(_components.span,{style:{color:`#1F2328`,\"--shiki-dark\":`#D4D4D4`},children:`[`}),_jsx(_components.span,{style:{color:`#CF222E`,\"--shiki-dark\":`#569CD6`},children:`Environment`}),_jsx(_components.span,{style:{color:`#1F2328`,\"--shiki-dark\":`#D4D4D4`},children:`]::SetEnvironmentVariable(`}),_jsx(_components.span,{style:{color:`#0A3069`,\"--shiki-dark\":`#CE9178`},children:`\"SINARCLOUD_API_KEY\"`}),_jsx(_components.span,{style:{color:`#CF222E`,\"--shiki-dark\":`#D4D4D4`},children:`,`}),_jsx(_components.span,{style:{color:`#0A3069`,\"--shiki-dark\":`#CE9178`},children:` \"paste-your-api-key-here\"`}),_jsx(_components.span,{style:{color:`#CF222E`,\"--shiki-dark\":`#D4D4D4`},children:`,`}),_jsx(_components.span,{style:{color:`#0A3069`,\"--shiki-dark\":`#CE9178`},children:` \"User\"`}),_jsx(_components.span,{style:{color:`#1F2328`,\"--shiki-dark\":`#D4D4D4`},children:`)`})]}),`\n`]})})})]})]}),_jsx(_components.p,{children:`Both ways store the key as plain text in your user account, so only do this on a computer that only you use.`})]})]}),`\n`,_jsx(Heading,{level:`2`,id:`keep-an-eye-on-spending`,children:`Keep an eye on spending`}),`\n`,_jsx(_components.p,{children:`Coding agents send the conversation so far, including the files they’ve read, with every request. A long session can use millions of tokens.`}),`\n`,_jsxs(_components.ul,{children:[`\n`,_jsxs(_components.li,{children:[_jsx(_components.strong,{children:`Check each tool’s spending.`}),` Under `,_jsx(_components.strong,{children:`AI`}),`, click `,_jsx(_components.strong,{children:`Usage`}),`, then choose the tool’s key in the `,_jsx(_components.strong,{children:`API key`}),` filter. See `,_jsx(_components.a,{href:`/ai/usage`,children:`Usage and spending`}),`.`]}),`\n`,_jsxs(_components.li,{children:[_jsx(_components.strong,{children:`Start a new session for each new task.`}),` A new session doesn’t resend the earlier conversation.`]}),`\n`,_jsxs(_components.li,{children:[_jsx(_components.strong,{children:`Compare prices before you choose a model.`}),` The `,_jsx(_components.strong,{children:`Models`}),` page shows each model’s price per 1M input and output tokens.`]}),`\n`,_jsxs(_components.li,{children:[_jsx(_components.strong,{children:`Use token credits.`}),` `,_jsx(_components.a,{href:`/ai/token-credits`,children:`Token credits`}),` for a model pay for its requests before your balance is charged.`]}),`\n`]}),`\n`,_jsxs(_components.p,{children:[`SinarCloud charges each request after it finishes, so a long agent session can take your balance below zero. A request starts only while your balance is above Rp 0, you have token credits left for the model, or the request can’t cost you anything. To keep working, `,_jsx(_components.a,{href:`/billing/top-up`,children:`add balance`}),`.`]}),`\n`,_jsx(Heading,{level:`2`,id:`next-steps`,children:`Next steps`}),`\n`,_jsxs(CardGroup,{cols:2,children:[_jsx(Card,{title:`Claude Code`,icon:`terminal`,href:`/integrations/claude-code`,children:_jsx(_components.p,{children:`Connect Anthropic’s coding agent for the terminal.`})}),_jsx(Card,{title:`OpenCode`,icon:`terminal`,href:`/integrations/opencode`,children:_jsx(_components.p,{children:`Connect the open source coding agent for the terminal.`})}),_jsx(Card,{title:`VS Code`,icon:`code`,href:`/integrations/vscode`,children:_jsx(_components.p,{children:`Connect a coding agent in VS Code: Claude Code, Cline, Kilo Code, or Continue.`})})]})]})}function MDXContent(props={}){const{wrapper:MDXLayout}={..._provideComponents(),...props.components};return MDXLayout?_jsx(MDXLayout,{...props,children:_jsx(_createMdxContent,{...props})}):_createMdxContent(props)}return{default:MDXContent};function _missingMdxReference(id,component){throw new Error(`Expected `+(component?`component`:`object`)+\" `\"+id+\"` to be defined: you likely forgot to import, pass, or provide it.\")}","frontmatter":{},"scope":{"config":{},"pageMetadata":{"title":"Before you connect a tool","sidebarTitle":"Before you connect","description":"Create an API key for the tool, choose a model, and save your key as an environment variable that every integration guide uses.","icon":"list-check","href":"/integrations/before-you-connect"}}},"mdxSourceWithNoJs":null},"mdxExtracts":{"tableOfContents":[{"title":"Keep an eye on spending","slug":"keep-an-eye-on-spending","depth":2,"children":[]},{"title":"Next steps","slug":"next-steps","depth":2,"children":[]}],"codeExamples":{}},"jsLinks":[],"subdomain":"sinar-cloud","siteName":"SinarCloud","title":"Before you connect a tool - SinarCloud","navMaps":{"firstHrefInVersion":{},"firstHrefInLanguage":{}},"lastModified":"2026-10-28T06:09:48.025Z","originalFileLocation":"integrations/before-you-connect.mdx"},"headHtml":"\u003cscript data-mint-head>(function(){var d=document.documentElement,p=null;if(!p){try{p=localStorage.getItem(\"isDarkMode\")}catch(e){}if(p==='true')p='dark';else if(p==='false')p='light';if(p!=='light'\u0026\u0026p!=='dark'\u0026\u0026p!=='system')p=\"system\"}var r=p==='system'?(matchMedia(\"(prefers-color-scheme: dark)\").matches?'dark':'light'):p;d.classList.remove(r==='dark'?'light':'dark');d.classList.add(r);d.setAttribute(\"data-theme-preference\",p)})();\u003c/script>\u003cmeta data-mint-head name=\"description\" content=\"Create an API key for the tool, choose a model, and save your key as an environment variable that every integration guide uses.\">\u003cmeta data-mint-head name=\"application-name\" content=\"SinarCloud\">\u003cmeta data-mint-head name=\"generator\" content=\"Mintlify\">\u003clink data-mint-head rel=\"icon\" type=\"image/png\" sizes=\"192x192\" href=\"/mintlify-assets/_mintlify/favicons/sinar-cloud/qYYrDQEL49wjTG-a/_generated/favicon/android-chrome-192x192.png\" media=\"(prefers-color-scheme: light)\">\u003clink data-mint-head rel=\"apple-touch-icon\" type=\"image/png\" sizes=\"180x180\" href=\"/mintlify-assets/_mintlify/favicons/sinar-cloud/qYYrDQEL49wjTG-a/_generated/favicon/apple-touch-icon.png\">\u003clink data-mint-head rel=\"icon\" type=\"image/png\" sizes=\"16x16\" href=\"/mintlify-assets/_mintlify/favicons/sinar-cloud/qYYrDQEL49wjTG-a/_generated/favicon/favicon-16x16.png\" media=\"(prefers-color-scheme: light)\">\u003clink data-mint-head rel=\"icon\" type=\"image/png\" sizes=\"32x32\" href=\"/mintlify-assets/_mintlify/favicons/sinar-cloud/qYYrDQEL49wjTG-a/_generated/favicon/favicon-32x32.png\" media=\"(prefers-color-scheme: light)\">\u003clink data-mint-head rel=\"shortcut icon\" type=\"image/x-icon\" href=\"/mintlify-assets/_mintlify/favicons/sinar-cloud/qYYrDQEL49wjTG-a/_generated/favicon/favicon.ico\" media=\"(prefers-color-scheme: light)\">\u003clink data-mint-head rel=\"icon\" type=\"image/png\" sizes=\"192x192\" href=\"/mintlify-assets/_mintlify/favicons/sinar-cloud/qYYrDQEL49wjTG-a/_generated/favicon-dark/android-chrome-192x192.png\" media=\"(prefers-color-scheme: dark)\">\u003clink data-mint-head rel=\"icon\" type=\"image/png\" sizes=\"16x16\" href=\"/mintlify-assets/_mintlify/favicons/sinar-cloud/qYYrDQEL49wjTG-a/_generated/favicon-dark/favicon-16x16.png\" media=\"(prefers-color-scheme: dark)\">\u003clink data-mint-head rel=\"icon\" type=\"image/png\" sizes=\"32x32\" href=\"/mintlify-assets/_mintlify/favicons/sinar-cloud/qYYrDQEL49wjTG-a/_generated/favicon-dark/favicon-32x32.png\" media=\"(prefers-color-scheme: dark)\">\u003clink data-mint-head rel=\"shortcut icon\" type=\"image/x-icon\" href=\"/mintlify-assets/_mintlify/favicons/sinar-cloud/qYYrDQEL49wjTG-a/_generated/favicon-dark/favicon.ico\" media=\"(prefers-color-scheme: dark)\">\u003cmeta data-mint-head property=\"og:title\" content=\"Before you connect a tool - SinarCloud\">\u003cmeta data-mint-head property=\"og:description\" content=\"Create an API key for the tool, choose a model, and save your key as an environment variable that every integration guide uses.\">\u003cmeta data-mint-head property=\"og:site_name\" content=\"SinarCloud\">\u003cmeta data-mint-head property=\"og:url\" content=\"https://docs.sinarcloud.com/integrations/before-you-connect\">\u003cmeta data-mint-head property=\"og:type\" content=\"website\">\u003cmeta data-mint-head property=\"og:image\" content=\"https://sinar-cloud.mintlify.app/_mintlify/api/og/v2?division=Start+here\u0026amp;title=Before+you+connect+a+tool\u0026amp;description=Create+an+API+key+for+the+tool%2C+choose+a+model%2C+and+save+your+key+as+an+environment+variable+that+every+integration+guide+uses.\u0026amp;theme=d3d561d856c05a6395bfee2d\u0026amp;signature=cd0e46ae0d67b19dba93967f8d4277f1d4b8aeffb85dafca06000345a07142dd\">\u003cmeta data-mint-head property=\"og:image:width\" content=\"1200\">\u003cmeta data-mint-head property=\"og:image:height\" content=\"630\">\u003cmeta data-mint-head name=\"twitter:card\" content=\"summary_large_image\">\u003cmeta data-mint-head name=\"twitter:title\" content=\"Before you connect a tool - SinarCloud\">\u003cmeta data-mint-head name=\"twitter:description\" content=\"Create an API key for the tool, choose a model, and save your key as an environment variable that every integration guide uses.\">\u003cmeta data-mint-head name=\"twitter:image\" content=\"https://sinar-cloud.mintlify.app/_mintlify/api/og/v2?division=Start+here\u0026amp;title=Before+you+connect+a+tool\u0026amp;description=Create+an+API+key+for+the+tool%2C+choose+a+model%2C+and+save+your+key+as+an+environment+variable+that+every+integration+guide+uses.\u0026amp;theme=d3d561d856c05a6395bfee2d\u0026amp;signature=cd0e46ae0d67b19dba93967f8d4277f1d4b8aeffb85dafca06000345a07142dd\">\u003cmeta data-mint-head name=\"twitter:image:width\" content=\"1200\">\u003cmeta data-mint-head name=\"twitter:image:height\" content=\"630\">\u003cmeta data-mint-head name=\"msapplication-config\" content=\"/mintlify-assets/_mintlify/favicons/sinar-cloud/qYYrDQEL49wjTG-a/_generated/favicon/browserconfig.xml\">\u003cmeta data-mint-head name=\"apple-mobile-web-app-title\" content=\"SinarCloud\">\u003cmeta data-mint-head name=\"msapplication-TileColor\" content=\"#0066CC\">\u003clink data-mint-head rel=\"canonical\" href=\"https://docs.sinarcloud.com/integrations/before-you-connect\">\u003clink data-mint-head rel=\"alternate\" type=\"application/xml\" href=\"/sitemap.xml\">\u003clink data-mint-head rel=\"alternate\" type=\"text/markdown\" href=\"/integrations/before-you-connect.md\">\u003cscript data-mint-head type=\"application/ld+json\">{\"@context\":\"https://schema.org\",\"@graph\":[{\"@type\":\"Organization\",\"@id\":\"https://docs.sinarcloud.com/#organization\",\"name\":\"SinarCloud\",\"url\":\"https://docs.sinarcloud.com\",\"logo\":{\"@type\":\"ImageObject\",\"url\":\"https://mintcdn.com/sinar-cloud/B5Imz7vUklgE_ozS/logo/light.svg?fit=max\u0026auto=format\u0026n=B5Imz7vUklgE_ozS\u0026q=85\u0026s=e9d750a5729c82b08c0c002770ca98b0\"}},{\"@type\":\"WebSite\",\"@id\":\"https://docs.sinarcloud.com#website\",\"name\":\"SinarCloud\",\"url\":\"https://docs.sinarcloud.com\",\"publisher\":{\"@id\":\"https://docs.sinarcloud.com/#organization\"}},{\"@type\":\"WebPage\",\"@id\":\"https://docs.sinarcloud.com/integrations/before-you-connect#webpage\",\"url\":\"https://docs.sinarcloud.com/integrations/before-you-connect\",\"name\":\"Before you connect a tool\",\"description\":\"Create an API key for the tool, choose a model, and save your key as an environment variable that every integration guide uses.\",\"dateModified\":\"2026-10-28T06:09:48.025Z\",\"isPartOf\":{\"@id\":\"https://docs.sinarcloud.com#website\"},\"breadcrumb\":{\"@id\":\"https://docs.sinarcloud.com/integrations/before-you-connect#breadcrumb\"}},{\"@type\":\"BreadcrumbList\",\"@id\":\"https://docs.sinarcloud.com/integrations/before-you-connect#breadcrumb\",\"itemListElement\":[{\"@type\":\"ListItem\",\"position\":1,\"name\":\"Start here\",\"item\":\"https://docs.sinarcloud.com/integrations/overview\"},{\"@type\":\"ListItem\",\"position\":2,\"name\":\"Before you connect a tool\",\"item\":\"https://docs.sinarcloud.com/integrations/before-you-connect\"}]},{\"@type\":[\"Article\",\"TechArticle\"],\"@id\":\"https://docs.sinarcloud.com/integrations/before-you-connect#article\",\"headline\":\"Before you connect a tool\",\"name\":\"Before you connect a tool\",\"description\":\"Create an API key for the tool, choose a model, and save your key as an environment variable that every integration guide uses.\",\"url\":\"https://docs.sinarcloud.com/integrations/before-you-connect\",\"mainEntityOfPage\":{\"@id\":\"https://docs.sinarcloud.com/integrations/before-you-connect#webpage\"},\"dateModified\":\"2026-10-28T06:09:48.025Z\",\"publisher\":{\"@id\":\"https://docs.sinarcloud.com/#organization\"},\"isPartOf\":{\"@id\":\"https://docs.sinarcloud.com#website\"}}]}\u003c/script>\u003cscript data-mint-head type=\"application/ld+json\">{\"@context\":\"https://schema.org\",\"@type\":\"WebSite\",\"name\":\"SinarCloud\",\"creator\":{\"@type\":\"Organization\",\"name\":\"Mintlify\",\"url\":\"https://mintlify.com\"}}\u003c/script>","siteName":"SinarCloud","nav":{"global":null,"tabs":[{"tab":"Guides","pages":[{"title":"Guides","href":""}]},{"tab":"Integrations","groups":[{"group":"Start here","icon":"flag","pages":[{"title":"Integrations","sidebarTitle":"Overview","description":"Run coding agents and other AI tools on SinarCloud models, in the terminal or in VS Code, paid from your rupiah balance. See which tools work and how they connect.","icon":"plug","href":"/integrations/overview"},{"title":"Before you connect a tool","sidebarTitle":"Before you connect","icon":"list-check","href":"/integrations/before-you-connect"},{"title":"Compatibility","sidebarTitle":"Compatibility","description":"Which request format each tool uses, what a model needs to run a coding agent, and which tool features don't work through SinarCloud.","icon":"circle-check","href":"/integrations/compatibility"}]},{"group":"VS Code","icon":"code","pages":[{"title":"Use SinarCloud in VS Code","sidebarTitle":"Choose an extension","icon":"code","href":"/integrations/vscode"},{"title":"Use Cline with SinarCloud","sidebarTitle":"Cline","icon":"code","href":"/integrations/cline"},{"title":"Use Kilo Code with SinarCloud","sidebarTitle":"Kilo Code","icon":"code","href":"/integrations/kilo-code"},{"title":"Use Continue with SinarCloud","sidebarTitle":"Continue","icon":"code","href":"/integrations/continue"}]},{"group":"CLI tools","icon":"terminal","pages":[{"title":"Use Claude Code with SinarCloud","sidebarTitle":"Claude Code","icon":"terminal","href":"/integrations/claude-code"},{"title":"Use OpenCode with SinarCloud","sidebarTitle":"OpenCode","icon":"terminal","href":"/integrations/opencode"}]}]}]},"basePath":"","title":"Before you connect a tool - SinarCloud","buildId":"dpl_345ReqzYaAjzS9QpeJemsKdb7KDj","deploymentId":"dpl_345ReqzYaAjzS9QpeJemsKdb7KDj","dynamics":["07c022d89b","a74be98ba7"],"chunks":["Frame-PS-3COT9.js","DynamicMarkdown-BcnBltEQ.js","zoom-image-lightbox-B4-wUcHm.js","lightbox-handle-r17bVUz3.js"]}